Documentation
Duo Protection for Cisco ASA SSO with Secure Client with Duo Access Gateway
Last Updated: May 30th, 2024Contents
Duo offers a variety of methods for adding two-factor authentication and flexible security policies to Cisco ASA SSO logins, complete with inline self-service enrollment and Duo Prompt.
Duo Access Gateway reaches Last Day of Support on October 26, 2023 for Duo Essentials, Advantage, and Premier customers. As of that date Duo Support may only assist with the migration of existing Duo Access Gateway applications to Duo Single Sign-On. Customers may not create new DAG applications after May 19, 2022. Please see the Guide to Duo Access Gateway end of life for more details.
Use the Duo Single Sign-on for Cisco ASA with AnyConnect application to protect Cisco ASA with AnyConnect with Duo Single Sign-On, our cloud-hosted identity provider featuring Duo Central and the Duo Universal Prompt.
Overview
Duo's SAML SSO for ASA supports inline self-service enrollment and the Duo Prompt for Secure Client and web-based SSL VPN logins. This deployment option requires that you have a SAML 2.0 identity provider (IdP) in place that features Duo authentication, like the Duo Access Gateway. Primary and Duo secondary authentication occur at the identity provider, not at the ASA itself.
Cisco ASA SSO requires ASA version of 9.7.1.24, 9.8.2.28, 9.9.2.1, or higher of these releases, or 9.10 and later, plus AnyConnect 4.6 or later or Secure Client. Prior versions of ASA firmware and AnyConnect do not support SAML login or use a different browser experience. Add Duo protection to earlier ASA versions with our ASA LDAPS SSL VPN or ASA RADIUS with AnyConnect configurations.
Duo Premier customers should be aware of these AnyConnect client minimum version requirements for Duo's Trusted Endpoints certificate detection.
| Operating System | AnyConnect Version |
|---|---|
| Windows | AnyConnect 4.7.04056 or later |
| macOS | AnyConnect 4.8.00175 or later |
| iOS | AnyConnect 4.8.00807 or later |
Trusted Endpoints detection on Android does not rely on certificates, so there is no dependency on a specific client app version.
Familiarize yourself with the limitations of ASA SAML 2.0 authentication by reviewing the Use Single Sign-On with Clientless SSL VPN documentation in the Cisco ASA Series VPN CLI Configuration Guide.
Walkthrough Video
Duo Access Gateway
Duo Access Gateway (DAG), our on-premises SSO product, layers Duo's strong authentication and flexible policy engine on top of Cisco ASA logins using the Security Assertion Markup Language (SAML) 2.0 authentication standard. Duo Access Gateway acts as an identity provider (IdP), authenticating your users using existing on-premises or cloud-based directory credentials and prompting for two-factor authentication before permitting access to Cisco ASA.
Duo Access Gateway is included in the Duo Premier, Duo Advantage, and Duo Essentials plans, which also include the ability to define policies that enforce unique controls for each individual SSO application. For example, you can require that Salesforce users complete two-factor authentication at every login, but only once every seven days when accessing Cisco ASA. Duo checks the user, device, and network against an application's policy before allowing access to the application.
Deploy or Update Duo Access Gateway
-
Install Duo Access Gateway on a server in your DMZ. Follow our instructions for deploying the server, configuring DAG settings, and adding your primary authentication source.
-
Add the attribute from the table below that corresponds to the Duo Mail attribute in the "Attributes" field when configuring your Active Directory or OpenLDAP authentication source in the DAG admin console. For example, if Active Directory is your authentication source, enter mail in the "Attributes" field.
Duo Attribute Active Directory OpenLDAP Mail attribute mail mail If your organization uses another directory attribute than the one listed here enter that attribute name instead. If you've already configured the attributes list for another cloud service provider, append the additional attribute not already present to the list, separated by a comma.
-
After completing the initial DAG configuration steps, click Applications on the left side of the Duo Access Gateway admin console.
-
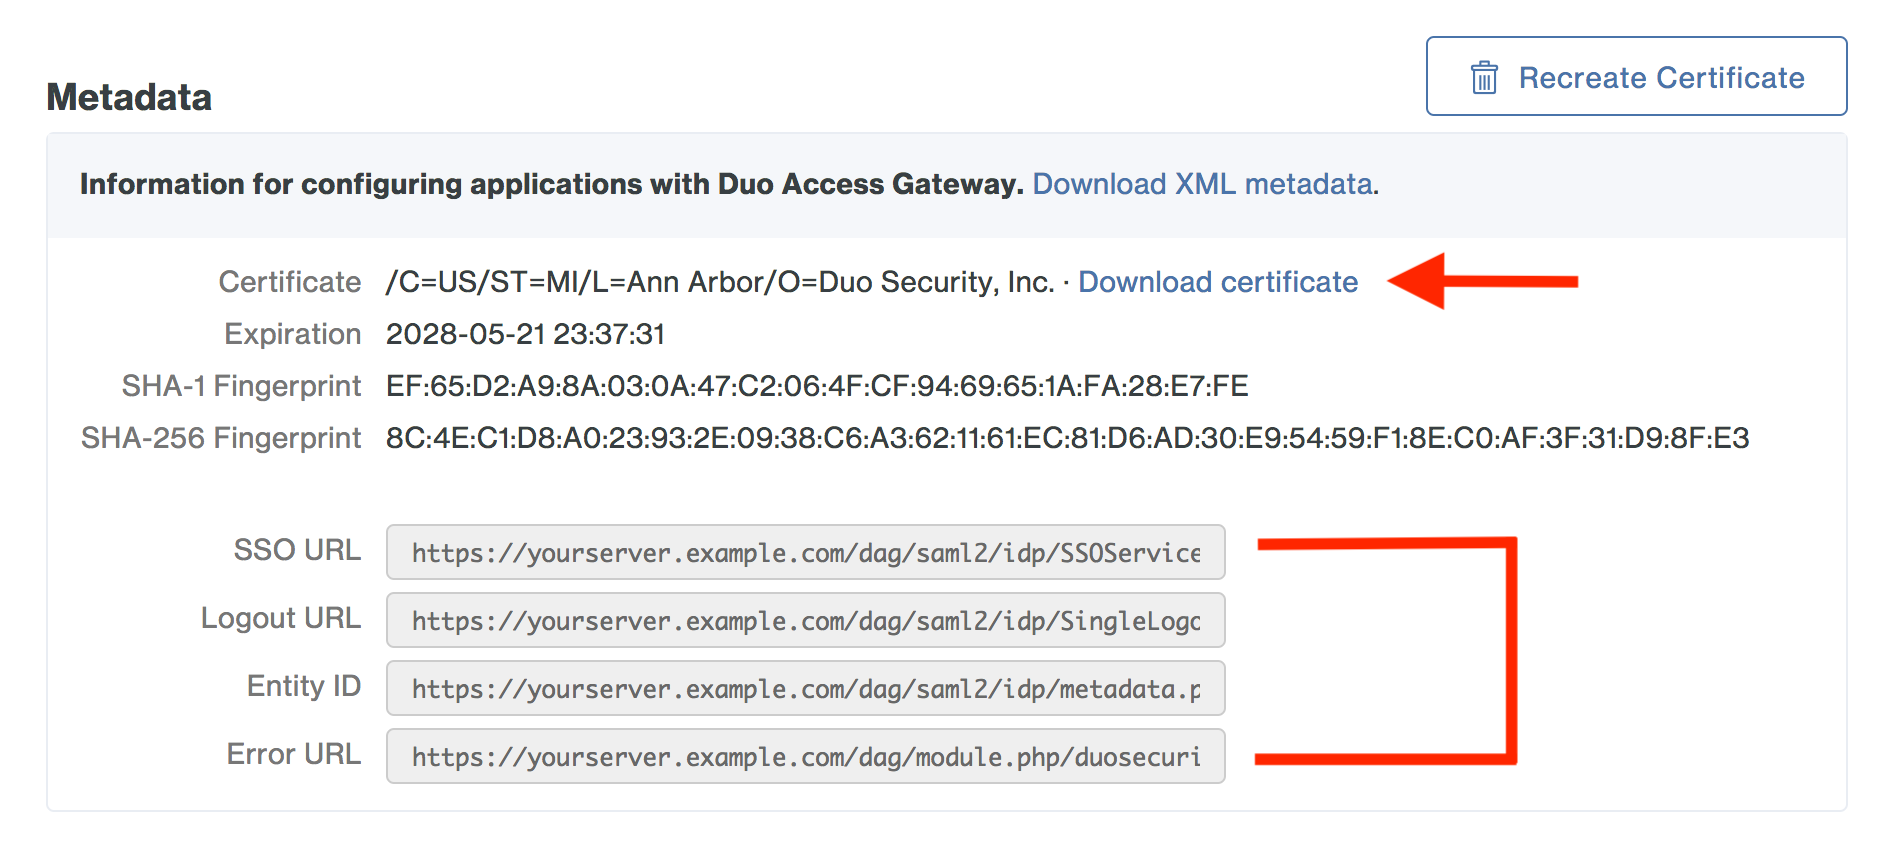
Scroll down the Applications page to the Metadata section. This is the information you need to provide to your Cisco ASA when configuring SSO. Click the Download Certificate link to obtain the token signing certificate (the downloaded file is named "dag.crt").
Configure Cisco ASA SSO
Add the Duo Access Gateway to Cisco ASA as a new single sign-on provider. The Cisco ASA can be configured through the Cisco Adaptive Security Device Manager (ASDM) or the command-line interface (CLI).
Cisco Adaptive Security Device Manager (ASDM)
Upload Duo Access Gateway Certificate
-
Connect to your Cisco ASA through your ASDM and log in as an administrative user.
-
Click on the Configuration button at the top of the screen.
-
Click Device Management in the bottom left-hand side of the screen.
-
In the navigation bar on the left side expand Certificate Management and then click CA Certificates
-
On the "CA Certificates" page click Add. A new window will pop-up.
-
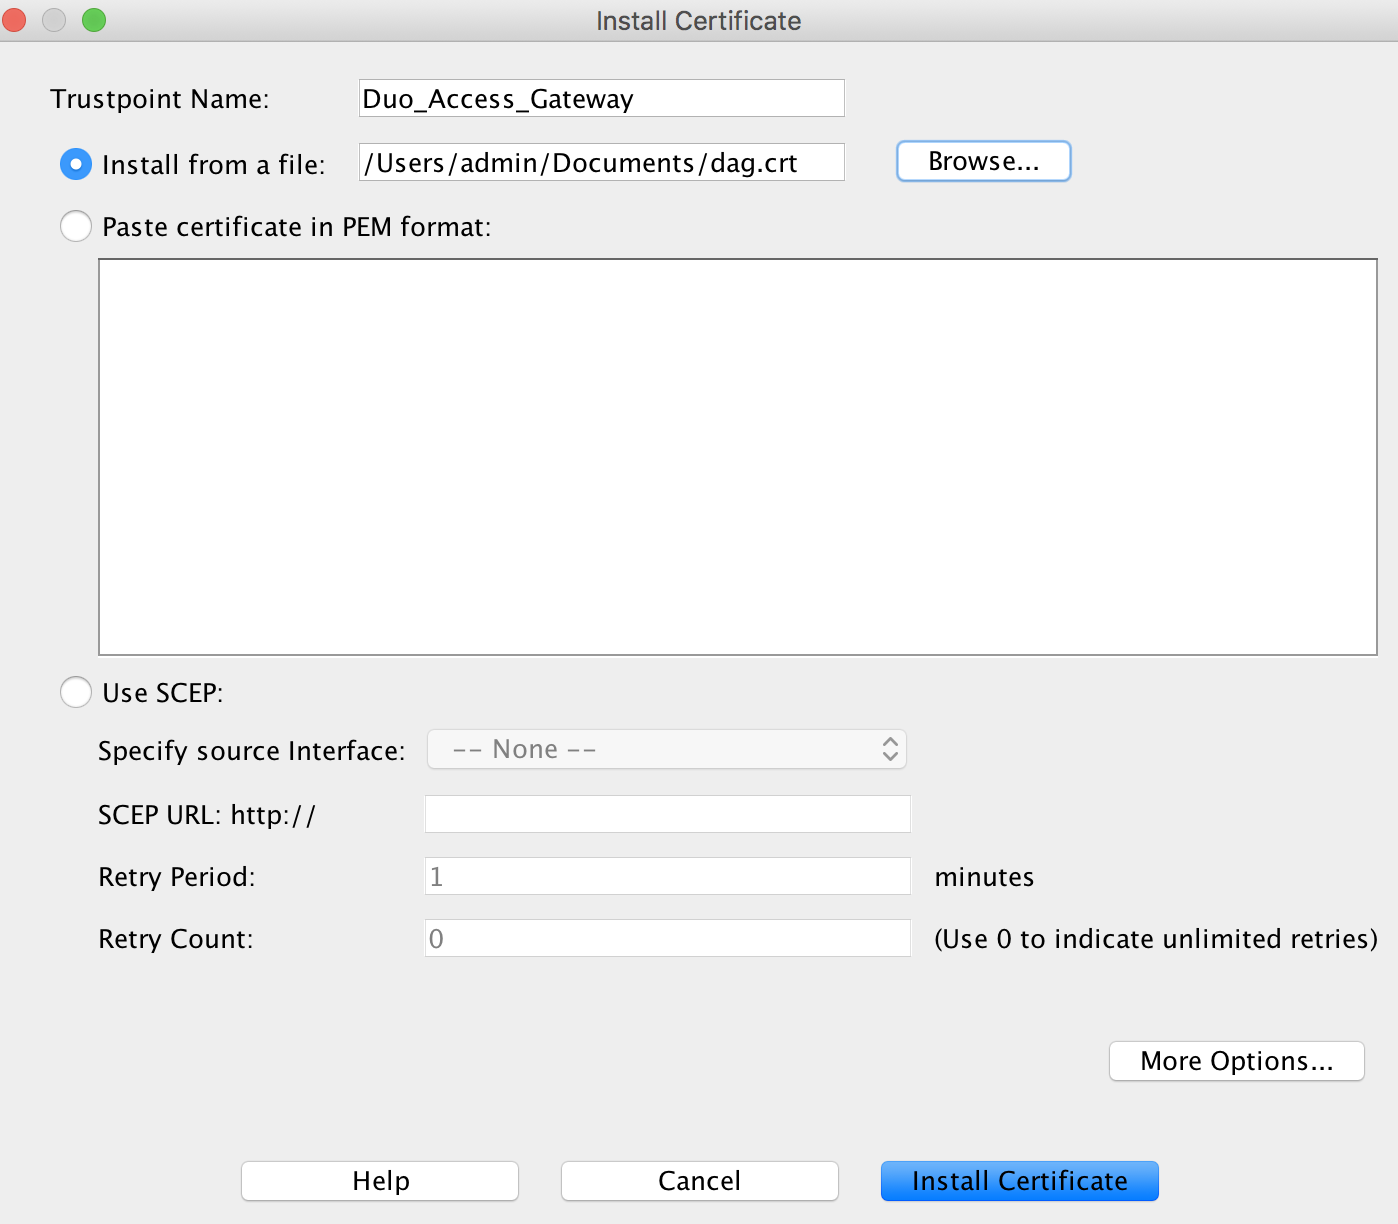
On the "Install Certificate" page type Duo_Access_Gateway into the "Trustpoint Name* field.
-
While the "Install from a file" option is selected click Browse…. A new window will pop-up.
-
Navigate to the location where you saved your dag.crt that you downloaded earlier and select it.
-
Click Install Certificate. You’ll see a pop-up that says "Certificate installed Successfully". Click OK.
-
Click Save at the top of the screen.
Configure Client Connection Profile
-
While logged into the Cisco ASDM click Remote Access VPN at the bottom of the screen.
-
On the left-hand navigation expand Network (Client) Access and click on Secure Client Connection Profiles.
-
Under "Connection Profiles" click select the Tunnel Group you'd like to protect with SSO. A new window will pop-up.
-
Make sure the Tunnel Group has an Alias set.
-
Under "Authentication" click the drop-down next to "Method" and select SAML.
-
Under "SAML Identity Provider" click Manage… next to "SAML Server**. A new window will pop-up.
-
On the "Configure SSO Servers SAML" screen click Add. A new window will pop-up.
-
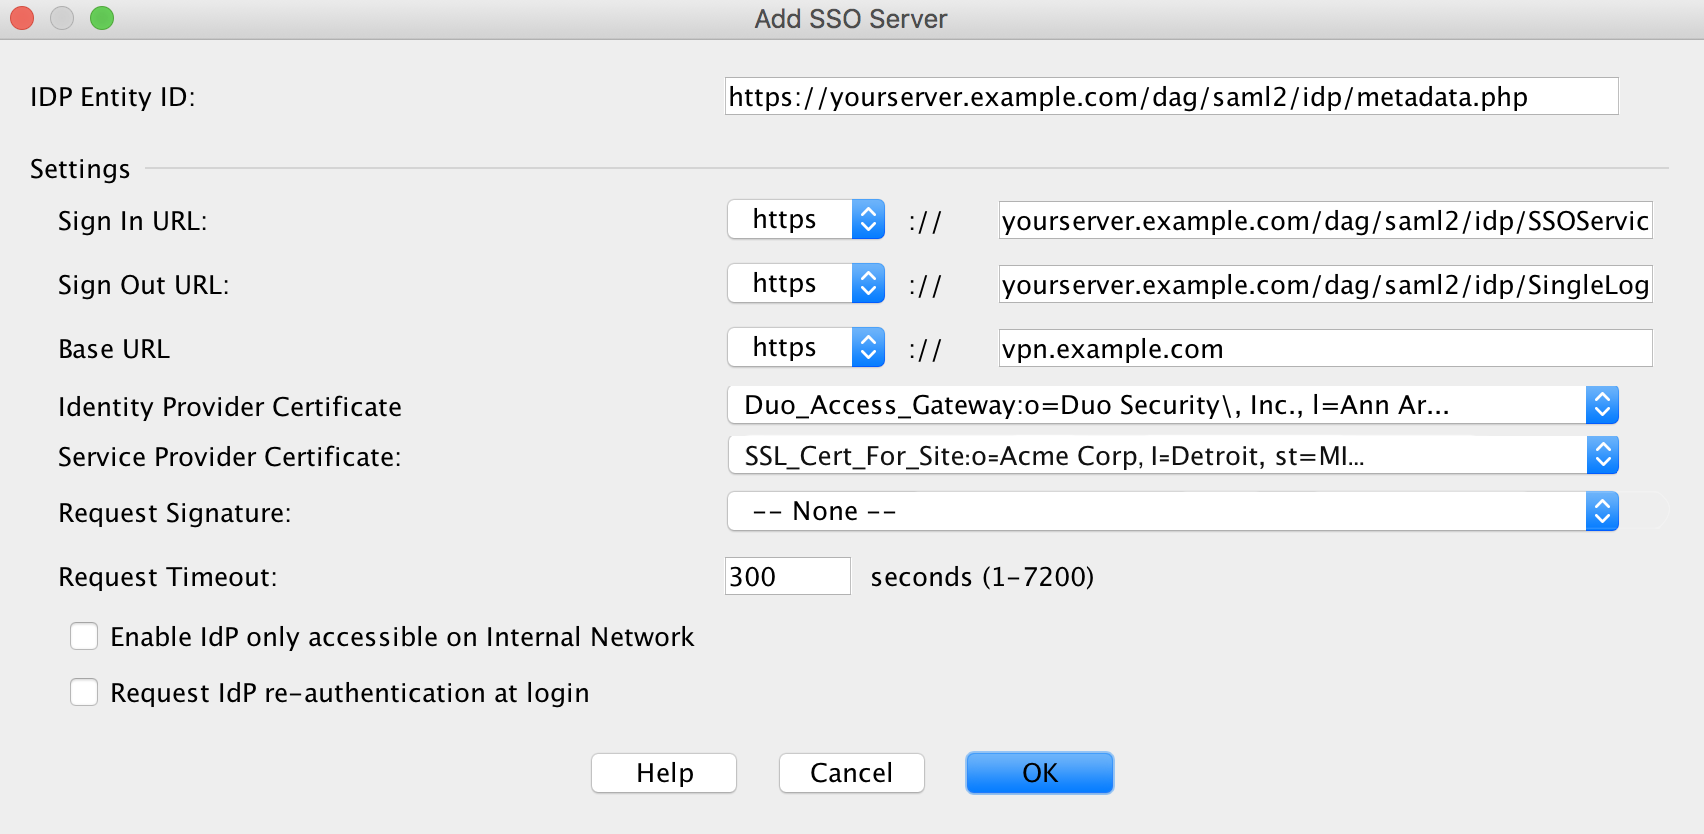
On the "Add SSO Server" page copy the Entity ID from the Duo Access Gateway admin console metadata display and paste it into the Cisco ASA IDP Entity ID field.
Example: https://yourserver.example.com/dag/saml2/idp/metadata.php
-
Next to Sign In URL select https from the drop-down. Copy the SSO URL from the Duo Access Gateway admin console metadata display and paste it into the Cisco ASA Sign In URL field. Remove the https:// from the pasted URL.
Example: yourserver.example.com/dag/saml2/idp/SSOService.php
-
Next to Sign Out URL select https from the drop-down. Copy the Logout URL from the Duo Access Gateway admin console metadata display and paste it into the Cisco ASA Sign Out URL field. Remove the https:// from the pasted URL.
Example: yourserver.example.com/dag/saml2/idp/SingleLogoutService.php
-
Next to Base URL select https from the drop-down. Enter the publicly resolvable hostname of your Cisco ASA into the field.
Example: vpn.example.com
-
Select Duo_Access_Gateway from the drop-down next to Identity Provider Certificate.
-
Select the SSL certificate used for the Cisco ASA itself from the drop-down next to Service Provider Certificate.
Important: You may need to update this selection when your SSL certificate expires or you change your Cisco ASA to use a new certificate. -
Leave the Request Signature sent to None.
-
Type 300 into the Request Timeout field.
-
Leave all other options at their default setting.
-
Click OK to return to the "Configure SSO Servers SAML" page.
-
Click OK to return to the "Add Secure Client Connection Profile" page.
-
Make sure the Entity ID of the SSO Server you just configured is selected in the drop-down next to SAML Server.
-
Continue filling out the page and click OK.
-
Click Apply.
-
Click Save to write all changes to the ASA device memory.
Learn more about Cisco ASA SSO at Cisco Support.
Command Line Interface (CLI)
Upload Trustpoint Certificate
-
SSH into your ASA and access the config terminal.
login as: asaadmin asaadmin@ciscoasa's password: Type help or '?' for a list of available commands. ciscoasa> enable Password: ******** ciscoasa# configure terminal ciscoasa(config)# -
Enter the following to begin uploading the Duo Access Gateway metadata certificate:
ciscoasa(config)#crypto ca trustpoint Duo_Access_Gateway ciscoasa(config-ca-trustpoint)# -
Enter the commands below. When prompted open the dag.crt file in a text editor (like Notepad), and copy the entire contents of the file (including the
-----BEGIN CERTIFICATE-----and-----END CERTIFICATE-----lines). Paste the certificate text into your terminal. Type quit on its own line and then hit return.ciscoasa(config-ca-trustpoint)# enrollment terminal ciscoasa(config-ca-trustpoint)# crypto ca authenticate Duo_Access_Gateway Enter the base 64 encoded CA certificate. End with the word "quit" on a line by itself -----BEGIN CERTIFICATE----- MIIDYTCCAkmgAwIBAgIBADANBgkqhkiG9w0BAQsFADBLMQswCQYDVQQGEwJVUzEL MAkGA1UECAwCTUkxEjAQBgNVBAcMCUFubiBBcmJvcjEbMBkGA1UECgwSRHVvIFNl Y3VyaXR5LCBJbmMuMB4XDTE4MDUyNDIzMzczMVoXDTI4MDUyMTIzMzczMVowSzEL MAkGA1UEBhMCVVMxCzAJBgNVBAgMAk1JMRIwEAYDVQQHDAlBbm4gQXJib3IxGzAZ BgNVBAoMEkR1byBTZWN1cml0eSwgSW5jLjCCASIwDQYJKoZIhvcNAQEBBQADggEP ADCCAQoCggEBAMs1bsVnXNq0WA7lIdygzQ2BI3ArOcqE8DdUZgV9QARXhTds976B u8JI4ZaFNOHQyDdWadwzX1gH1qO9n+BtAUSAcUsmM5HhHuLn4Zu8+xpBfOxM/R9N s3yQSbTL3JEESsQFi7IDb3x75xkxi5x7/trUAUrCOW3thwux/Tby3ycKZVOdF7pN QXXgfglYtpERo5wi162c2FLkFJ6Lxg0GdnlC7WqdkAOvpA+/q+MYG2QTqZkL+2F6 a1vuza2ouUHm55PF1HZwfl8UCGygg45UFd+OVgZt1U47TwQHxy9n6PVyD8S++DMD pelkQHlriWaf18LPwy8vnmYVkyHOCXi4PVsCAwEAAaNQME4wHQYDVR0OBBYEFJZb I5+FfPjHQSmJuxCTp0TFMwHIMB8GA1UdIwQYMBaAFJZbI5+FfPjHQSmJuxCTp0TF MwHIMAwGA1UdEwQFMAMBAf8wDQYJKoZIhvcNAQELBQADggEBAFvoonmxaEGzNN7a ddKIwVK9bdEkZrJiYCFmwlhrkEq+Xxmzr2ntu0zZVbWNQ/mdJSzhQ5ZFS4N9DHSS 9oe5xDqRFRSEsPj0mT/MmJI9kFq7h8B32zYVZlcwy+GSC7wLOo4sIa2RfS3PxWeD ES5YpTda6E9M8nq6wLKrt/RUUDHAq5aieBaPtqmbSb+xNHq0k/15+Q4BFO1iqkr9 ZMmbkErX4FYmRWfubYn+nBVLHjjXk81UxVhlsj+zP4OkLJyINTjs89LPshfknEts Dc80Fs1oUQ6JVnaWpsPm0QduevMNWjtA5nLm0x7PBjpSo/SsbDInK81BSkVLpzuj 7c8OuOM= -----END CERTIFICATE----- quit -
You will be asked to accept the certificate. Type yes.
INFO: Certificate has the following attributes:
Fingerprint:     ca20076b b1daa7f8 76d535c6 8e404ccd
Do you accept this certificate? [yes/no]: yes

Trustpoint CA certificate accepted.

% Certificate successfully imported
ciscoasa(config)#
Find SSL Certificate
-
Enter the following command to print a list of all the certificates uploaded to the Cisco ASA. Locate the Trustpoint certificate used to serve SSL for your Cisco ASA. Make note of it as you'll need it later.
ciscoasa(config)# show crypto ca trustpoints

Trustpoint SSL_Cert_For_Site:
    Subject Name:
    cn=COMODO RSA Domain Validation Secure Server CA
    o=COMODO CA Limited
    l=Salford
    st=Greater Manchester
    c=GB
        Serial Number: 1a2b3ccd4556788d123a4bcda56bc78
    Certificate configured.

Trustpoint Duo_Access_Gateway:
    Subject Name:
    o=Duo Security\, Inc.
    l=Ann Arbor
    st=MI
    c=US
        Serial Number: 00
    Certificate configured.
Add Duo Access Gateway as an SSO Server
-
Enter config-webvpn and then copy the Entity ID from the Duo Access Gateway admin console metadata display and paste it into the server like the exmaple below.
Example: https://yourserver.example.com/dag/saml2/idp/metadata.php
ciscoasa(config)# webvpn ciscoasa(config-webvpn)# saml idp https://yourserver.example.com/dag/saml2/idp/metadata.php ciscoasa(config-webvpnsaml-idp)# -
Copy the SSO URL from the Duo Access Gateway admin console metadata display and enter it as the url sign-in.
Example: https://yourserver.example.com/dag/saml2/idp/SSOService.php
ciscoasa(config-webvpnsaml-idp)# url sign-in https://yourserver.example.com/dag/saml2/idp/SSOService.php -
Copy the Logout URL from the Duo Access Gateway admin console metadata display and enter it as the url sign-out.
Example: https://yourserver.example.com/dag/saml2/idp/SingleLogoutService.php
ciscoasa(config-webvpnsaml-idp)# url sign-out https://yourserver.example.com/dag/saml2/idp/SingleLogoutService.php -
Configure the Base URL of your Cisco ASA.
Example: vpn.example.com.
ciscoasa(config-webvpn-saml-idp)# base-url https://vpn.example.com -
Set the trustpoint certificate you uploaded earlier for the SSO server.
ciscoasa(config-webvpn-saml-idp)# trustpoint idp Duo_Access_Gateway
ciscoasa(config-webvpn-saml-idp)# trustpoint sp SSL_Cert_For_Site
ciscoasa(config-webvpn-saml-idp)#
Important: You may need to update this selection when your SSL certificate expires or you change your Cisco ASA to use a new certificate. -
Set the timeout for when a pending SSO login is no longer valid. We recommend setting it to 300 seconds.
ciscoasa(config-webvpn-saml-idp)# timeout assertion 300 -
Set Force Re-Authentication to false.
ciscoasa(config-webvpn-saml-idp)# no force re-authentication -
Exit saml-idp mode and verify that your configuration looks like the example below.
ciscoasa(config-webvpn-saml-idp)# exit
ciscoasa(config-webvpn)# show webvpn saml idp
saml idp https://yourserver.example.com/dag/saml2/idp/metadata.php
url sign-in https://yourserver.example.com/dag/saml2/idp/SSOService.php
url sign-out https://yourserver.example.com/dag/saml2/idp/SingleLogoutService.php
base-url https://vpn.example.com
trustpoint idp Duo_Access_Gateway
trustpoint sp SSL_Cert_For_Site
no signature
no force re-authentication
timeout assertion 300
ciscoasa(config-webvpn)#
Set Tunnel Group to use SSO
Now that you've added the Duo Access Gateway as an SSO server in Cisco ASA you need to set a tunnel group to use the Duo Access Gateway for authentication.
-
Create a tunnel group that will be used for SSO by using the commands below.
- Replace "cloud-idp-dag" with the name of the tunnel group you'd like to use.
- Replace "cloud_idp" with the alias name you'd like to use.
- Replace https://yourserver.example.com/dag/saml2/idp/metadata.php with your Duo Access Gateway's Entity ID.
ciscoasa(config) webvpn ciscoasa(config-webvpn)# tunnel-group-list enable ciscoasa(config-webvpn)# tunnel-group cloud-idp-dag type remote-access ciscoasa(config)# tunnel-group cloud-idp-dag webvpn-attributes ciscoasa(config-tunnel-webvpn)# authentication saml ciscoasa(config-tunnel-webvpn)# group-alias cloud_idp enable ciscoasa(config-tunnel-webvpn)# saml identity-provider https://yourserver.example.com/dag/saml2/idp/metadata.php -
Continue configuring your new tunnel group with any additional settings.
Learn more about Cisco ASA SSO at Cisco Support.
Create the Cisco ASA Application in Duo
-
Log on to the Duo Admin Panel and navigate to Applications.
-
Click Protect an Application and locate the entry for Cisco ASA with a protection type of "2FA with SSO self-hosted (Duo Access Gateway)" in the applications list. Click Protect to the far-right to start configuring Cisco ASA. See Protecting Applications for more information about protecting applications in Duo and additional application options.
-
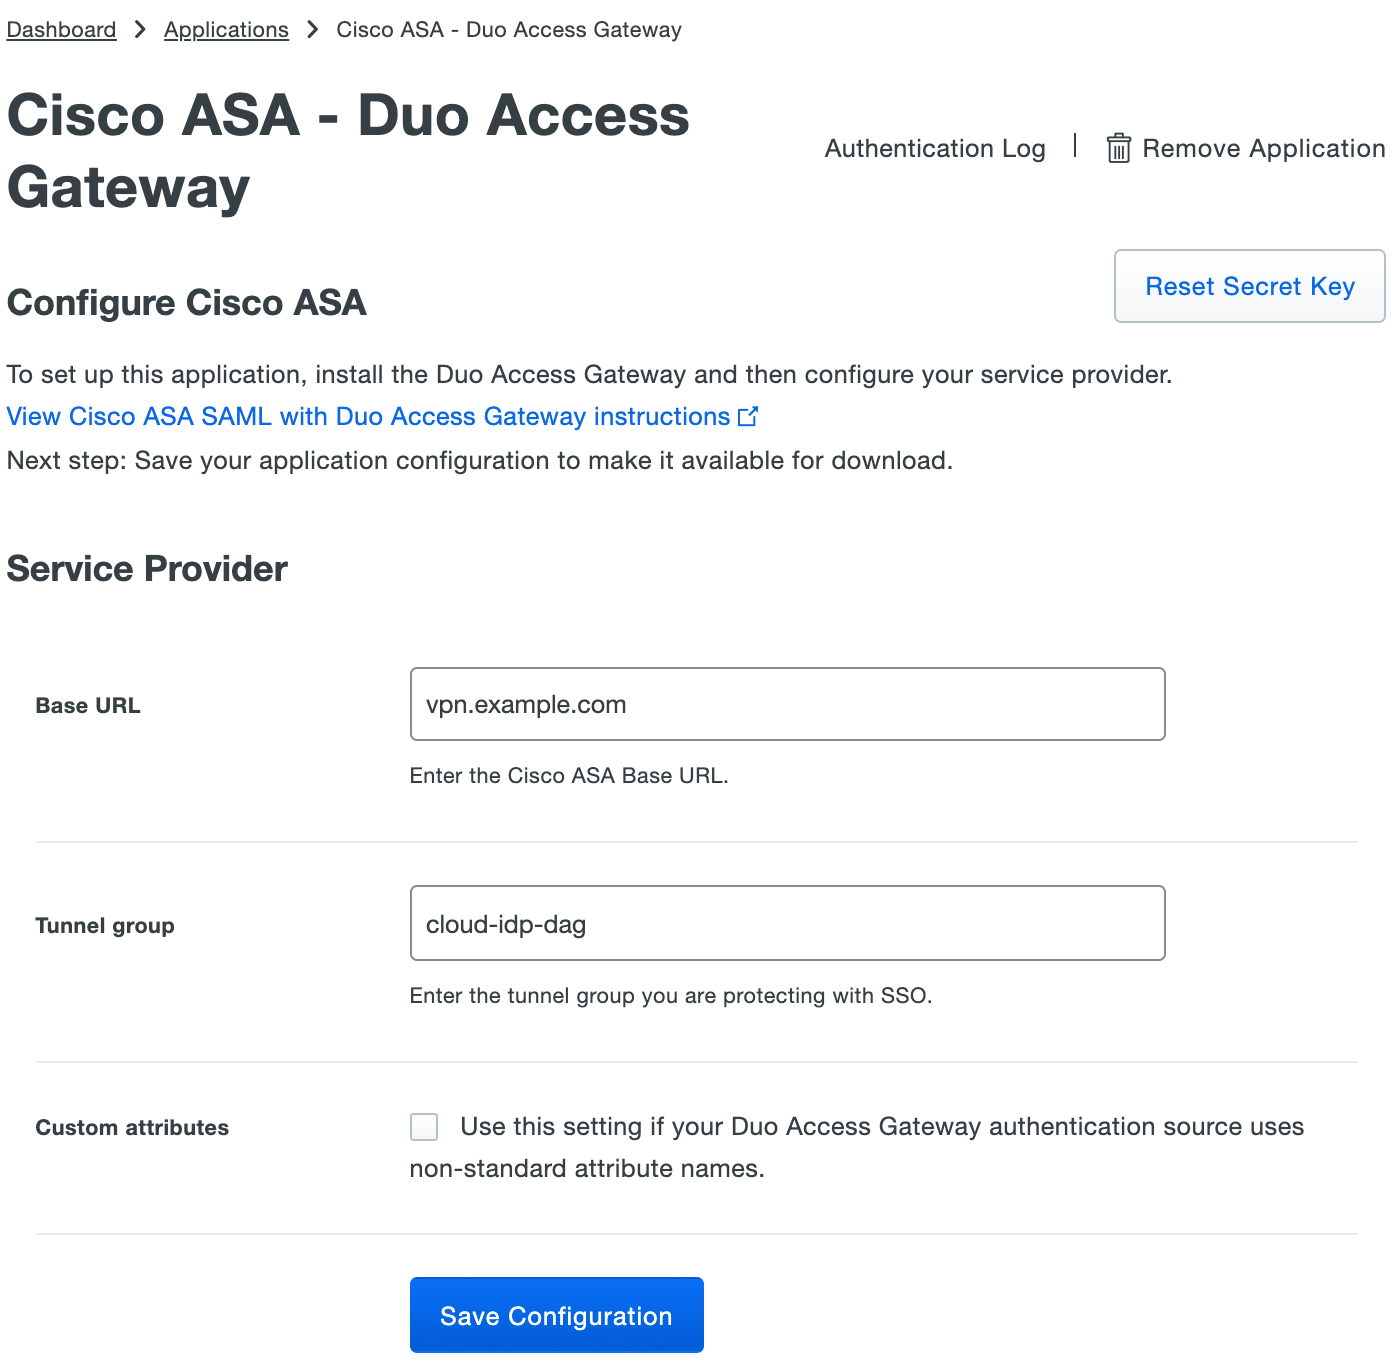
Enter the base URL of your Cisco ASA that you entered above as the Base URL. For example, if your Cisco ASA base URL is https://vpn.example.com then enter vpn.example.com.
-
Enter the tunnel group of your Cisco ASA that you entered above as the Tunnel Group. The tunnel group name is case-sensitive and must match. For example, if your tunnel group is cloud-idp-dag then enter cloud-idp-dag.
-
Cisco ASA uses the Mail attribute when authenticating. We've mapped Mail attribute to DAG supported authentication source attributes as follows:
Duo Attribute Active Directory OpenLDAP SAML IdP Google Azure Mail attribute mail mail mail email mail If you are using a non-standard email attribute for your authentication source, check the Custom attributes box and enter the name of the attribute you wish to use instead.
-
Click Save Configuration to generate a downloadable configuration file.
-
You can adjust additional settings for your new SAML application at this time — like changing the application's name from the default value, enabling self-service, or assigning a group policy — or come back and change the application's policies and settings after you finish SSO setup. If you do update any settings, click the Save Changes button when done.
-
Click the Download your configuration file link to obtain the Cisco ASA application settings (as a JSON file).
Important: This file contains information that uniquely identifies this application to Duo. Secure this file as you would any other sensitive or password information. Don't share it with unauthorized individuals or email it to anyone under any circumstances!
Add the Cisco ASA Application to Duo Access Gateway
Before you do this, verify that you updated the "Attributes" list for your Duo Access Gateway authentication source as specified here.
-
Return to the Applications page of the DAG admin console session.
-
Click the Choose File button in the "Add Application" section of the page and locate the Cisco ASA SAML application JSON file you downloaded from the Duo Admin Panel earlier. Click the Upload button after selecting the JSON configuration file.
-
The Cisco ASA SAML application is added.

Verify SSO
If your organization enabled the Duo Access Gateway Launcher, log into the Launcher page using the link provided by your administrator. Click Cisco ASA from the dashboard to access the application.
You can also log into your Cisco ASA using your organization’s login page e.g. https://vpn.example.com. Select the tunnel group and click Login. This redirects to the Duo Access Gateway login page. Enter your primary directory logon information, approve Duo two-factor authentication, and get redirected back to the Cisco ASA site after authenticating.
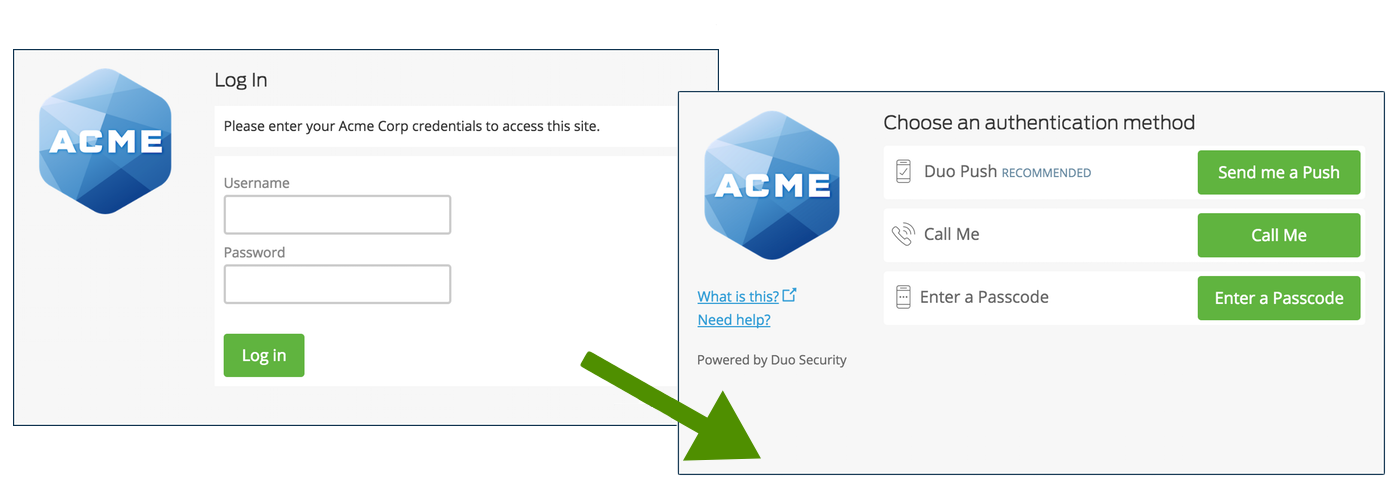
Cisco client mobile or desktop apps require AnyConnect version 4.6 or higher or Secure Client. Select your tunnel group from your client and click Login. You will be redirected to authenticate to Duo Access Gateway.
Congratulations! Your Cisco ASA users now authenticate using Duo Access Gateway.
If you plan to permit use of WebAuthn authentication methods (security keys, U2F tokens, or Touch ID) in the traditional Duo Prompt, Duo recommends configuring allowed hostnames for this application and any others that show the inline Duo Prompt before onboarding your end-users.
The Duo Universal Prompt has built-in protection from unauthorized domains so this setting does not apply.
Microsoft AD FS
Microsoft's Active Directory Federation Services (AD FS) is a popular choice for SSO because it easily integrates with the AD identity store many organizations already have deployed. Duo's support for cloud applications and SSO drops in to an existing AD FS installation to provide secondary authentication after a user passes primary authentication (successful Active Directory logon).
If you don't already have AD federation running the first step is to install and configure Microsoft AD FS in your organization. Deployment Guides for AD FS versions 2.1, and 3.0/4.0 are available from Microsoft.
Once your AD FS services are up and running, the second step is to configure the SSO partnership between your AD FS service and the external cloud resource, in this case Cisco ASA. Learn more about configuring Cisco ASA SSO with AD FS at the Cisco Support site.
After you have successfully configured and tested AD FS SSO login to Cisco ASA using your AD domain credentials, you can then install the Duo AD FS integration. AD FS protection is included with Duo's paid plans.
With the Duo integration for AD FS installed, users pass primary authentication to the AD FS service as usual. Once primary authentication succeeds, users are forwarded to the Duo service for secondary authentication. After approving logon using one of Duo's authentication methods, the user is fully logged in to Cisco ASA.
Other Identity Partners
Using a third-party SSO provider for cloud application access? Duo partners with leading cloud SSO providers like Okta and OneLogin to secure access with our strong and flexible authentication platform.
You can also use Duo two-factor authentication with CAS and Shibboleth on-premises IdPs.
Troubleshooting
Need some help? Try searching our Knowledge Base articles or Community discussions. For further assistance, contact Support.
Network Diagram
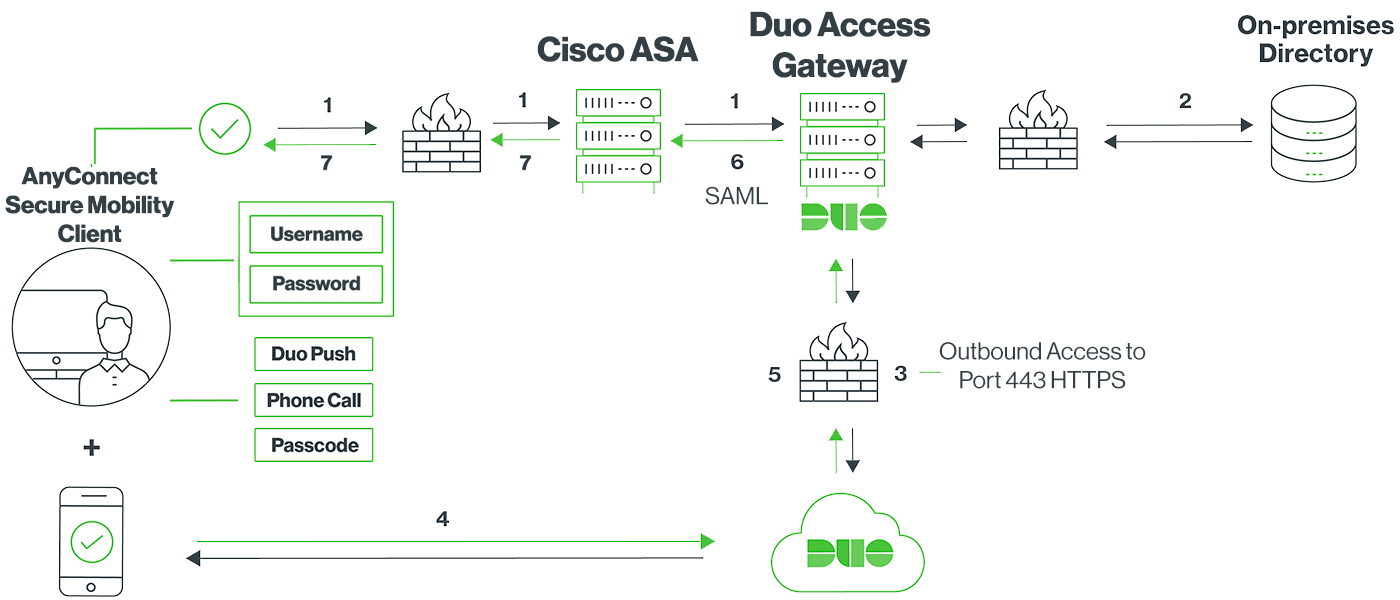
- Client connection initiated to Cisco ASA, which redirects to the Duo Access Gateway for SAML authentication
- Client performs primary authentication via the Duo Access Gateway using an on-premises directory (example)
- Duo Access Gateway establishes connection to Duo Security over TCP port 443 to begin 2FA
- User completes Duo two-factor authentication via the interactive web prompt served from Duo's service and their selected authentication factor.
- Duo receives authentication response and returns that information to the Duo Access Gateway
- Duo Access Gateway returns a SAML token for access
- Cisco ASA VPN access granted
