Contents
Duo Access Gateway adds two-factor authentication, complete with inline self-service enrollment and Duo Prompt, to popular cloud services like Salesforce and Google Workspace using SAML 2.0 federation.
Duo Access Gateway reached Last Day of Support on October 26, 2023 for Duo Essentials, Advantage, and Premier customers. As of that date, Duo Support may only assist with the migration of existing Duo Access Gateway applications to Duo Single Sign-On. Please see the Guide to Duo Access Gateway end of life for more details.
Learn more about Duo Single Sign-On, our cloud-hosted identity provider featuring Duo Central and the Duo Universal Prompt.
This guide takes you through Duo Access Gateway installation and configuration on Windows. Want to host the Duo Access Gateway on Linux? See our instructions for deploying the Duo Access Gateway as a Docker container on Linux.
Overview
Duo Access Gateway secures access to cloud applications with your users’ existing directory credentials (like Microsoft Active Directory or Google Workspace accounts) using the Security Assertion Markup Language (SAML) 2.0 authentication standard. SAML delegates authentication from a service provider to an identity provider, and is used for single sign-on solutions (SSO).
Duo provides SAML connectors for enterprise cloud applications like Google Workspace, Amazon Web Services, Box, Salesforce and Microsoft Office 365. Duo Access Gateway also ships with the ability for the customer to provide their own SAML "metadata" and connect to just about any app that supports the 2.0 standard.
Protected cloud applications redirect your users to the Duo Access Gateway server on your network. Duo Access Gateway acts as a SAML identity provider (IdP), authenticating your users using your existing primary authentication source for credential verification, and then prompting for two-factor authentication before permitting access to the SAML application.
Duo Access Gateway is part of the Duo Premier, Duo Advantage, and Duo Essentials plans.
Duo Access Gateway supports local Active Directory (AD) and OpenLDAP directories as identity sources, as well as on-premises or cloud SAML IdPs.
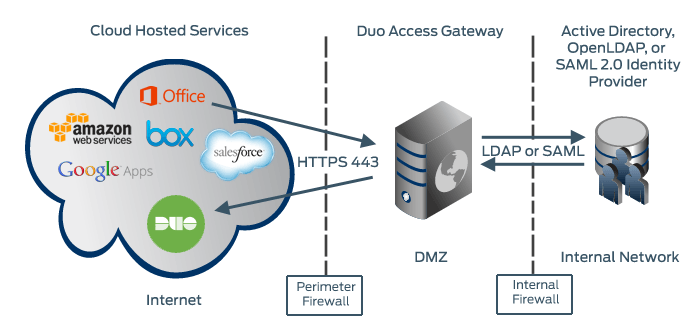
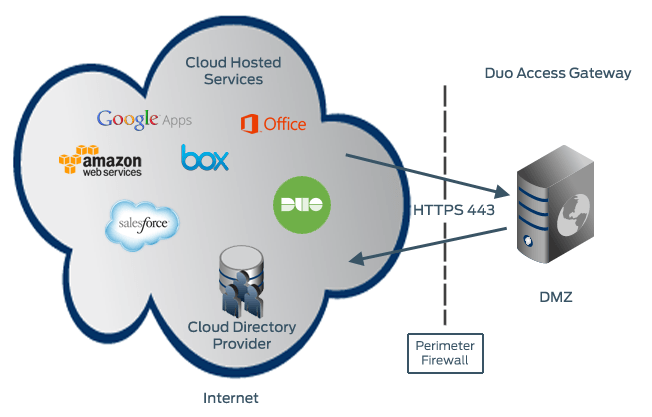
You can also use the Duo Access Gateway with Azure AD (now known as Microsoft Entra ID) and Google directories or third-party IdPs hosted in the cloud.
Define Duo policies that enforce unique controls for each individual SSO application. For example, you can require that Salesforce users complete two-factor authentication at every login, but only once every seven days when accessing Google Workspace. Duo checks the user, device, and network against an application's policy before allowing access to the application.
Before moving on to the deployment steps, it's a good idea to familiarize yourself with Duo administration concepts and features like options for applications, available methods for enrolling Duo users, and Duo policy settings and how to apply them. See all Duo Administrator documentation.
Installation Overview Video
Duo Access Gateway and Universal Prompt
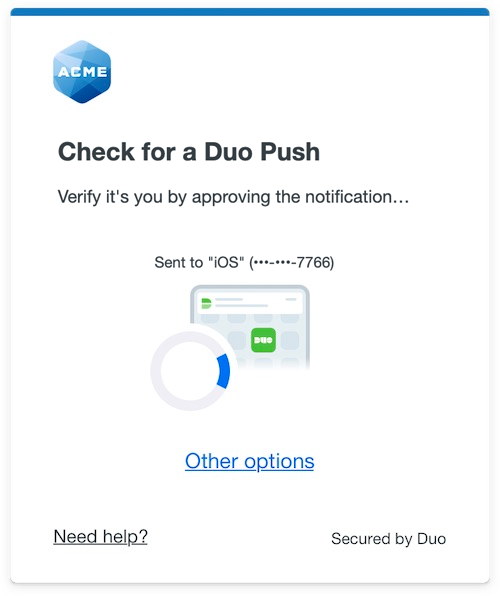
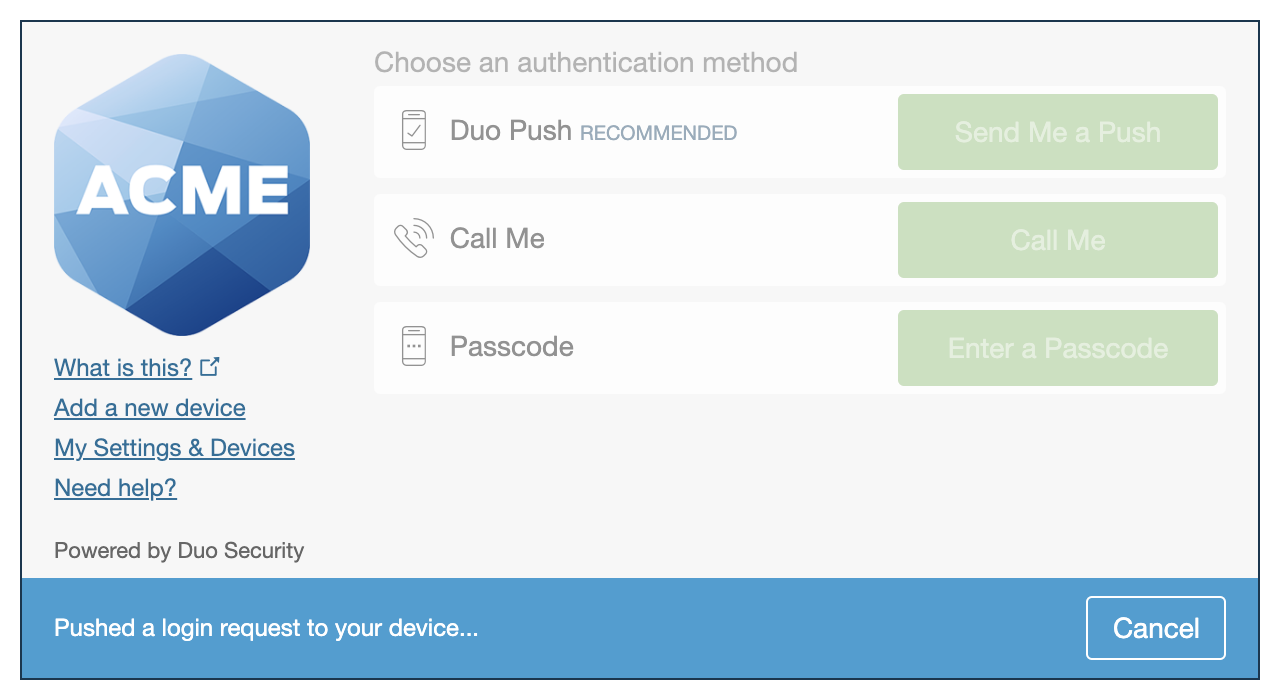
Duo's next-generation authentication experience, the Universal Prompt, provides a simplified and accessible Duo login experience for web-based applications, offering a redesigned visual interface with security and usability enhancements.
| Universal Prompt | Traditional Prompt |
 |
 |
Duo is updating the login experience for our in-scope applications, and working with our technology partners to ensure they update their solutions for Universal Prompt as well.
With the general availability of Duo Single Sign-On, which includes support for the Duo Universal Prompt, we may provide security updates for DAG but do not plan to release any additional feature enhancements to Duo Access Gateway, nor will we update Duo Access Gateway for Duo commercial plan customers to use the Universal Prompt. Review the list of applications excluded from the Universal Prompt update scope in the Universal Prompt Update Guide.
Consider deploying or migrating to Duo Single Sign-On today to future-proof your Duo experience and receive the latest updates.
Prerequisites
This application communicates with Duo's service on SSL TCP port 443.
Firewall configurations that restrict outbound access to Duo's service with rules using destination IP addresses or IP address ranges aren't recommended, since these may change over time to maintain our service's high availability. If your organization requires IP-based rules, please review Duo Knowledge Base article 1337.
Effective June 30, 2023, Duo no longer supports TLS 1.0 or 1.1 connections or insecure TLS/SSL cipher suites. See Duo Knowledge Base article 7546 for additional guidance.
Before you start installing Duo Access Gateway for Windows, make sure to complete all these requirements described below.
- Deploy a Windows server in your DMZ to host Duo Access Gateway.
- Install IIS and other required Microsoft software.
- Download a supported version of PHP.
- Obtain a SSL certificate for the Duo Access Gateway web site from a commercial CA.
Deploy a DMZ Server
-
Deploy a physical or virtual server in your perimeter network (or DMZ). The minimum system requirements for the Duo Access Gateway host are:
- Form Factor: Physical or virtual machine
- Processor: Two processors of 2 GHz or faster
- Memory: 4 GB RAM or greater
- Disk Storage: 60 GB or greater
- Operating System: Windows Server 2016, 2019, or 2022.
The server should neither be in your internal network nor joined to an Active Directory domain. Review additional security recommendations for patch management, antivirus, and user management at Microsoft TechNet.
-
Disable SSL 3.0 in IIS as described in this Duo Knowledge Base article.
-
Restrict console and RDP access to as few administrators as possible. Require strong passwords and consider two-factor authentication for remote access.
-
Open port 443 in the perimeter firewall for HTTPS external traffic to and from the server.
-
Open a port for LDAP (default 389) or LDAPS (default 636) traffic from the server to your internal Active Directory Domain Controller(s) or OpenLDAP directory server if you are using an on-premises directory.
-
Create an Internet resolvable fully qualified DNS entry for external access (e.g. yourserver.example.com). Your users need to access the Duo Access Gateway server using that fully qualified name when logging in to cloud hosted services.
-
Ensure that your server can resolve the fully-qualified host name via internal and external DNS. If you do not have internal DNS available, you can add an entry to your
C:\Windows\System32\drivers\etc\hostsfile associating the fully-qualified host name with the internal IP and/or the 127.0.0.0 loopback address.
Install Internet Information Server (IIS)
The Duo Access Gateway Windows installer requires IIS installed on the C: drive (as it will deploy into a directory under C:\Inetpub).
-
Launch Windows PowerShell as an administrator.
-
Enter the command
import-module servermanagerto load the Server Manager PowerShell cmdlets. -
Enter this command to install IIS and the additional components required by the Duo Access Gateway installer.
add-windowsfeature Web-Server, Web-Mgmt-Tools, Web-CGI, NET-Framework-Core, Web-Asp-Net45, Web-Scripting-ToolsIf you receive an error about missing source for install you may need to mount your Windows Server ISO on your server VM or insert the Windows DVD and rerun the
add-windowsfeaturecommand, appending-source D:\sources\sxs(replacing D: with the actual drive letter) to the end. See your virtualization vendor's documentation for help mounting the Windows installer ISO on your virtual server.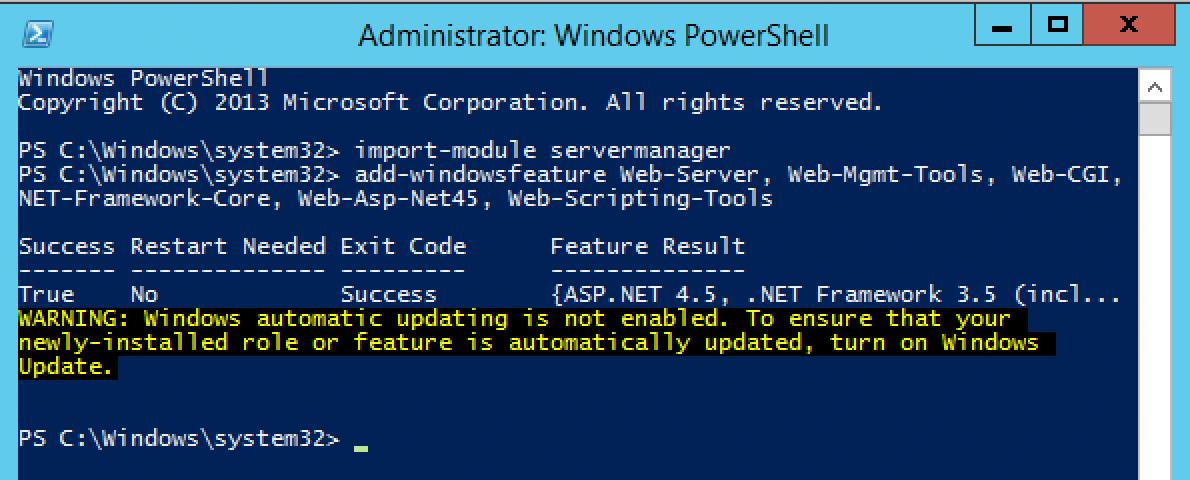
-
Reboot the server if prompted.
Additional Software Requirements
Windows 10 Universal C Runtime
The Duo Access Gateway installer will also install the Visual C++ Redistributable for Visual Studio 2015-2019 package if not present on your server. The Visual C++ Redistributable for Visual Studio 2015-2019 package is itself dependent on the Windows 10 Universal C Runtime (CRT). Ensure that the Universal C Runtime package is installed on your server before proceeding with Duo Access Gateway installation.
PHP
Duo Access Gateway 1.5.13 and greater requires PHP 8.1 non thread safe, with the minimum supported version being 8.1.11. We recommend PHP 8.1.13.
Download the PHP 8.1.13 VC16 x64 Non Thread Safe zip package. You do not need to unzip the file archive, just save the file in a location you can access later during the install.
Obtain and Install an SSL Certificate
Purchase an SSL certificate for your server from a commercial certificate authority (CA), using the fully qualified DNS name of your Duo Access Gateway server as the common name (e.g. yourserver.example.com). You may also use a wildcard SSL certificate.
The certificate should include the entire certificate bundle (where it includes the full chain of issuing CA certificates). Import that certificate bundle into the machine's Web Server or Personal certificate store and create a binding for HTTPS/443 in IIS using that certificate on the "Default Web Site".
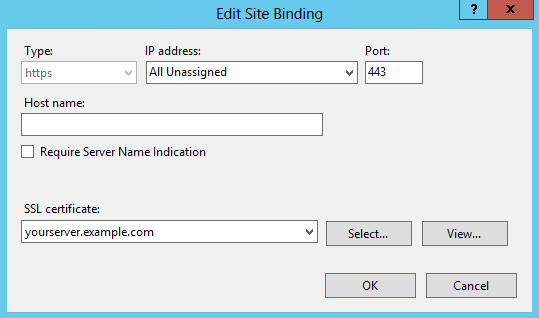
Here are instructions for importing a purchased certificate into IIS from Microsoft as well as some popular commercial CAs:
Using an SSL certificate from your internal enterprise CA is not recommended, as external clients do not trust your CA by default. Your users will receive certificate errors unless they can obtain and install the full certificate chain for certificates issued by your internal CA.
Browser Settings
Verify that the browser settings on the Duo Access Gateway server allow JavaScript. For Internet Explorer users we recommend adding the HTTPS URL of your server to the "Trusted Sites" security zone, as well as https://*.duosecurity.com. Then, ensure that the security level for the Trusted Sites zone enables scripting.
Verify Web Server Functionality
Browse to https://yourserver.example.com. You should see the IIS welcome page, and not receive any certificate warnings.
Install Duo Access Gateway
The Duo Access Gateway installer verifies the prerequisites and exits if any are missing. If your installation fails to complete please review the prerequisites, install any missing items flagged by the installer, and try again.
-
Download the Duo Access Gateway installer executable from Duo and launch. View checksums for Duo downloads here.
-
If the Microsoft Visual C++ 2015-2019 Redistibutable Package (x64) is not present on your server then the Duo Access Gateway setup wizard prompts you to install it.
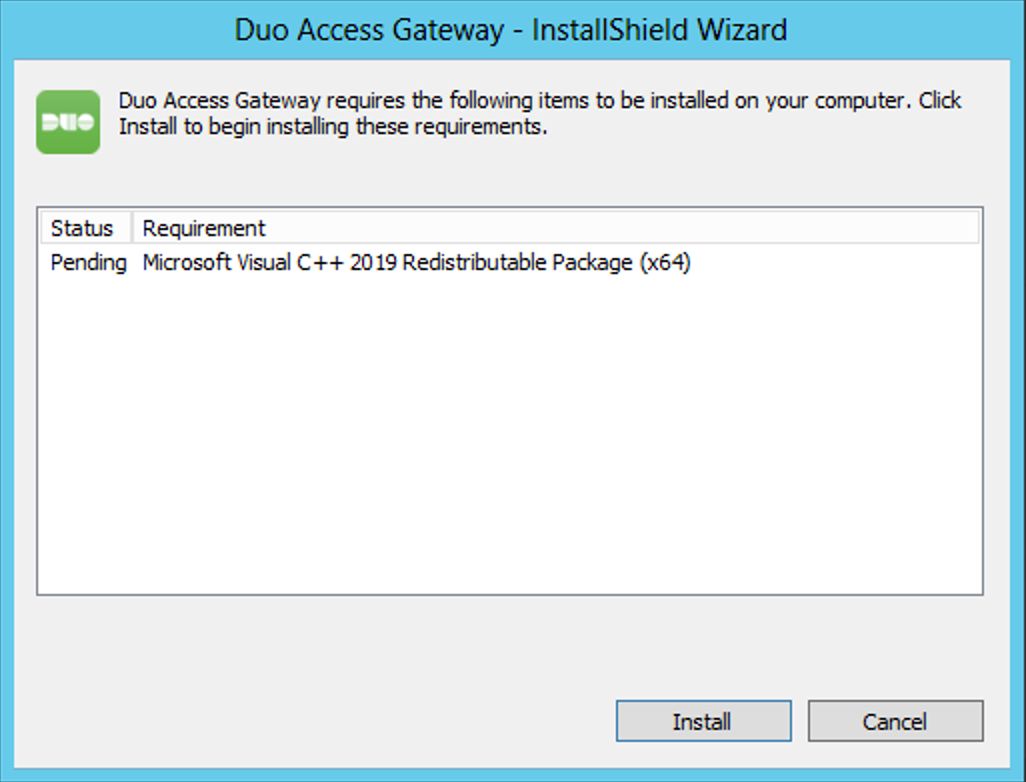
-
You must specify the location of PHP. Use the Browse utility to locate and select the PHP zip file you downloaded earlier and continue with the installation.
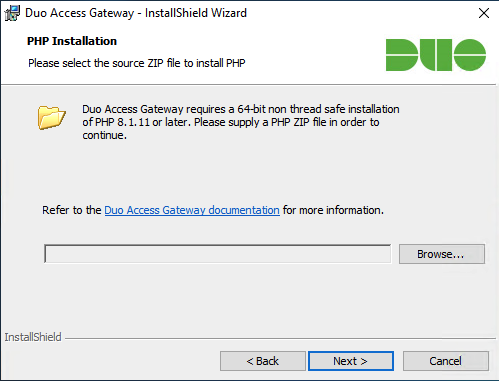
If you receive an error stating that the PHP version can not be verified, ensure that you have installed the Windows 10 Universal C Runtime prerequisite package.
If the installer prompts you to change impersonation mode, click Yes.
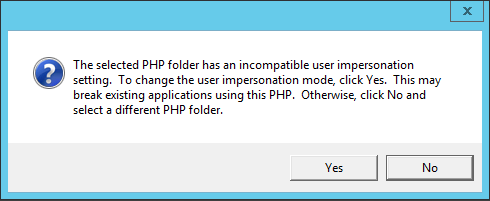
Should you receive an additional security warning prompt asking if you want to run the unsigned php.exe file, uncheck the Always ask before opening this file option and click Run.
-
Select the fully-qualified host name from the list. Choose the one that matches the external DNS entry for your Duo Access Gateway server.
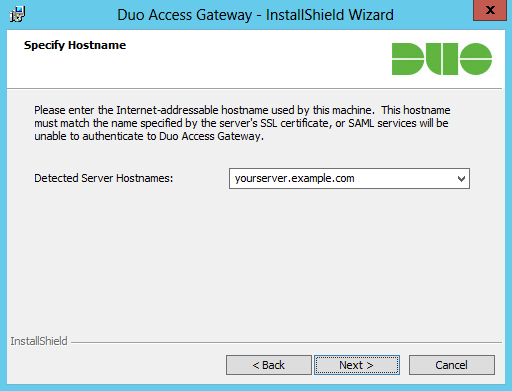
If your IIS site binding uses a wildcard certificate then the installer can't determine the hostname. Type in the fully qualified hostname (i.e. yourserver.example.com) in the space provided.
-
By default the Duo Access Gateway administrative interface can only be accessed from the Duo Access Gateway server's assigned IP addresses. If you need to access the Duo Access Gateway admin console from an IP address not assigned to the Duo Access Gateway server's network interface(s) — such as an external IP address assigned to your Duo Access Gateway server by your public DNS service or a management server on your internal network — enter the additional IP addresses when prompted.
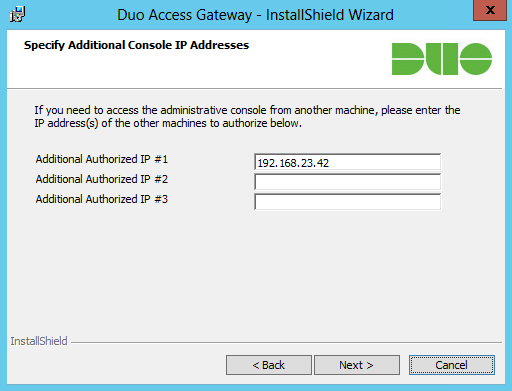
-
Click Install to complete Duo Access Gateway installation.
Access the Admin Console
Important: Unless you specified additional access IP addresses during installation you can only access the Duo Access Gateway admin console from the Duo Access Gateway server itself after install completes. Learn how to add additional allowed IPs after installation in our FAQ.
-
From the Duo Access Gateway server's console, click the Configure icon in the "Duo Access Gateway" application group to log on to https://yourserver.example.com/dag.
-
You must choose a new admin password at initial log on.
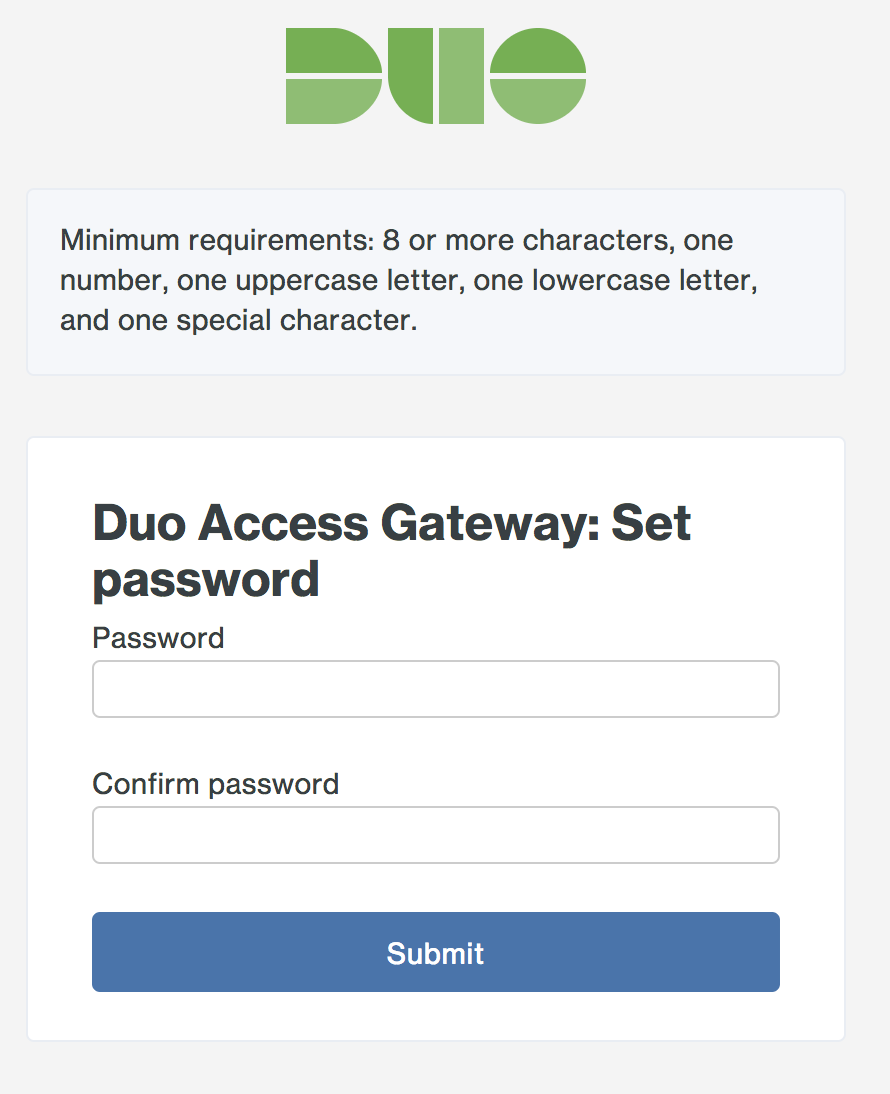
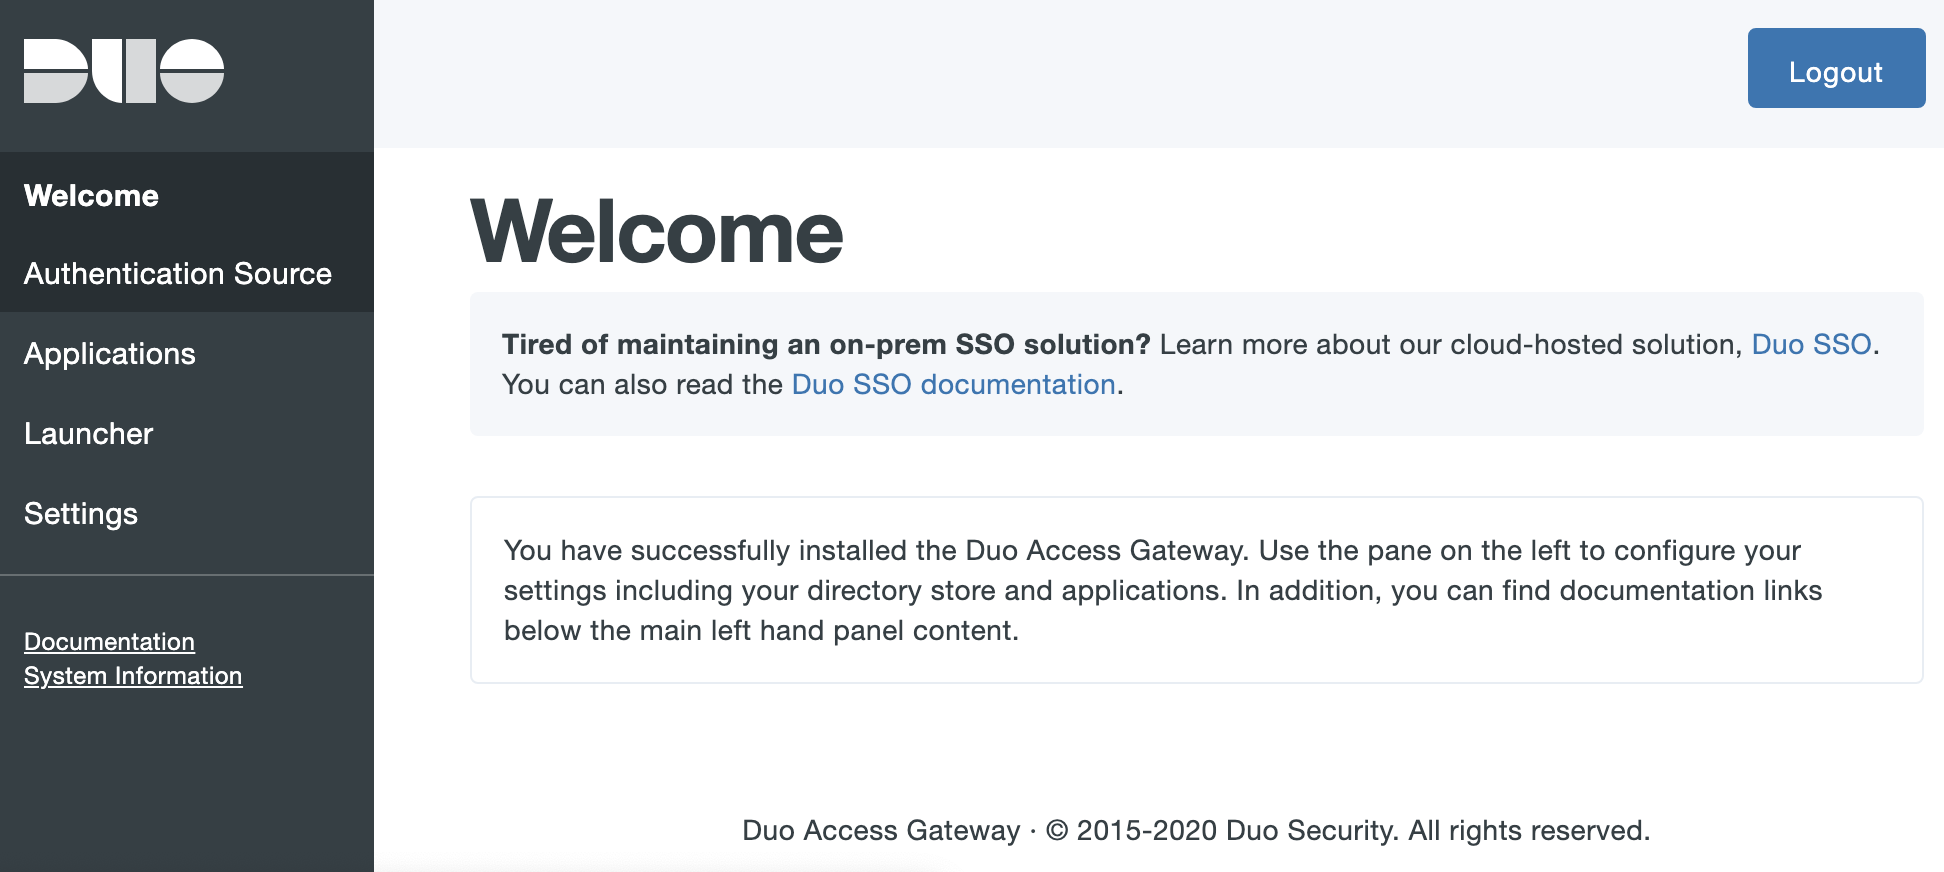
The Duo Access Gateway admin site lists all configuration options along the left.
- Applications: Add and remove cloud applications.
- Authentication Source: Configure primary authentication.
- Launcher: Enable the optional application launcher portal.
- Settings: Change global configuration options.
- Documentation: Link to the online Duo Access Gateway documentation page.
- System Information: View details about your Duo Access Gateway server, such as operating system build, fully qualified hostname, and PHP version.
Configure Your Authentication Source
Duo Access Gateway supports the following authentication sources:
- Active Directory
- OpenLDAP
- SAML IdP
- Google (OpenID Connect)
- Microsoft Azure (OpenID Connect)
-
In the Duo Access Gateway admin console, click Authentication Source. You'll notice that the Source type drop-down under Set Active Source has no options. You'll need to configure and save an authentication source before you can set one as active. Your first configured authentication source is automatically set as your active source.
-
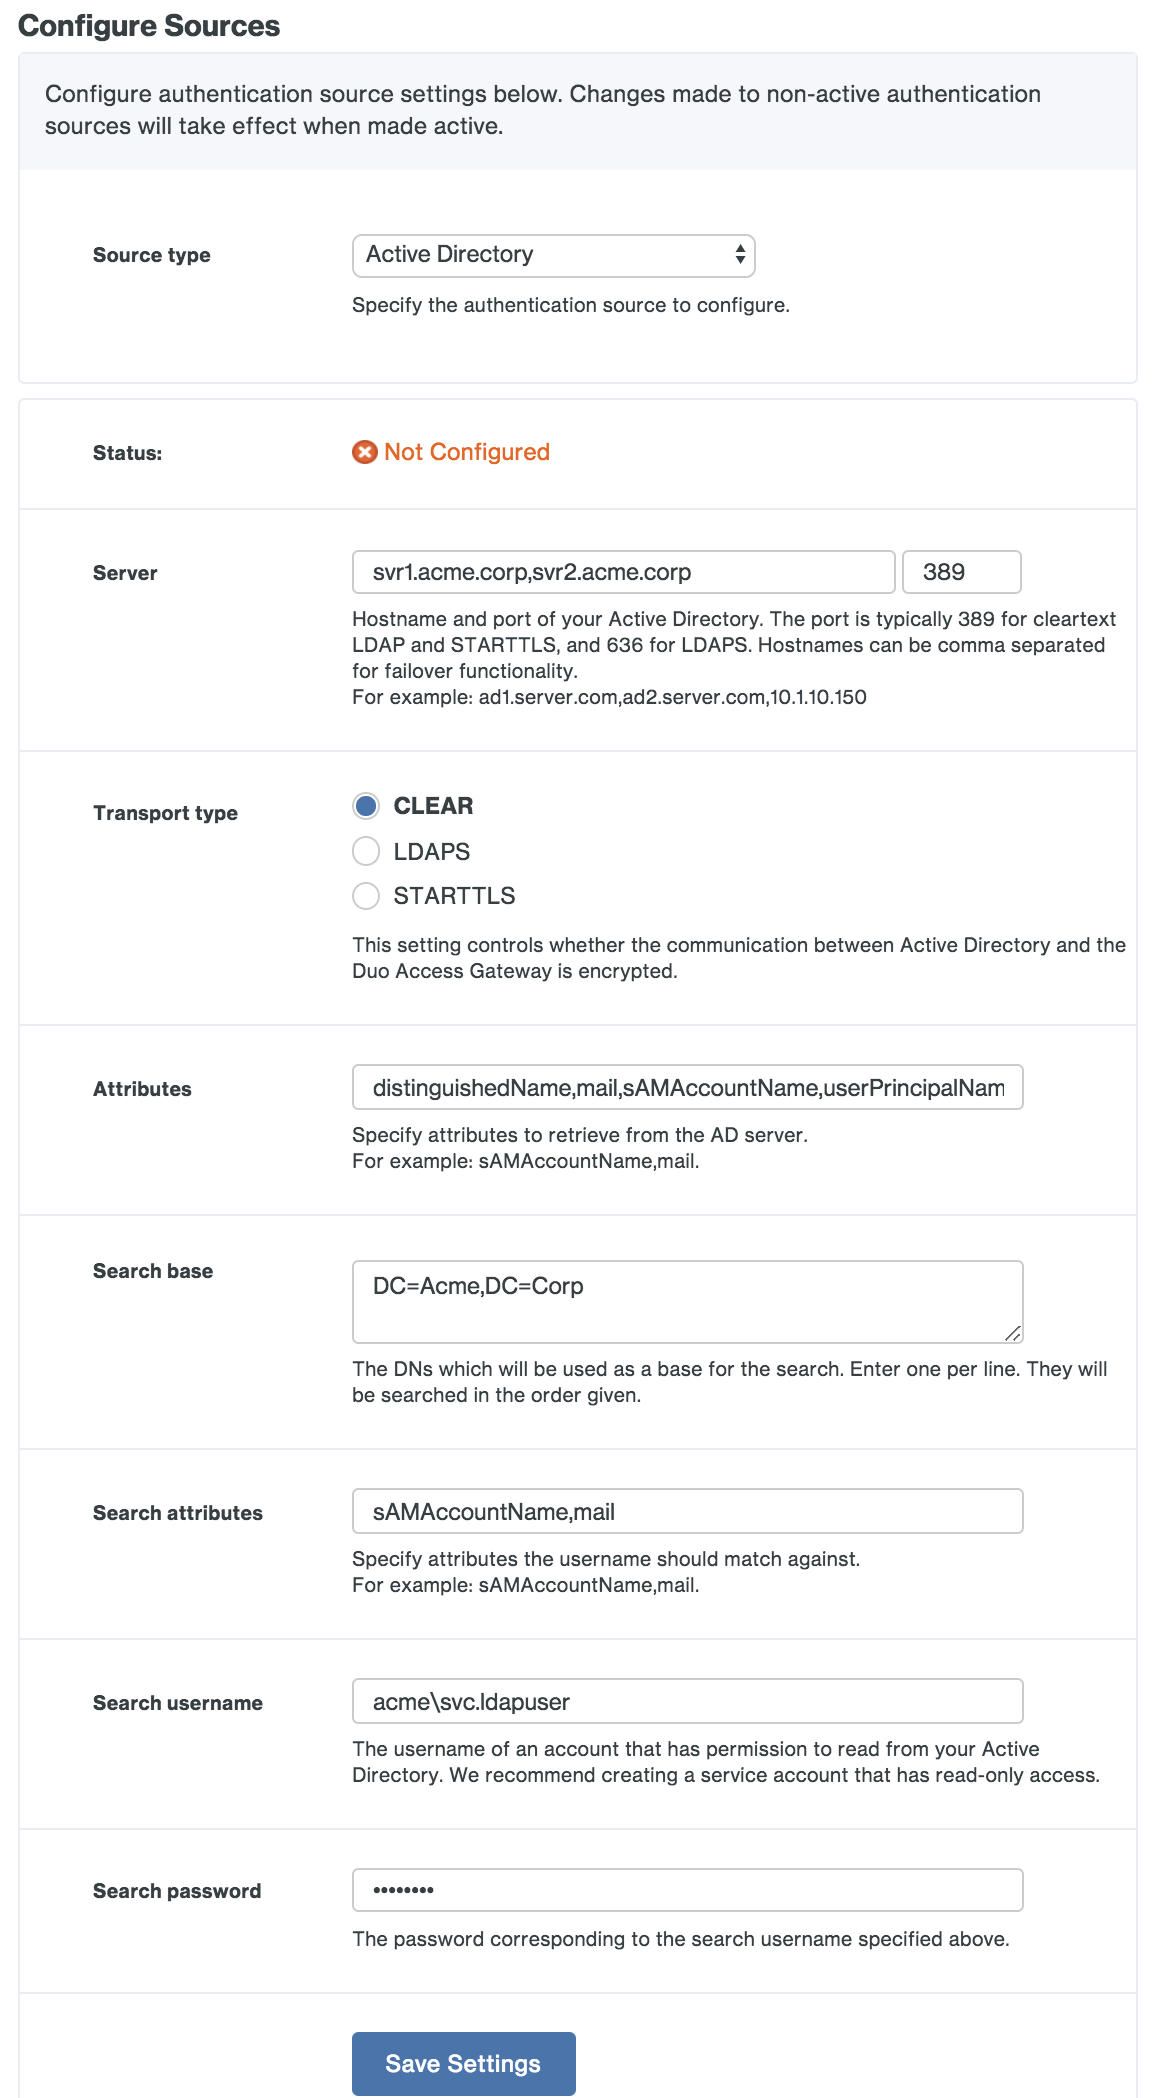
In the Configure Sources section, select your desired Source type from the drop-down and enter your configuration settings.
Active Directory
| Server | The hostname or IP address of your domain controller. If entering more than one domain controller prefix the DC hostname or IP address with ldap:// and separate the entries with commas, for example ldap://dc1.acme.corp,ldap://dc2.acme.corp. If you will be using STARTTLS or LDAPS transport types then you should specify server hostnames here that match the server hostnames in your domain controller's SSL certificate. |
| Port | Enter the port used to communicate with Active Directory. The default port for LDAP and STARTTLS is 389, while the default port for LDAPS is 636. To search the Global Catalog the default port is 3268. |
| Transport type | This determines how the connection between the Duo Access Gateway and the Active Directory server is encrypted. The default, CLEAR, is unencrypted. Select STARTTLS or LDAPS to encrypt LDAP authentication traffic. If you select STARTTLS or LDAPS you will need to provide the certificate chain for your directory server's SSL certificate as the AD Certificate. |
| AD Certificate | In order to secure LDAP connections to your AD domain server using LDAPS or STARTTLS protocols, you'll need the PEM formatted certificate from the certificate authority (CA) that issued your AD domain controller's SSL certificate. The hostname that the DC's cert was issued to should match the hostname you specified in the "Server" field. To obtain the PEM formatted version of the AD domain controller certificate's issuing CA certificate, view the "Certification Path" tab of the DC's certificate properties and double-click the issuing certificate to view it. Export the issuing CA certificate as a Base-64 encoded X.509 (CER) format. Open the issuing CA certificate you exported in a text editor. Copy the file contents (including the BEGIN and END wrapper) and paste into the SSL CA certs field on your AD domain configuration page. You may need to export all the certs in the CA (such as root CA and intermediate CA) in the certification path and paste them all into this page. It is not required that you provide the actual certificate issued to the domain controller, unless it is using a self-signed certificate (where the cert is issued to and issued by the same host). If you do use a self-signed certificate to secure communications to your domain controller, the certificate's key usage must include "Certificate Signing". |
| Attributes | Enter the AD user attributes required for SSO login. Many cloud service providers use the mail or sAMAccountname attributes. Check your service provider's SSO documentation for the specific attributes required. |
| Search base | Enter the DN that corresponds to a container or OU in your directory structure containing the user accounts for SSO. You can enter multiple DNs in this field, one per line. Example DNs: CN=Users,dc=acme,dc=corp (searches the built-in Users container), OU=Employees,OU=US,DC=acme,DC=corp (searches within an organizational unit hierarchy), OU=Users,DC=EMEA,DC=acme,DC=corp (searches an OU in a child domain) |
| Search attributes | Enter the AD attribute or attributes with values that match what users type into the Username field on the login page. Separate multiple attribute names with commas, for example sAMAccountName,mail. |
| Search username | Enter the NTLM formatted username (e.g. DOMAIN\User) of an AD domain account that has permission to bind to Active Directory and perform LDAP queries. |
| Search password | Enter the password for the search username account. |
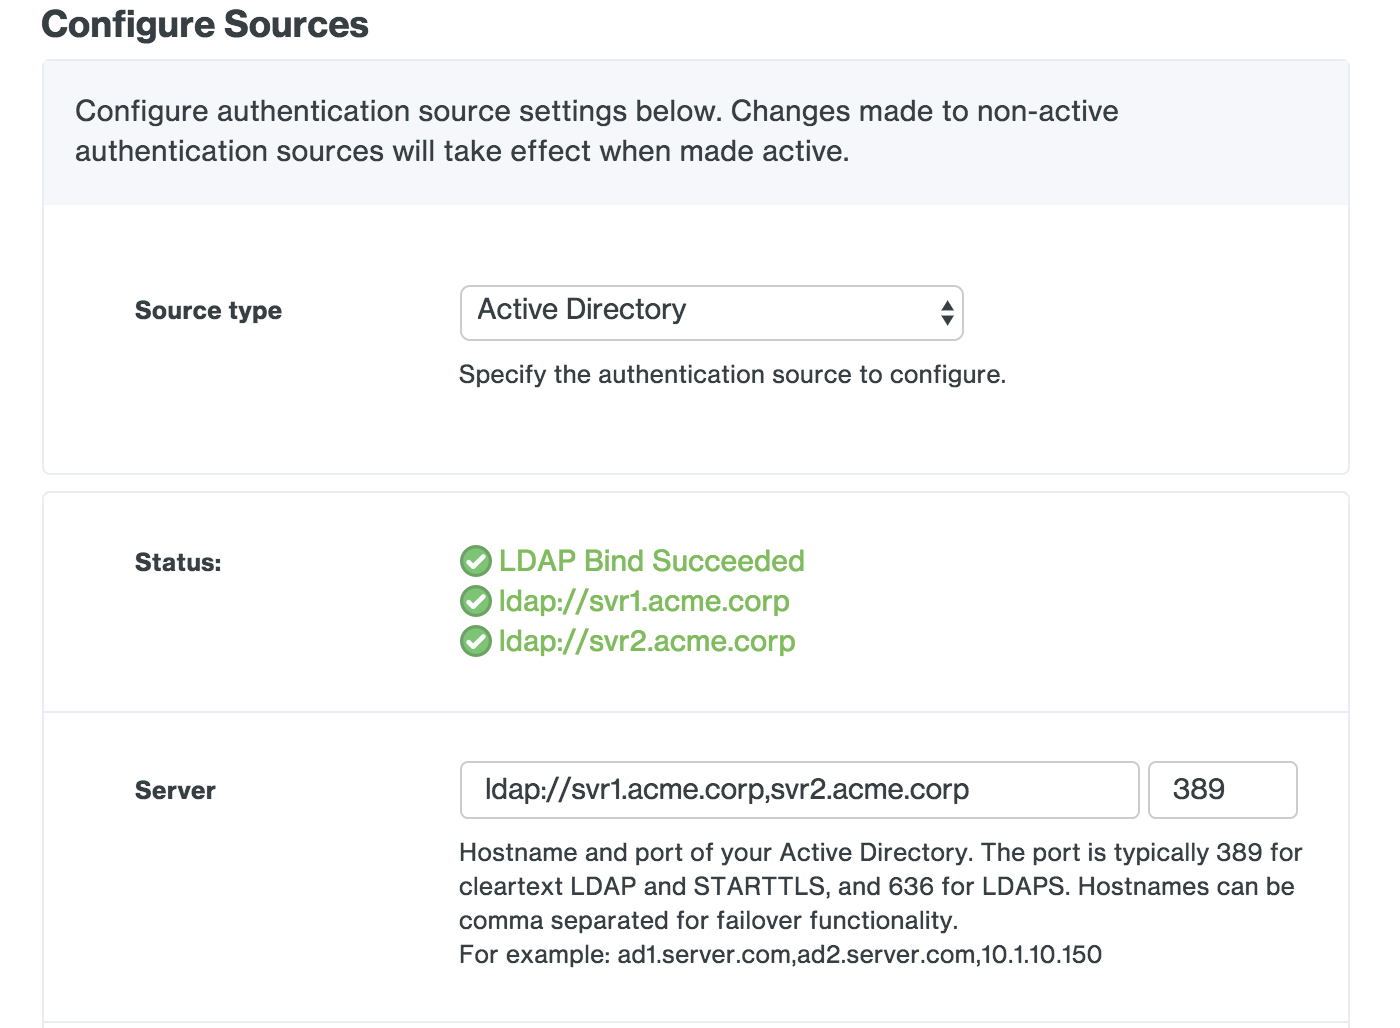
Save your Active Directory settings. If this is your first configured authentication source, Duo Access Gateway sets this as your active source and contacts the domain controller using the provided information. If this is not your first configured authentication source you'll need to set this one as the active source using the drop-down under Set Active Source to test connectivity.
If you do not see a "Bind Succeeded" message please double-check your configuration information and verify the Duo Access Gateway server has the necessary connectivity to your domain controllers.
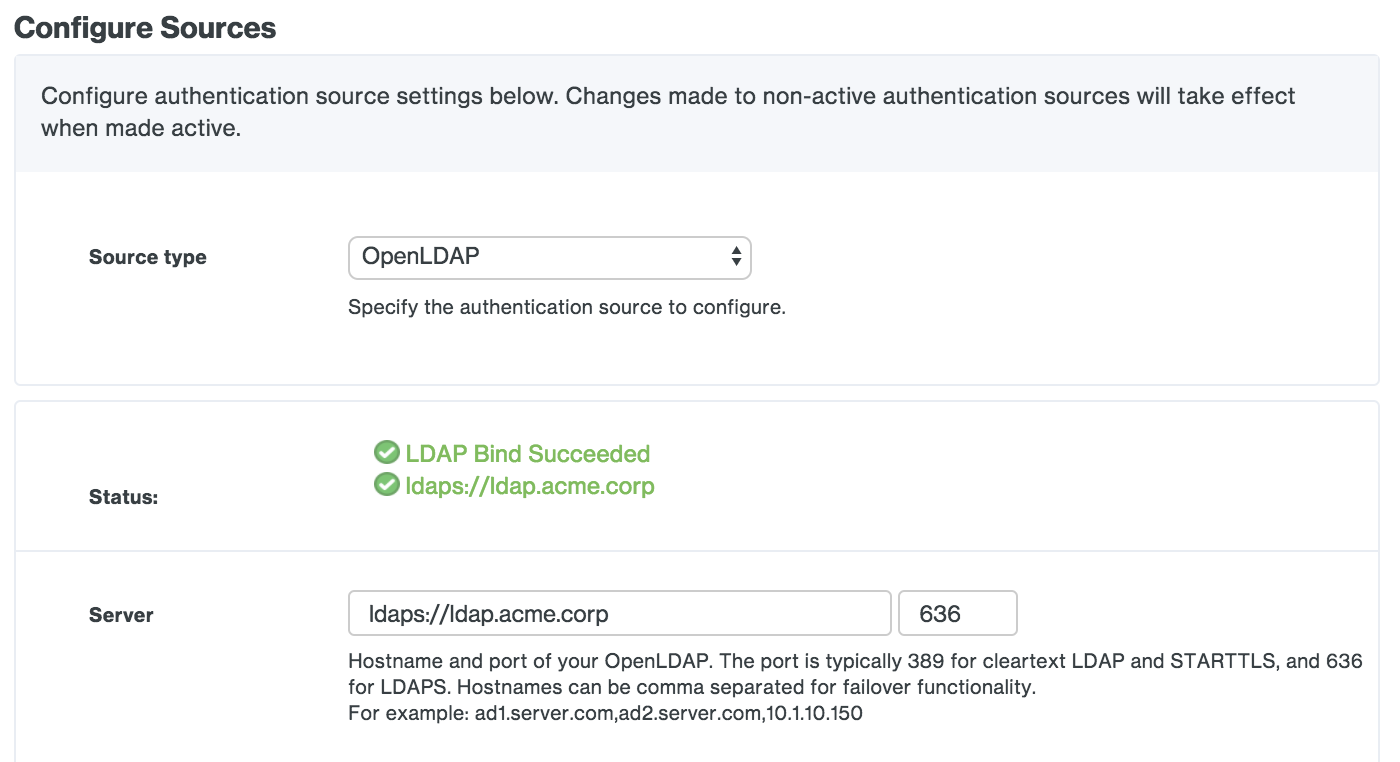
OpenLDAP
| Server | The comma-separated hostname(s) of your LDAP directory server(s). If you will be using STARTTLS or LDAPS transport types then you should specify server hostnames here that match the server hostnames in your directory server's SSL certificate. |
| Port | Enter the port used to communicate with OpenLDAP. The default port for LDAP and STARTTLS is 389, while the default port for LDAPS is 636. |
| Transport type | This determines how the connection between the Duo Access Gateway and the OpenLDAP server is encrypted. The default, CLEAR, is unencrypted. Select STARTTLS or LDAPS to encrypt LDAP authentication traffic. If you select STARTTLS or LDAPS you will need to provide the certificate chain for your directory server's SSL certificate as the Certificate. |
| Certificate | To use STARTTLS or LDAPS encryption you’ll need the certificate from your OpenLDAP directory server certificate’s issuing CA or CA chain. If you have an intermediate CA export all the certs (such as root CA and intermediate CA) in the certification path and combine them into one file using a text editor. Copy the certificate file to the Duo Access Gateway server; then click the Browse button to select the exported certificate. Additionally, the hostname that the LDAP server's cert was issued to should match the hostname you specified in the "Server" field. |
| Attributes | Enter the OpenLDAP user attributes required for SSO login. Many cloud service providers use the mail or uid attributes. Check your service provider's SSO documentation for the specific attributes required. |
| Search base | Enter the DN that corresponds to a container or OU in your directory structure containing the user accounts for SSO. You can enter multiple DNs in this field, one per line. Example DNs: ou=Employees,ou=US,dc=acme,dc=corp (searches within an organizational unit hierarchy), dc=acme,dc=corp (searches the entire domain) |
| Search attributes | Enter the LDAP attribute or attributes with values that match what users type into the Username field on the login page. Separate multiple attribute names with commas, for example uid,mail. |
| Search username | Enter the dn of an OpenLDAP service account that has permission to bind to the directory and perform LDAP queries. Example service account DN: uid=ldapuser,ou=SvcAccts,dc=acme,dc=corp |
| Search password | Enter the password for the search username account. |
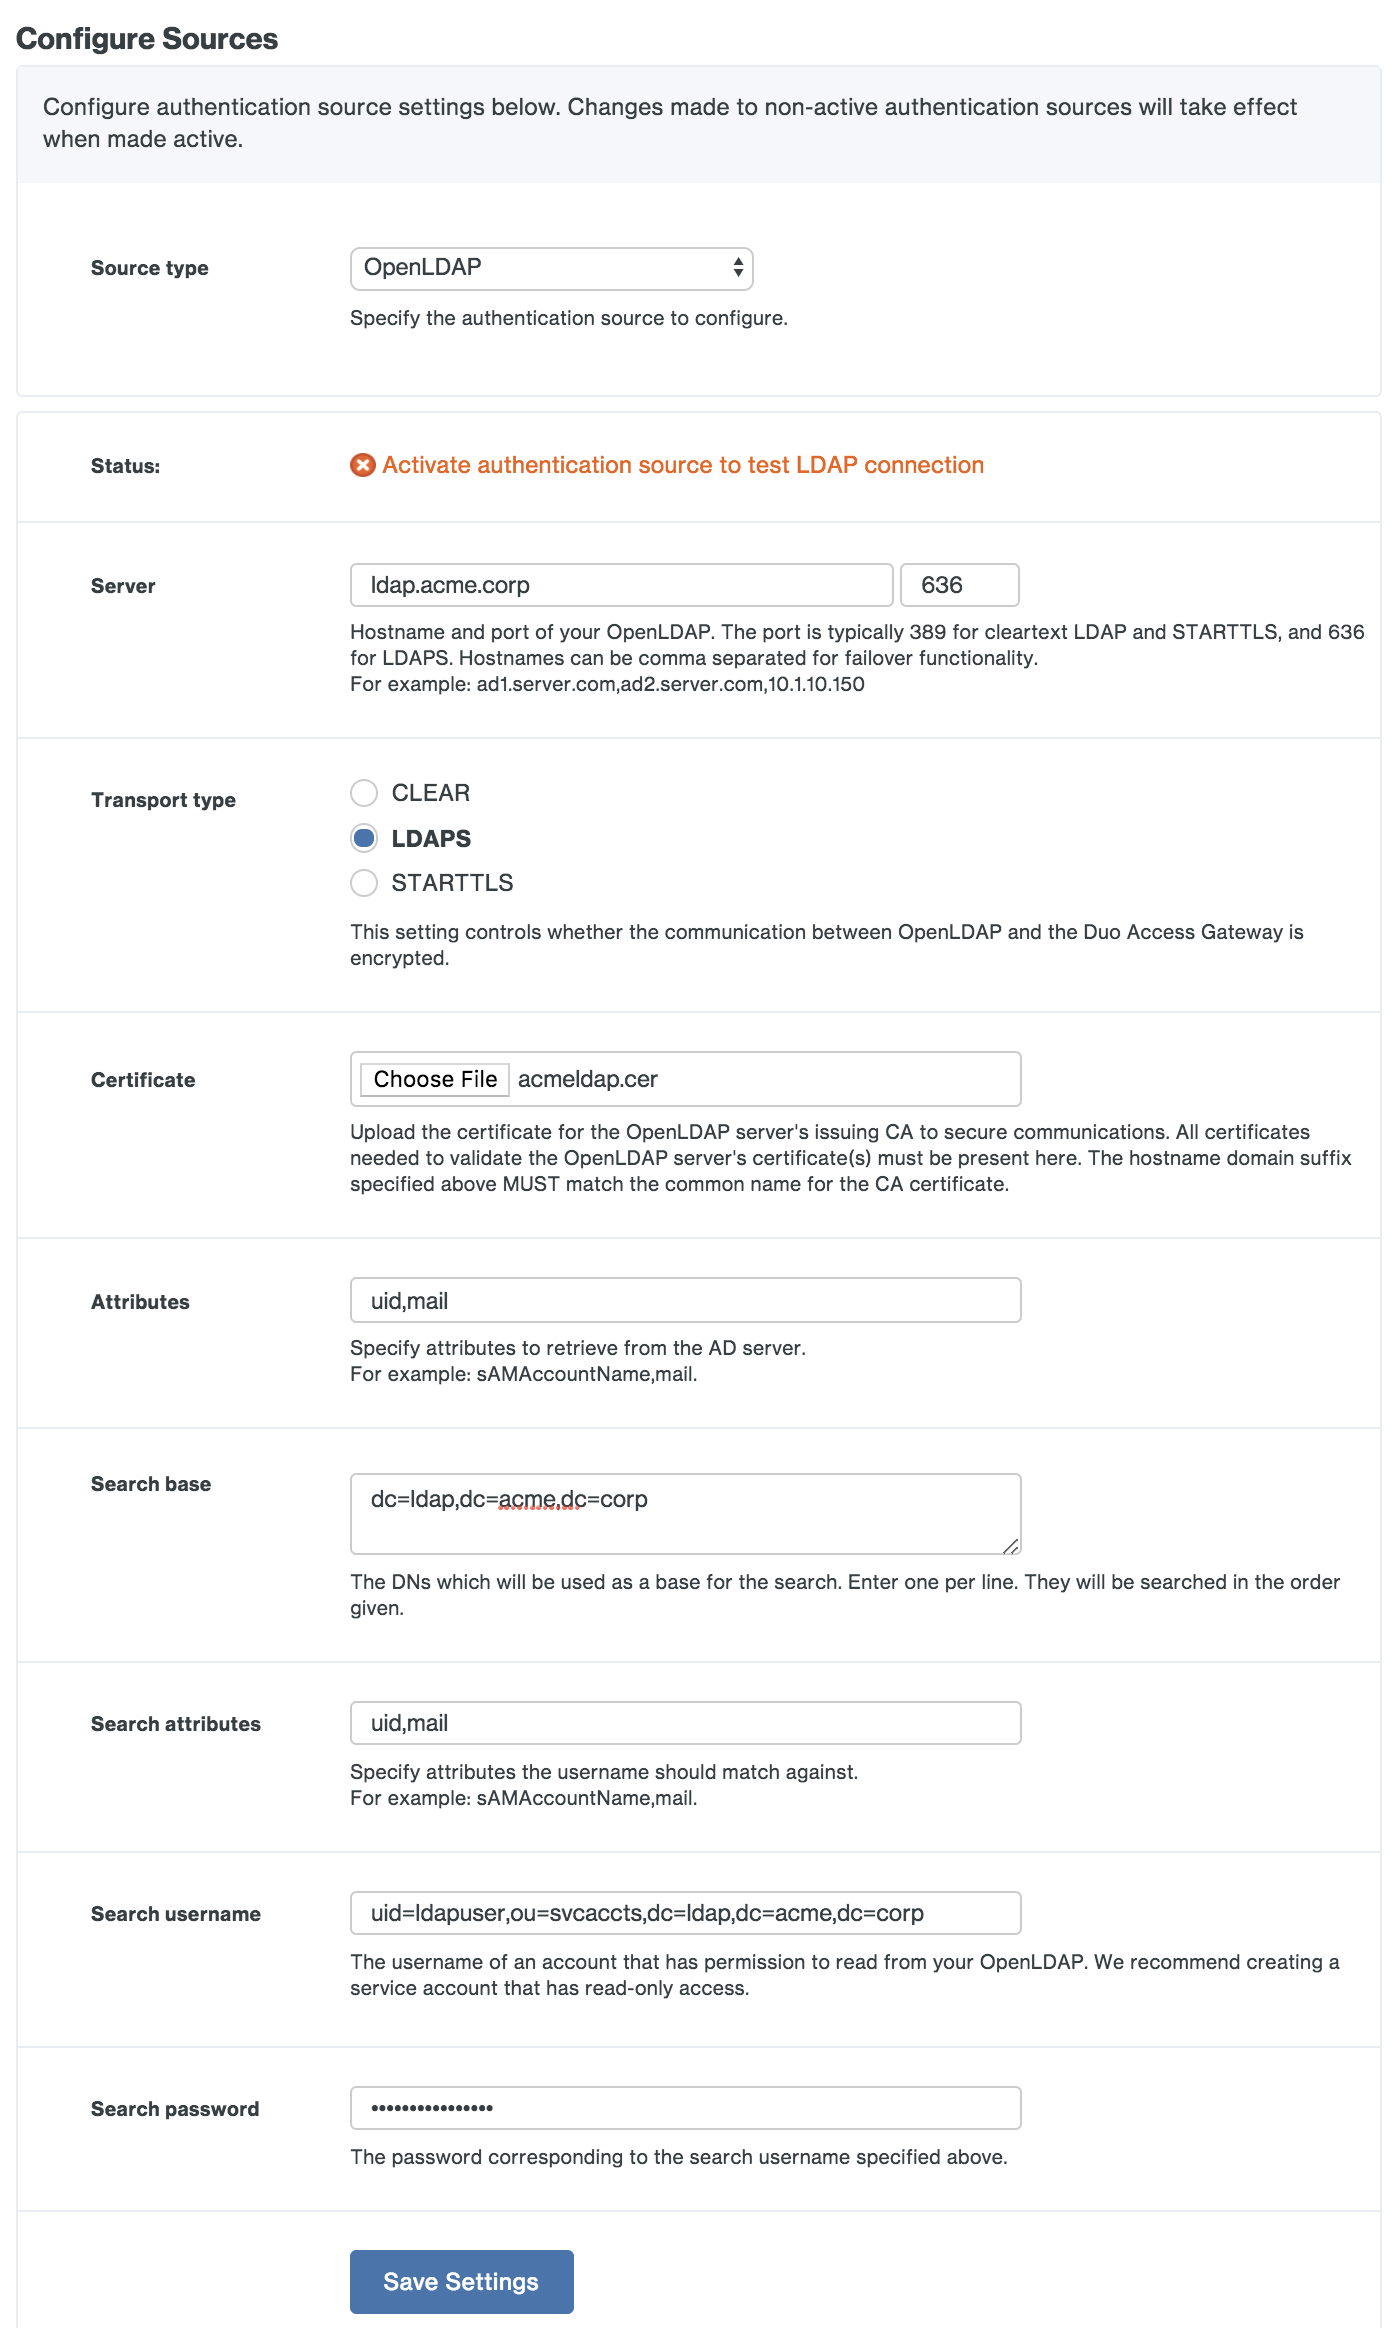
Save your OpenLDAP settings. If this is your first configured authentication source, Duo Access Gateway sets this as your active source and contacts the directory server using the provided information. If this is not your first configured authentication source you'll need to set this one as the active source using the drop-down under Set Active Source to test connectivity.
If you do not see a "Bind Succeeded" message please double-check your configuration information and verify the Duo Access Gateway server has the necessary connectivity to your directory.
SAML IdP
| Entity ID | The global, unique name for your SAML entity. This is provided by your primary authentication identity provider. |
| Single sign-on URL | The authentication URL for your identity provider. |
| Single logout URL | The logout URL for your identity provider. |
| Certificate | Download the token signing certificate for your identity provider, and then click the Browse button to select the exported certificate. |
| Duo Username Attribute | The Duo Access Gateway uses the NameID SAML attribute as the username default. If you need to use a different username attribute, check the box next to the "Specify an alternate SAML attribute to use as the Duo username instead of NameID" option, and type in your username attribute in the space provided. |
| Disable Scoping | Check this box to disable sending scoping information if you're configuring AD FS as your SAML IdP. |
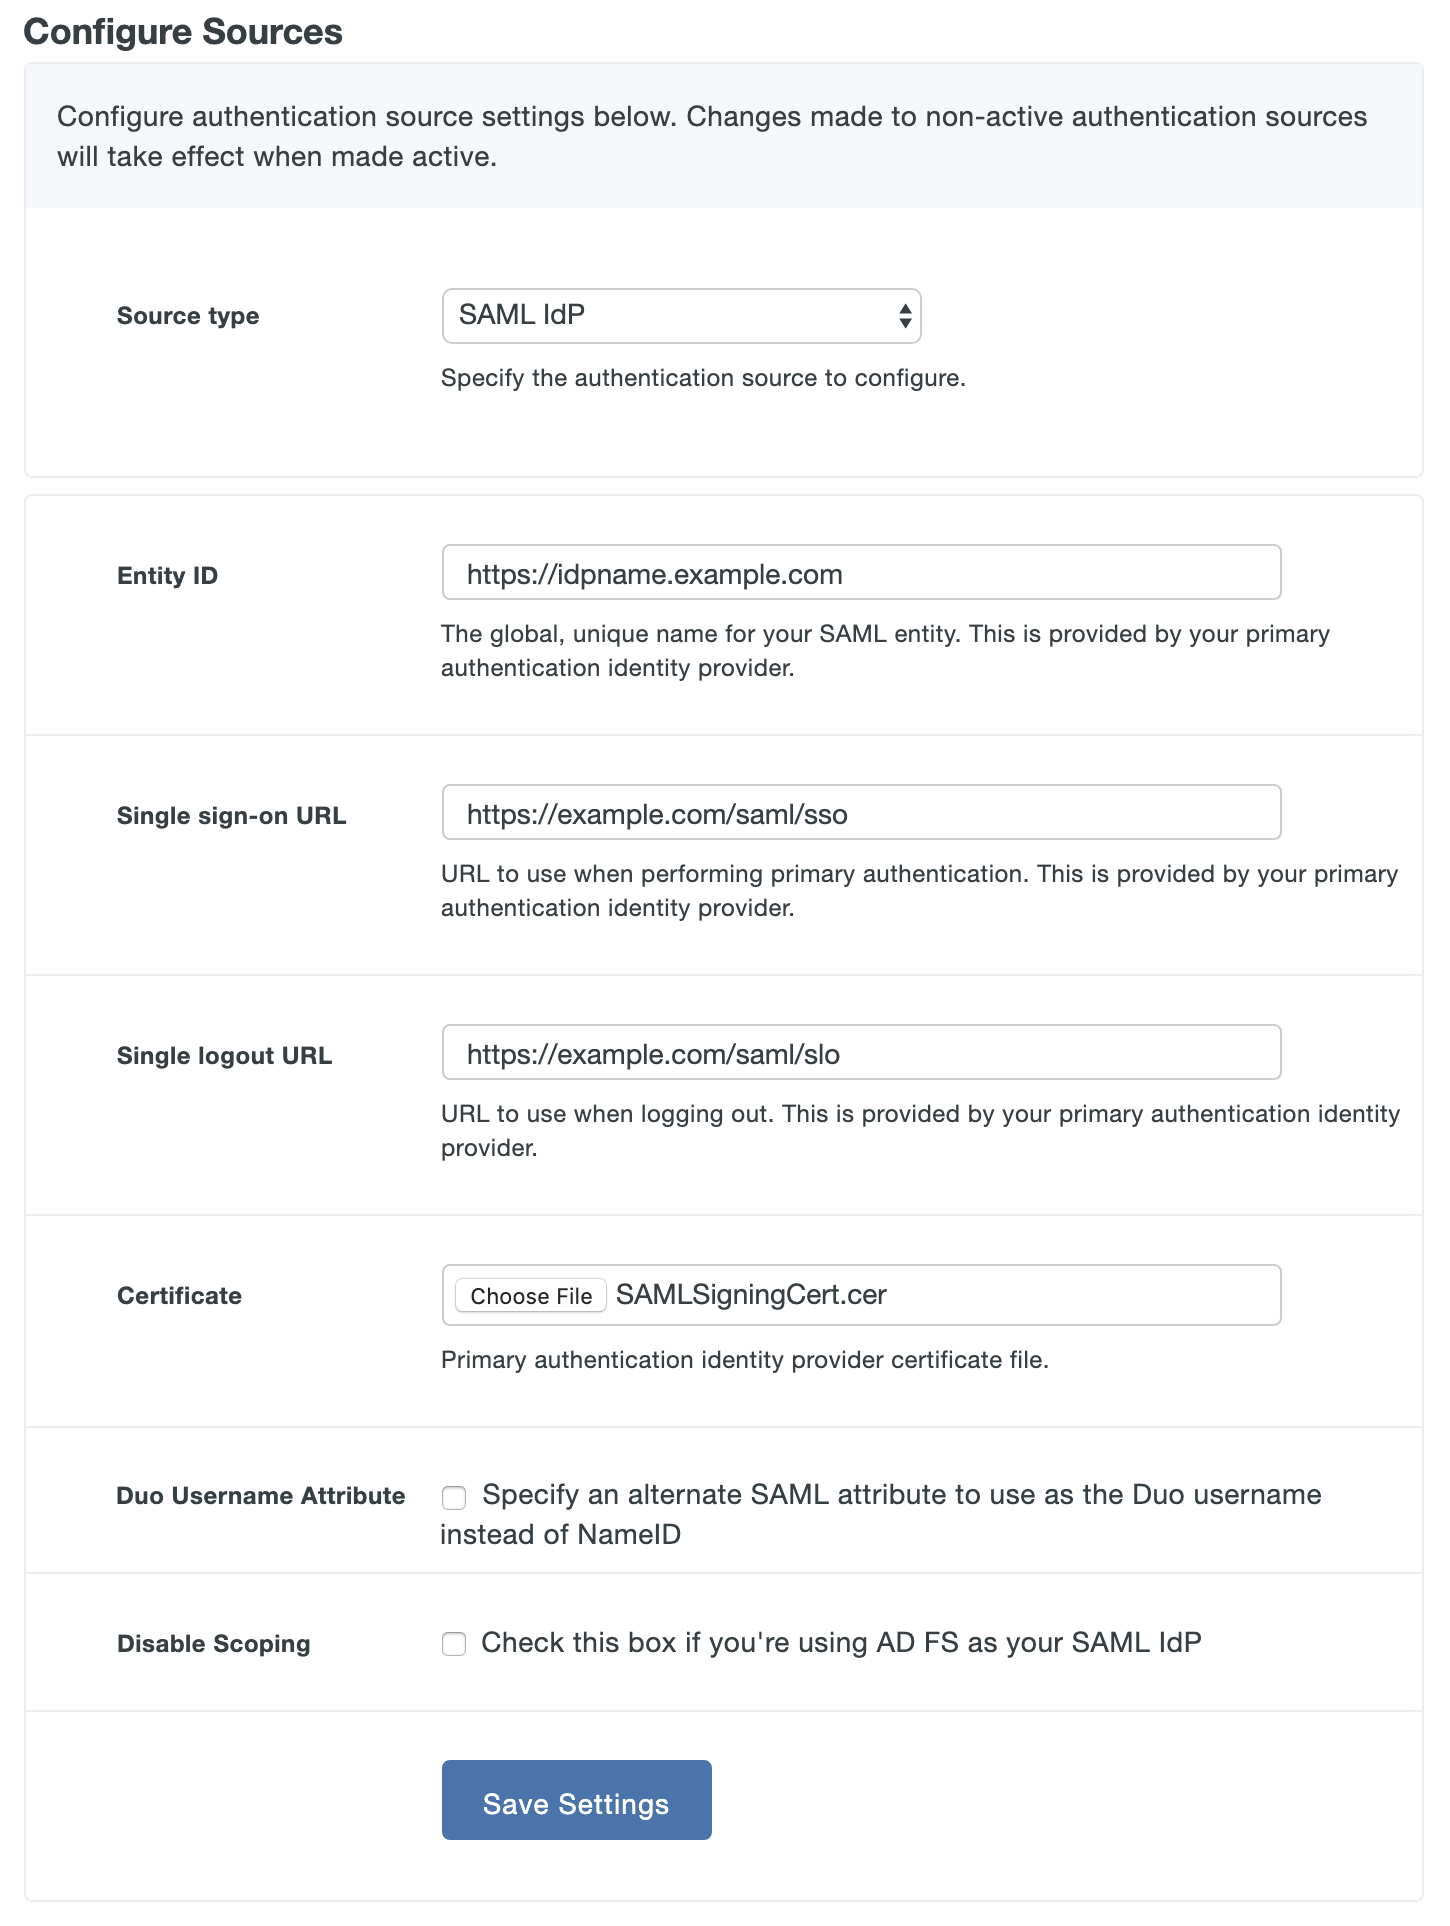
Save your SAML IdP settings.
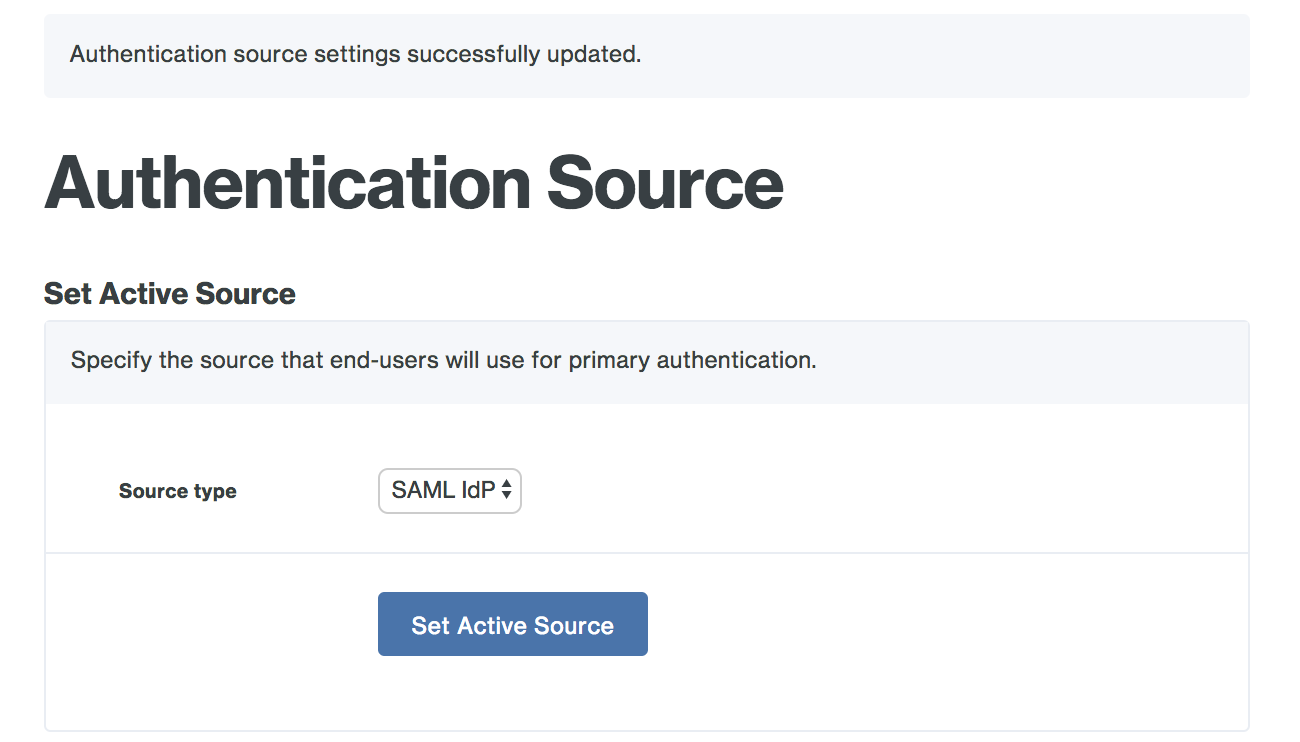
If this is your first configured authentication source, Duo Access Gateway sets this as your active source. If this is not your first configured authentication source you'll need to set this one as the active source using the drop-down under Set Active Source.
You'll need to ensure that your SAML IdP passes these attributes in its responses to the Duo Access Gateway:
| IdP Attribute | Duo Access Gateway Attribute |
|---|---|
| Email Address | |
| Username | sAMAccountName |
| First Name | givenName |
| Last Name | sn |
You will also need to provide some information about your Duo Access Gateway server to your SAML IdP provider. You can find this information in the "Metadata" section at the bottom of the SAML IdP authentication source configuration page in the Duo Access Gateway console.
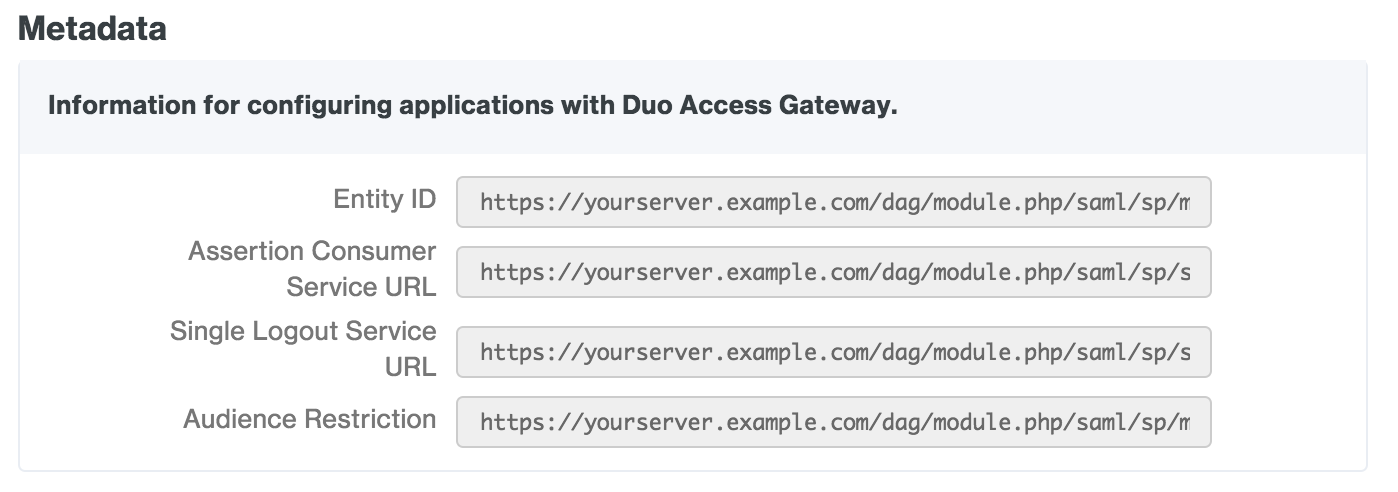
Google (OpenID Connect)
Before you can configure Google OpenID Connect as an authentication source you'll need to create an OAuth project in Google and collect some information to input into the Duo Access Gateway configuration page.
-
Log in to the Google Developers Console as an administrator for your Google Workspace account.
-
If you do not already have an active project, click the Create Project button to create a new one. Give the new project a name and click Create. The page refreshes after creating your new project. You can also use an existing project.
-
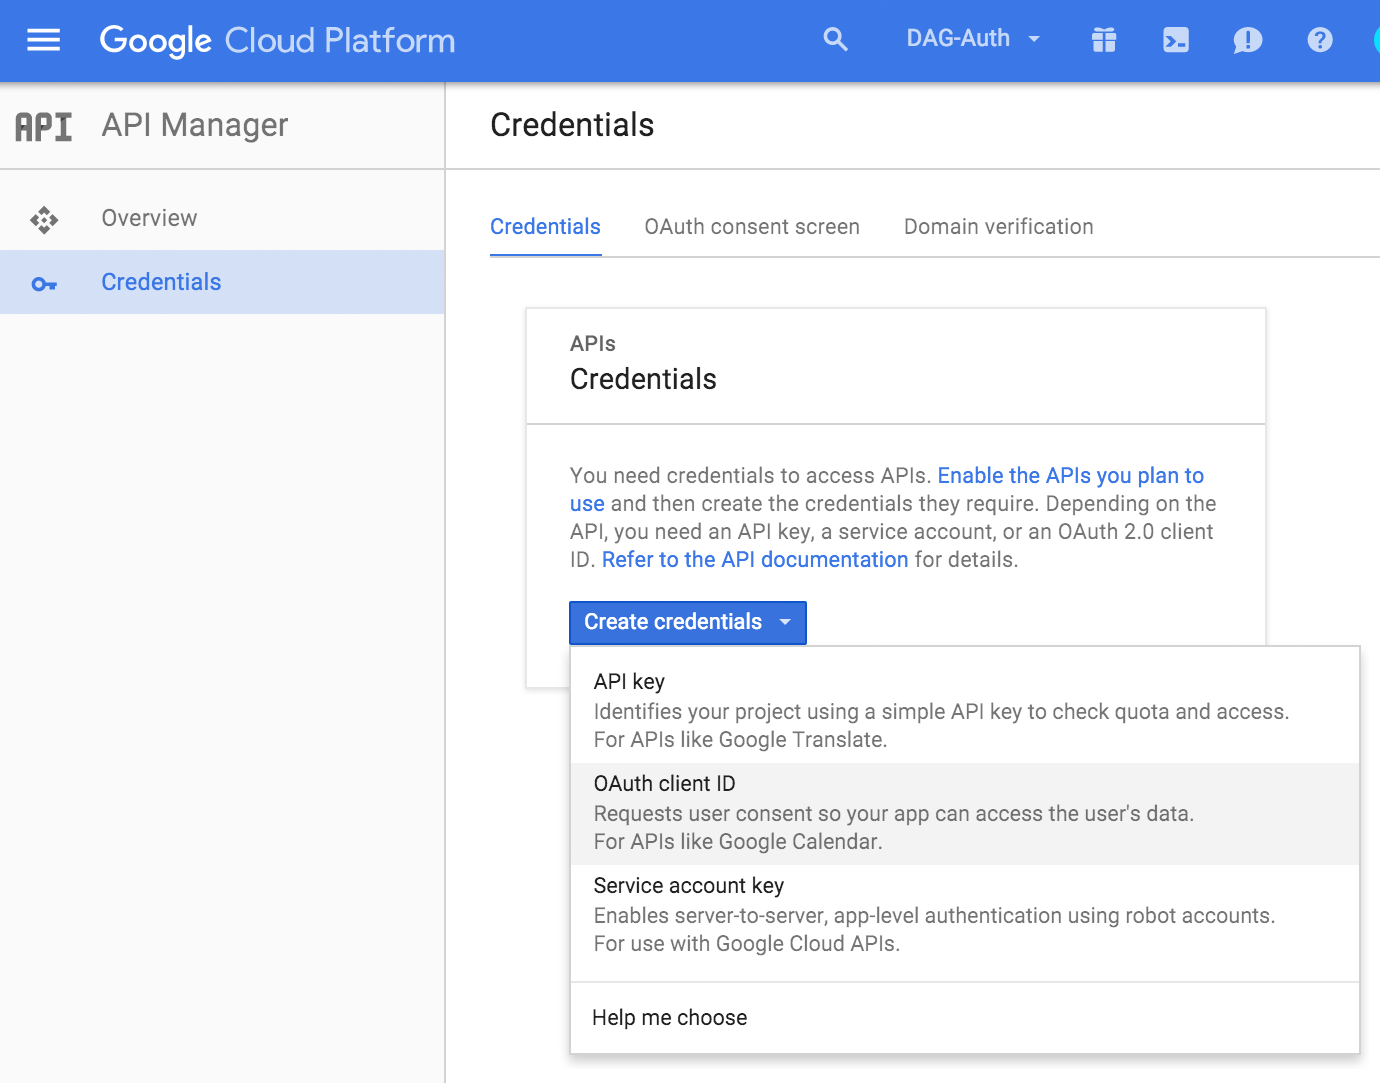
Click the Enable and manage APIs link on the Dashboard. Once in the API Manager, click Credentials on the left, then click the Create credentials button and select OAuth client ID from the list.
-
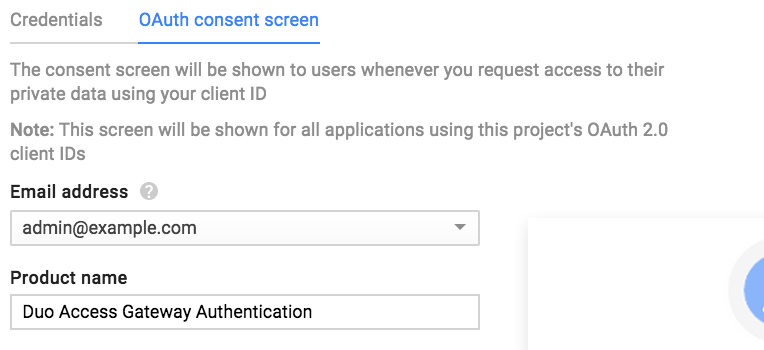
If you created a new project you may need to first click Configure consent screen and enter a Product Name on the "OAuth consent screen" properties page. Click Save to return to the "Create client ID" page.
-
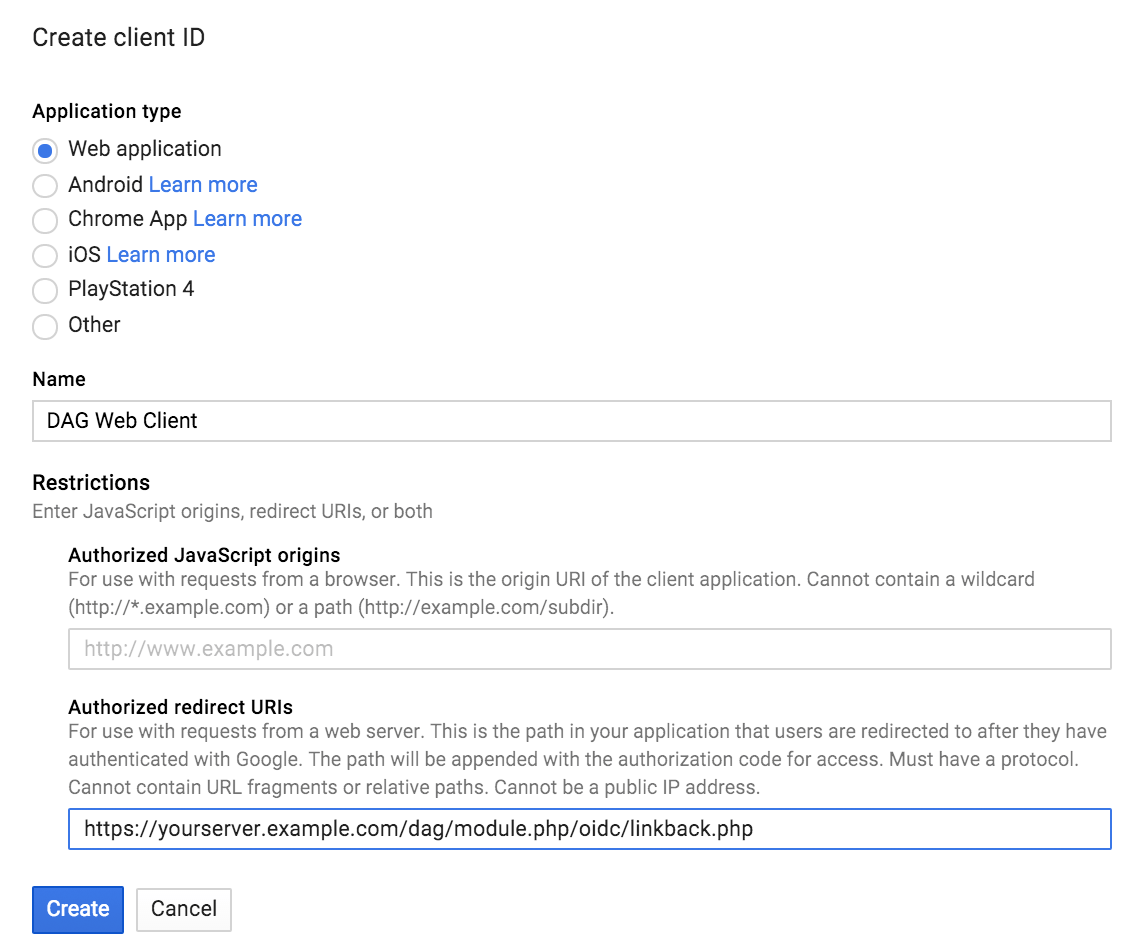
On the "Create client ID" page select Web application. Enter a descriptive Name for the new web client ID, and then enter the redirect URI for your Duo Access Gateway server (for example, https://yourserver.example.com/dag/module.php/oidc/linkback.php, replacing "yourserver.example.com" with the FQDN of your Duo Access Gateway server). You can find this in the "Metadata" section at the bottom of the Google (OpenID Connect) authentication source configuration page in the Duo Access Gateway console.

After pasting in the information click Create.
-
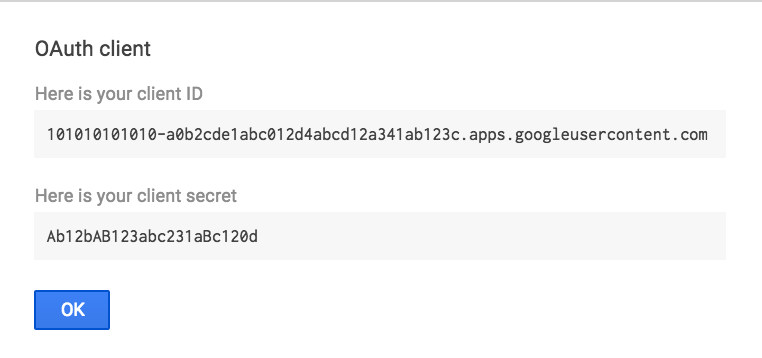
Make note of your client ID and client secret values. You'll need to enter these in the Duo Access Gateway admin console.
-
Return to the Duo Access Gateway admin console and enter the following information for the Google (OpenID Connect) authentication source.
Setting Value Domain Enter your organization's Google Workspace domain. Client ID Enter the Google OAuth web application client ID from the Google Developers Console. Client Secret Enter the Google OAuth web application client secret from the Google Developers Console. 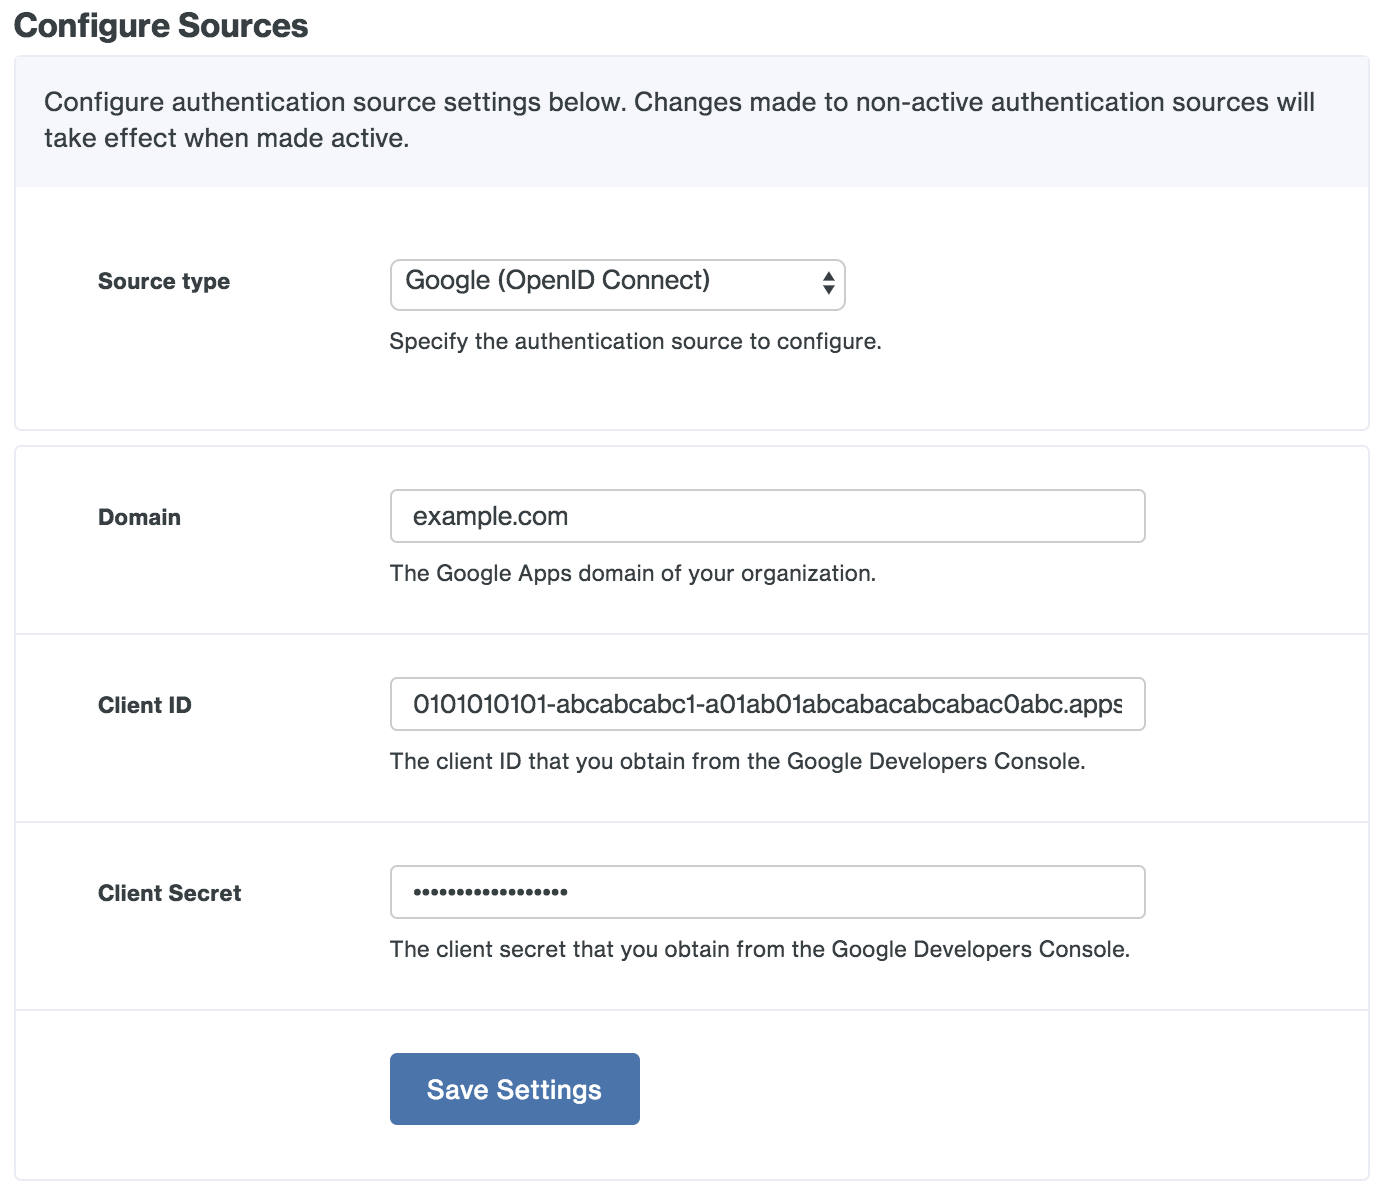
-
Save your Google (OpenID Connect) settings. If this is your first configured authentication source, Duo Access Gateway sets this as your active source. If this is not your first configured authentication source you'll need to set this one as the active source using the drop-down under Set Active Source.
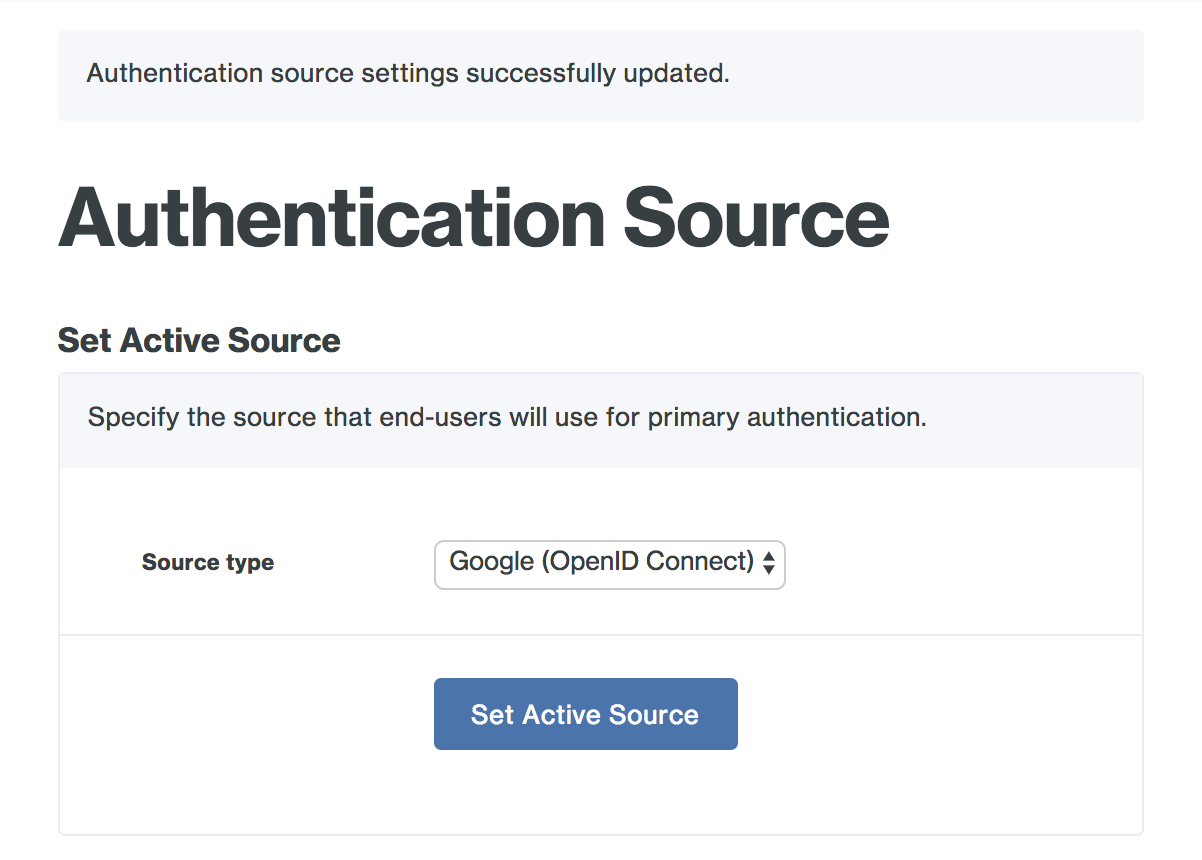
For more information about Google OpenID Connect and Google's OAuth 2.0 APIs please see Google's OpenID Connect guide.
Microsoft Azure (OpenID Connect)
In order to use the Duo Access Gateway with Azure Active Directory (now known as Microsoft Entra ID) the Azure domain must be synced with an on-premises Active Directory domain so that the "mail" attribute is populated, or the Azure domain users must be provisioned with an Office 365 email address.
Before you can configure Azure OpenID Connect as an authentication source you'll need to create an Azure Active Directory web application in Azure and collect some information to input into the Duo Access Gateway configuration page.
-
Enter your Azure organization's email domain on the Duo Access Gateway Azure (OpenID Connect) authentication source configuration page as the Domain.
-
Log in to the Microsoft Azure Administrator console as an Azure AD administrator.
-
Click Azure Active Directory on the left and then click on the Azure Active Directory domain you want to use with the Duo Access Gateway.
-
Click on App registrations in the "Manage" section of your Azure domain's blade.
-
Click New registration.
-
Enter a descriptive name for the application and select Accounts in this organizational directory only under "Supported account types".
-
Under "Redirect URI (optional)" set the drop-down to Web. Locate the Sign-On URL in the "Metadata" section at the bottom of the Microsoft Azure (OpenID Connect) authentication source configuration page in the Duo Access Gateway console. This will look like https://yourserver.example.com/dag/module.php/oidc/linkback.php, where "yourserver.example.com" is the FQDN of your Duo Access Gateway server.

Copy the url and paste it into the text field in Azure next to the Web drop-down.
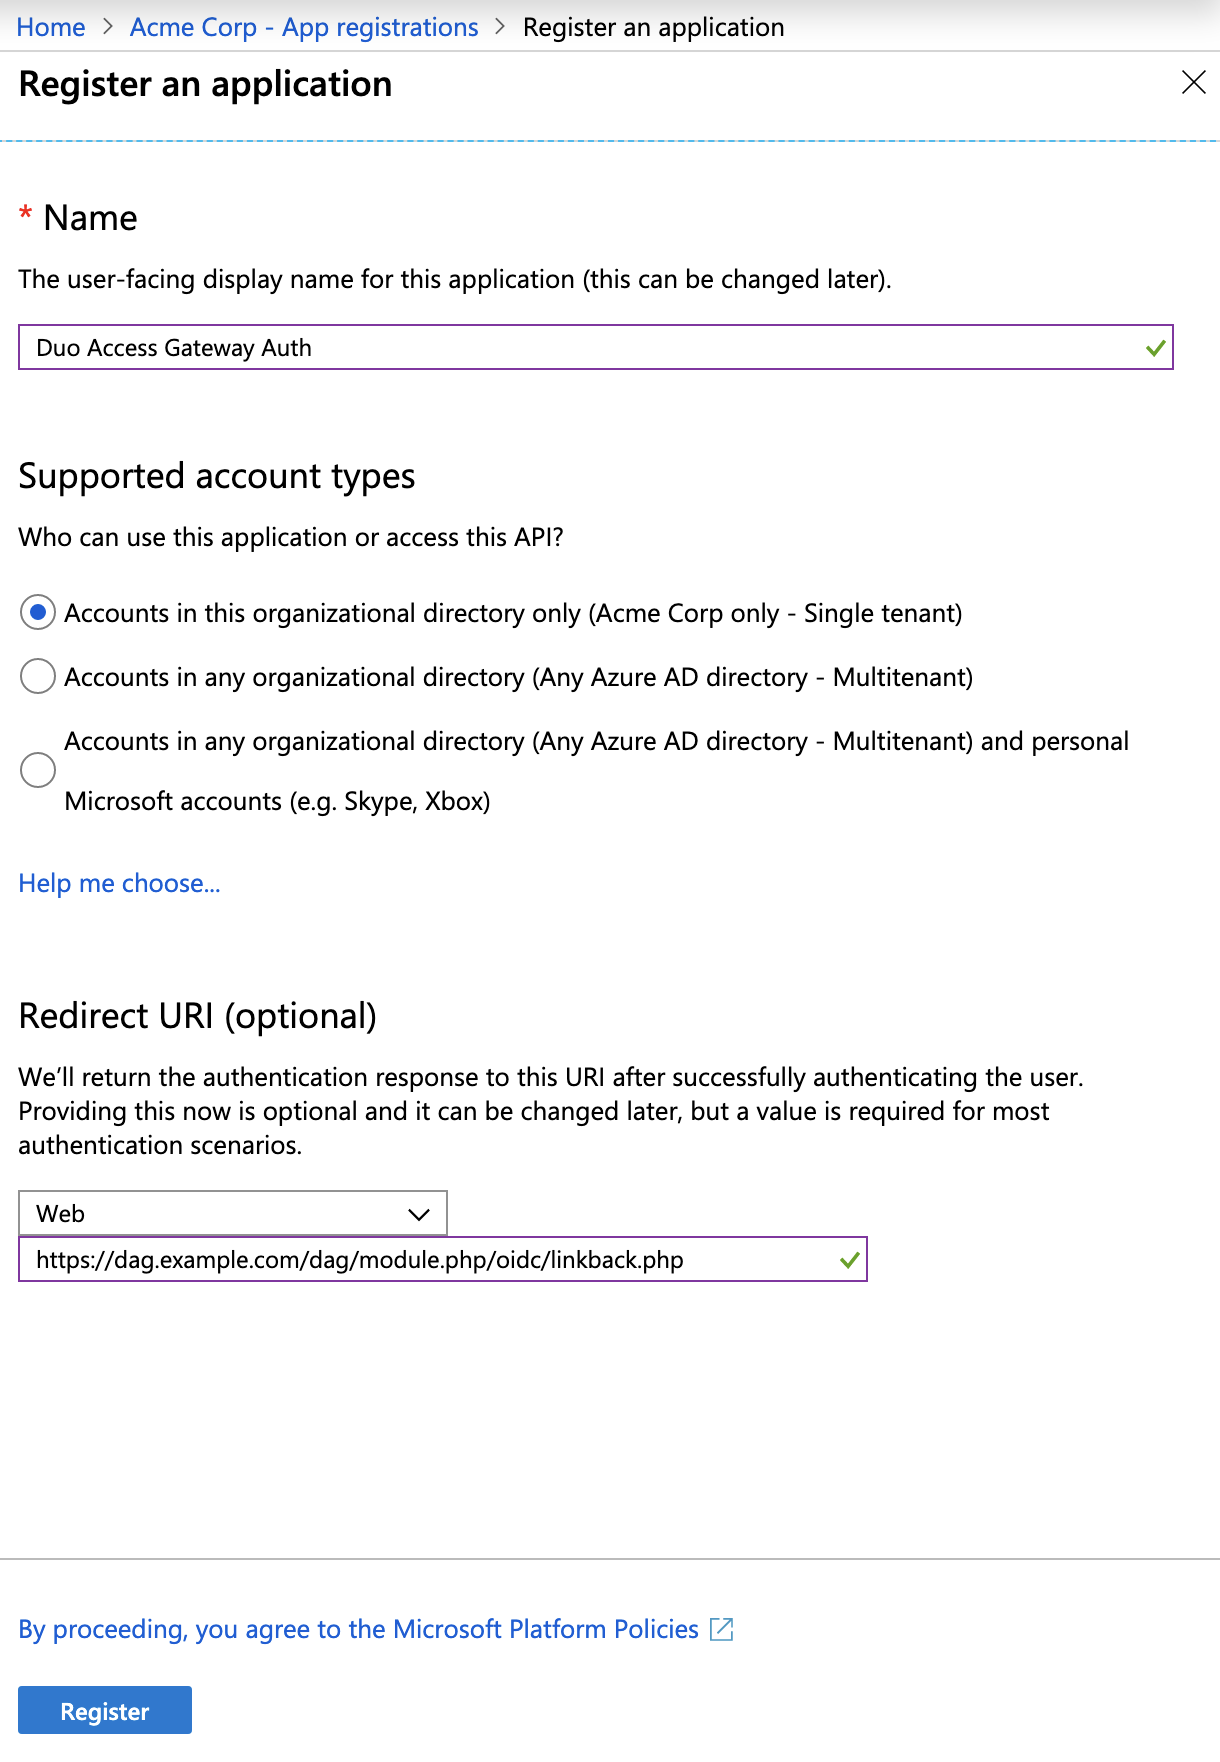
After entering all information click Register to complete new app registration.
-
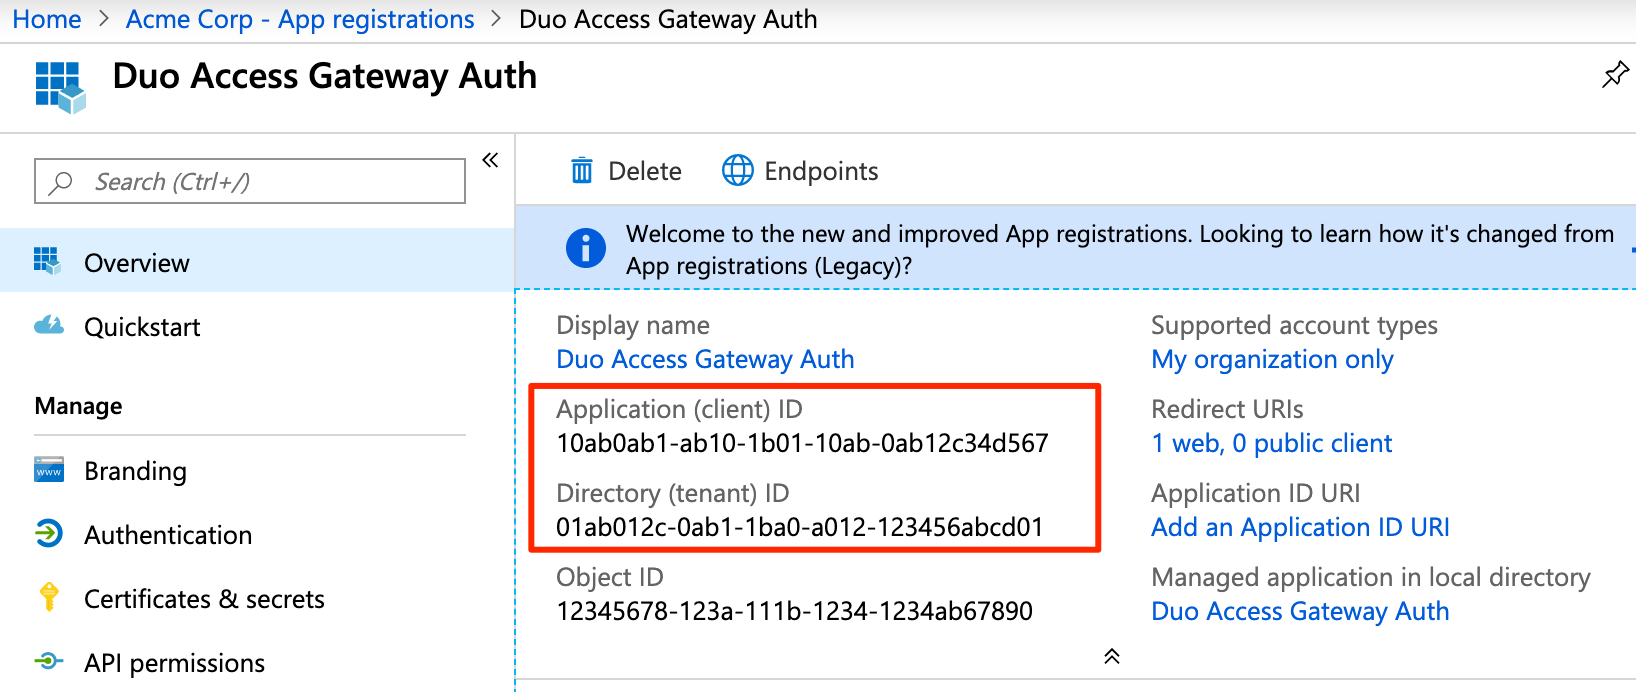
Locate the Application (client) ID for your newly registered app. Copy this and paste it into the Duo Access Gateway admin portal as the Azure Client ID.
-
Locate the Directory (tenant) ID for your Azure AD domain, copy it, and paste it into the Duo Access Gateway admin portal as the Azure Tenant ID.
-
Click Add an Application ID URI under "Application ID URI" on the Overview blade.
-
At the top of the "Expose an API" click Set next to Application ID URI. Copy the Sign-On URL from the Duo Access Gateway's "Metadata" section again, and paste it into Azure as the App ID URI. Click Save.

-
Click Certificate & secrets in the "Manage" section of your Azure domain's blade.
-
Under "Client secrets" click New client secret. In the Description leave a comment then under "Expires" select Never. This creates a new key, but the key value is hidden until you save your changes. Click Add.
-
The new key's value is shown after you save. Copy the VALUE and paste it into the Duo Access Gateway admin portal as the Azure Key.

This is your only chance to view the key value! If you leave this blade before entering the key value into the Duo Access Gateway, then you can't view the same key's value again and you'll have to create a new one.
-
Return to the Duo Access Gateway admin console and verify that you've entered the following information for the Azure (OpenID Connect) authentication source.
Tenant ID The Directory ID of your Azure Active Directory domain. Client ID The Application ID for the Azure registered app you created for the Duo Access Gateway. Key The key value from the Azure registered app you created for the Duo Access Gateway. 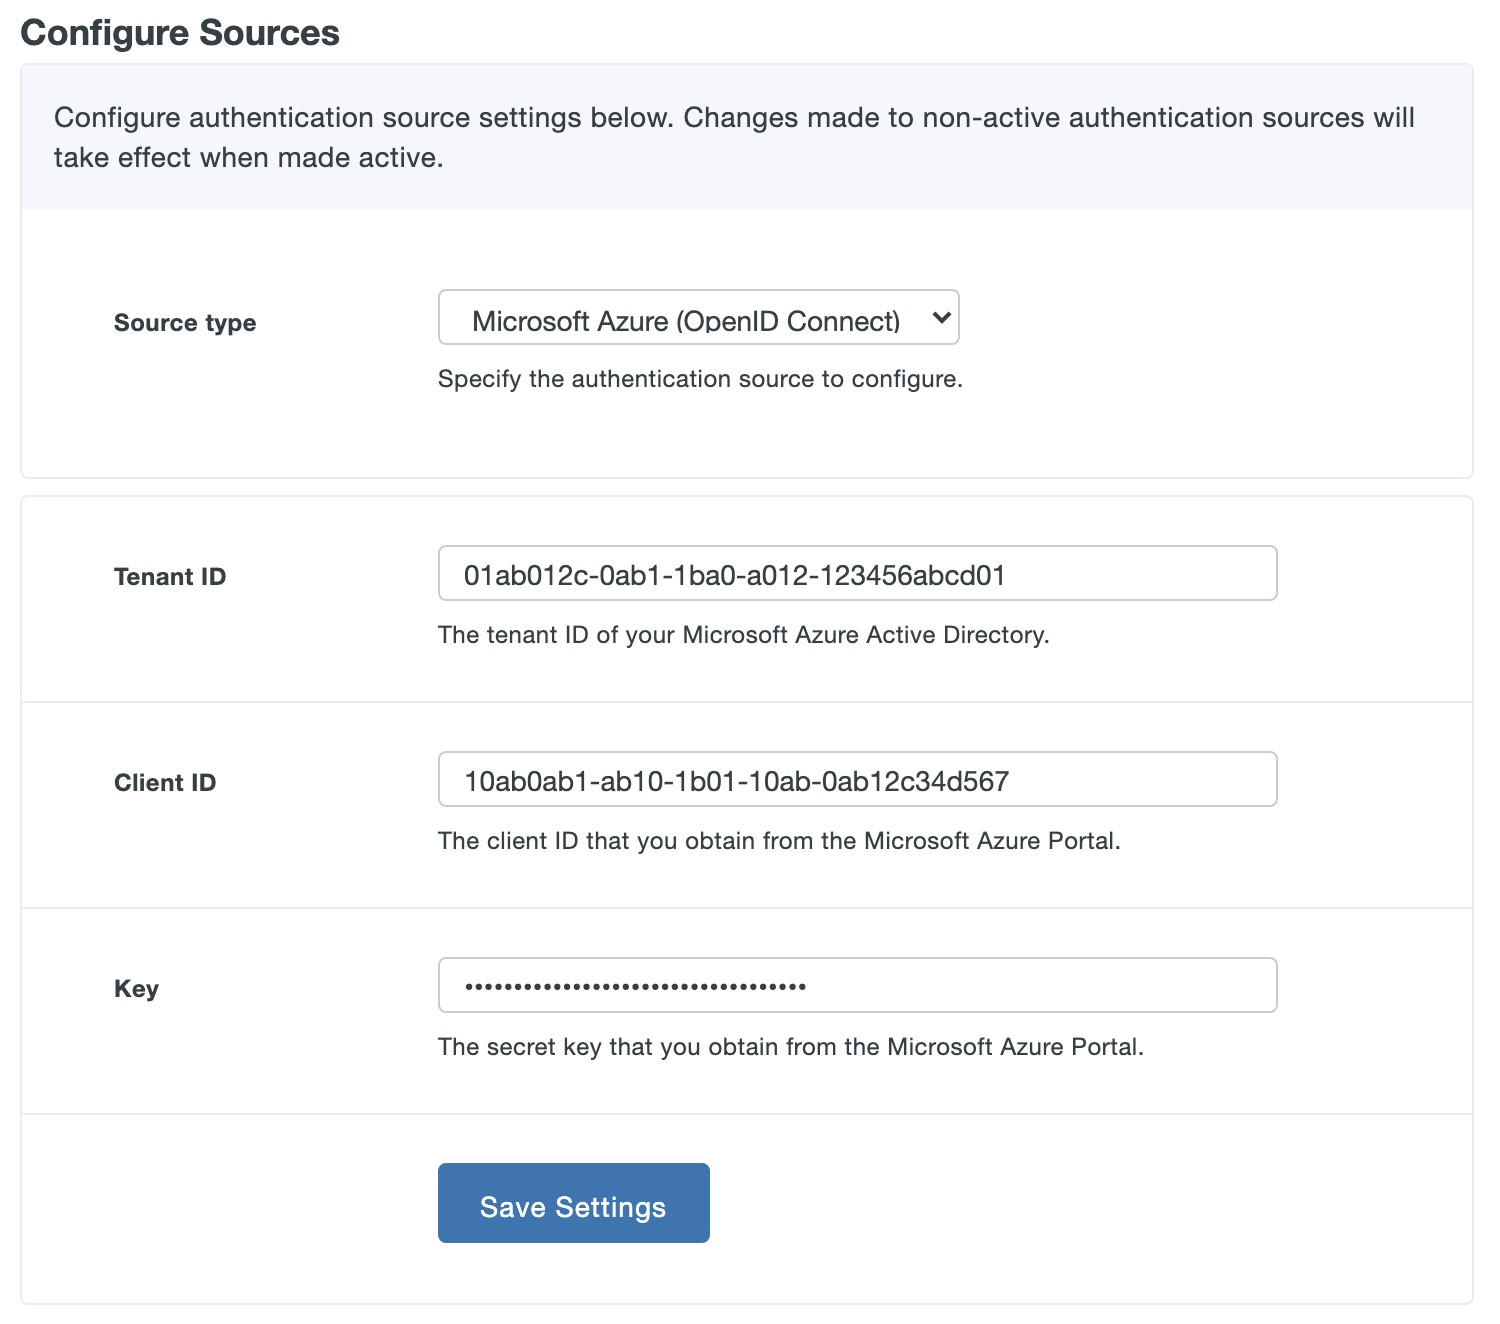
-
Save your Microsoft Azure (OpenID Connect) settings. If this is your first configured authentication source, the Duo Access Gateway sets this as your active source. If this is not your first configured authentication source you'll need to set this one as the active source using the drop-down under Set Active Source.
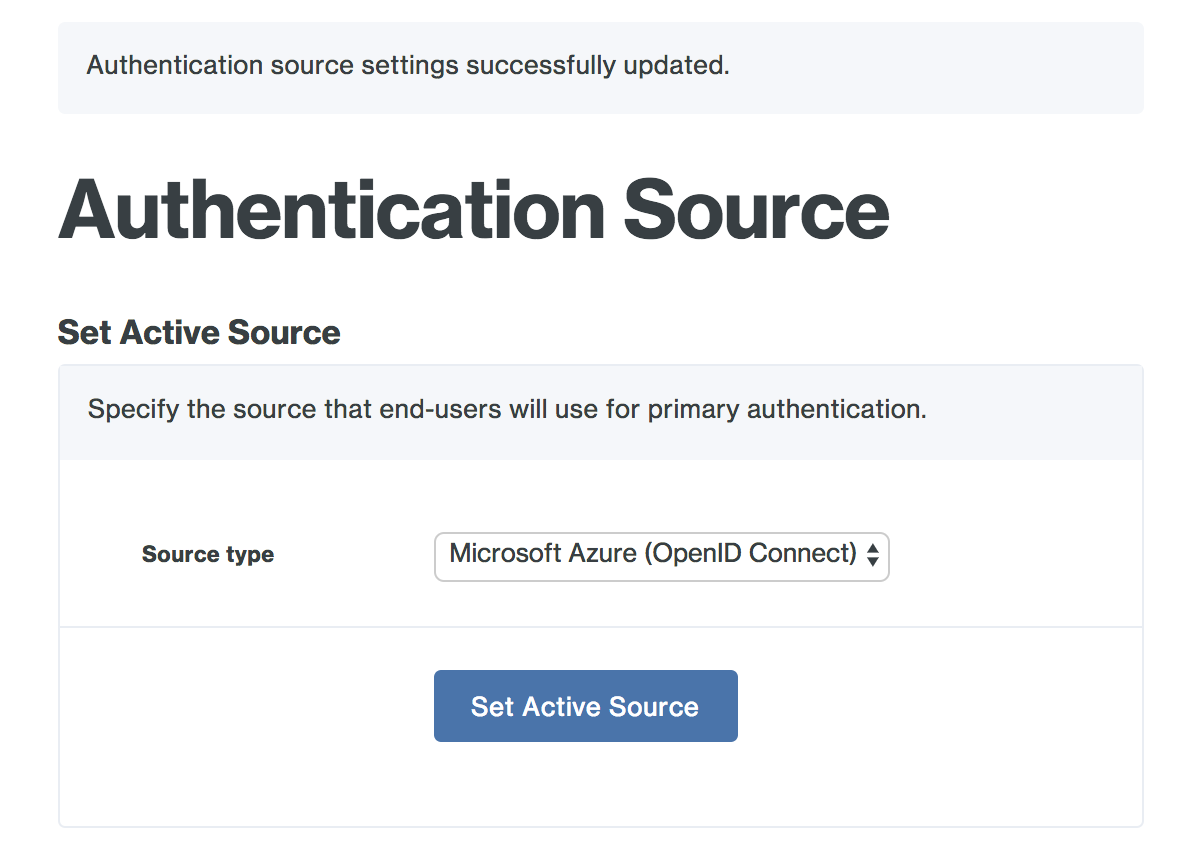
For more information about Microsoft Azure apps please see Integrating applications with Azure Active Directory.
Additional Settings
Fail Mode
The fail mode determines whether to permit or deny user logons if the Duo Access Gateway server is unable to contact Duo’s service. If the fail mode is safe, users who successfully pass primary authentication may access the cloud application without completing two-factor authentication. If the fail mode is secure then DAG requires that all users perform 2FA. If the user's client browser or application is then able to contact Duo and complete two-factor authentication then users proceed to the application or to the DAG Launcher page. If the user's client also cannot contact Duo for 2FA, then the user cannot continue.
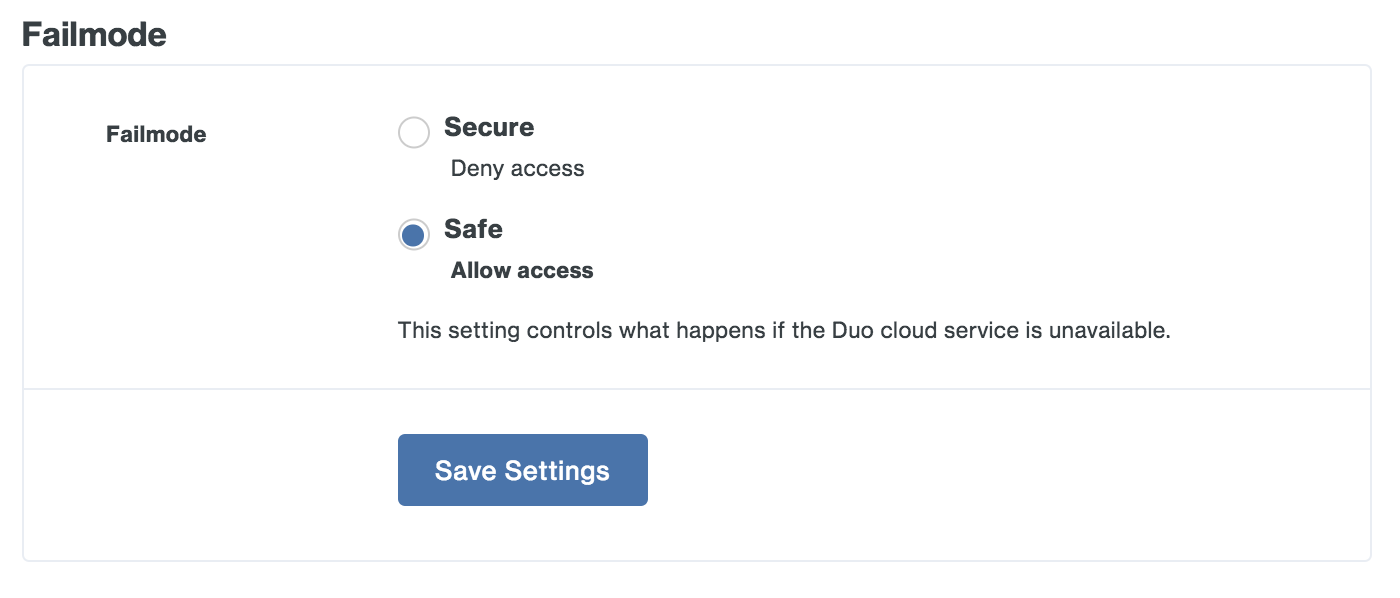
Note that when fail mode is "Secure" and the user is able to perform 2FA and access the DAG launcher page when the DAG itself cannot contact Duo no "Permitted Groups" application restrictions apply, as the DAG would not be able to obtain the user's Duo group memberships from Duo's service. In that scenario users may see applications in the launcher to which they do not have access.
Session Management
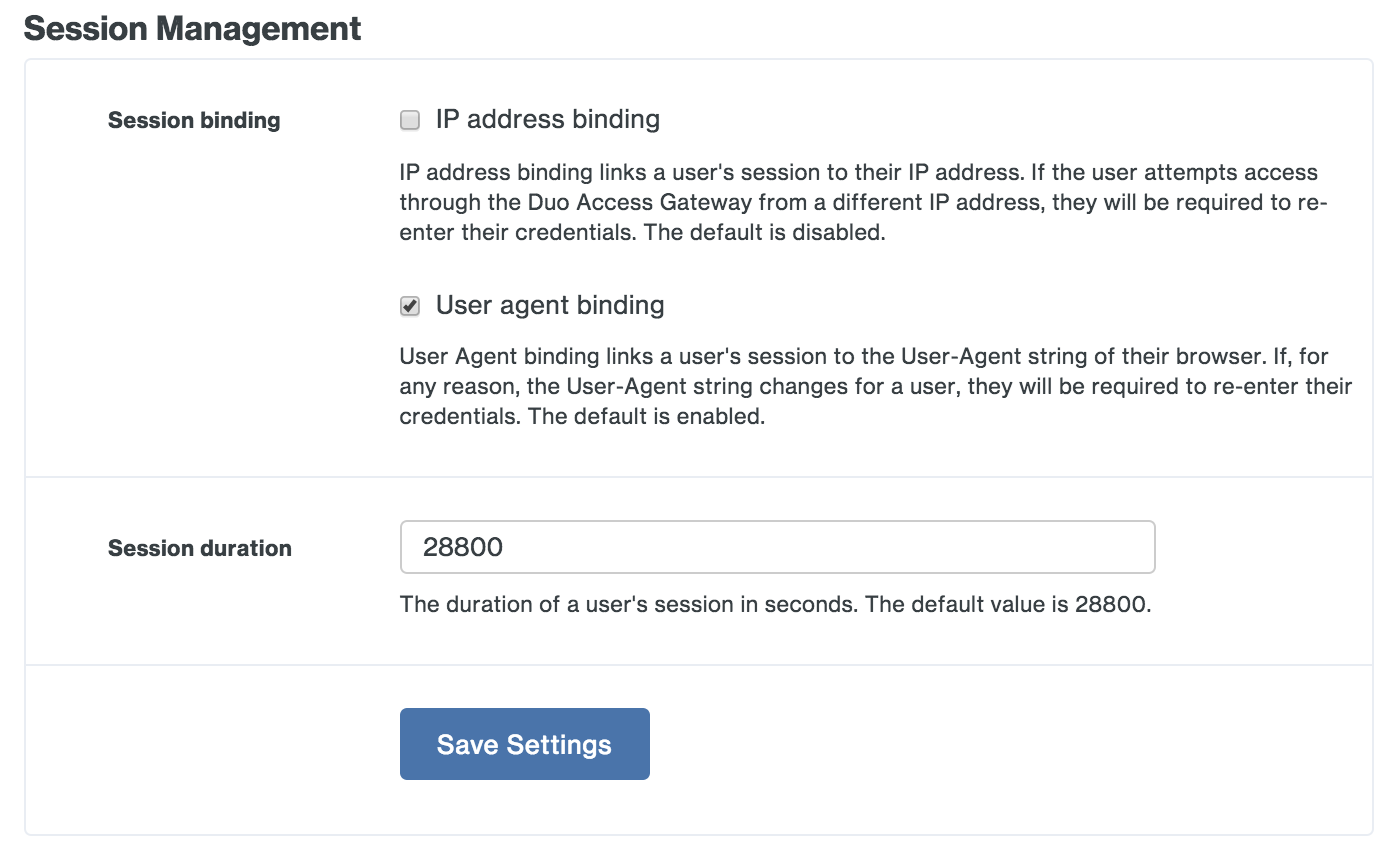
Session binding has two options, IP address binding and User agent binding.
Enabling the IP address binding option associates an authenticated Duo Access Gateway session to the client's IP address. Once users authenticate to a Duo protected cloud service they are not prompted again for primary authentication until the session lifetime is reached or the client's IP address changes. Users do not need to reauthenticate when their client IP changes if this setting remains disabled.
The User agent binding option associates an authenticated Duo Access Gateway session to the client browser's reported user agent (the information that identifies the browser type and version to web servers). By default, users need to reauthenticate if their reported browser information changes. Disable this option if you do not want users to reauthenticate to the Duo Access Gateway if their browser User-Agent changes after initial authentication.
The Session duration setting defines the maximum lifetime of a user's SSO session. Once a user successfully completes primary authentication at the Duo Access Gateway, the user will not have to repeat primary authentication again for subsequent service provider logon redirects to Duo Access Gateway within the configured session lifetime. Whether the user needs to perform secondary authentication depends on the Duo 2FA policies applied to that SAML application or to the user.
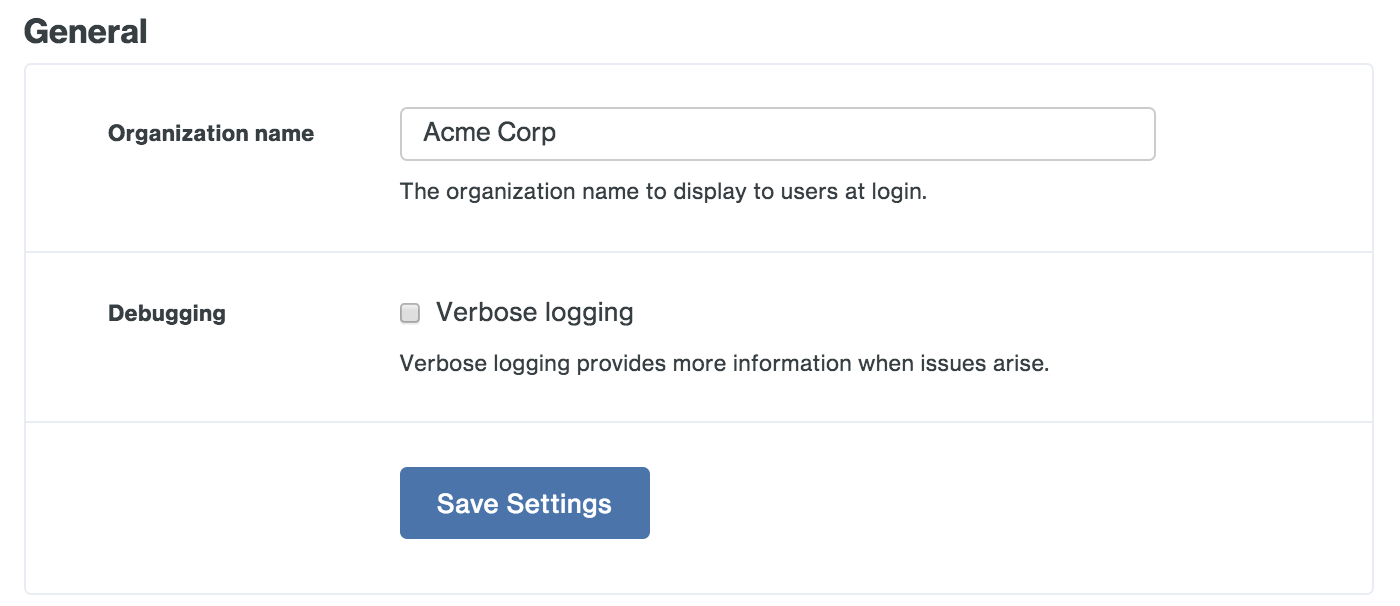
General
The Duo Access Gateway end-user logon page displays the Organization Name you enter here within the text of the primary authentication prompt.
Enable the Verbose logging option when troubleshooting Duo Access Gateway issues.
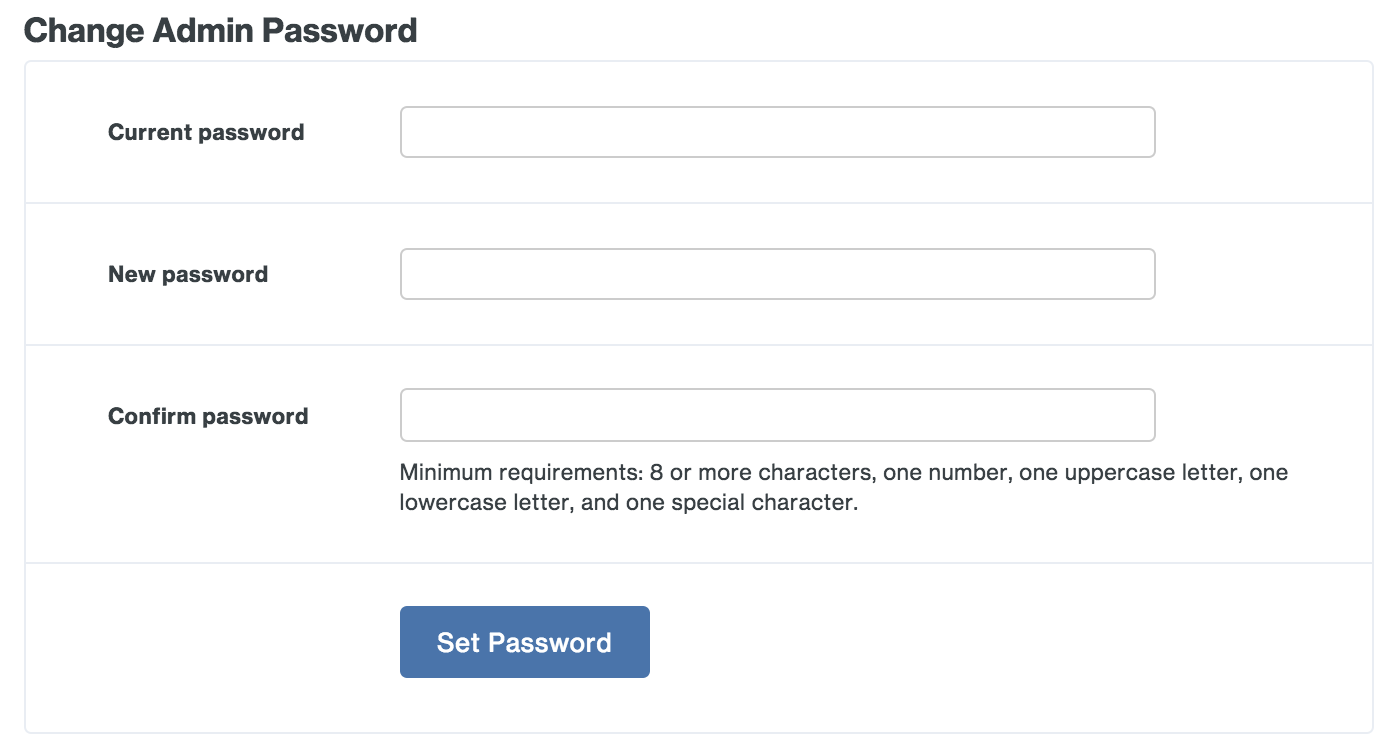
Change Admin Password
Set a new administrator password. We require a strong password that uses a mix of uppercase and lowercase letters, numbers, and special characters.
Create a Cloud Application in Duo
Duo has pre-configured SAML configurations for many popular cloud applications, like Salesforce, Google Workspace, and Amazon Web Services.
We've mapped the most common authentication source attributes as follows:
| Duo Attribute | Active Directory | OpenLDAP | SAML IdP | Azure | |
|---|---|---|---|---|---|
| Mail attribute | |||||
| First name attribute | givenName | gn | givenName | given_name | givenName |
| Last name attribute | sn | sn | sn | family_name | surname |
| Username attribute | sAMAccountName | uid | sAMAccountName |
If your configured authentication source uses a different attribute than these mapped defaults, you'll have the opportunity to change it when creating the service provider application in Duo.
To provision one of the Duo supported service providers:
-
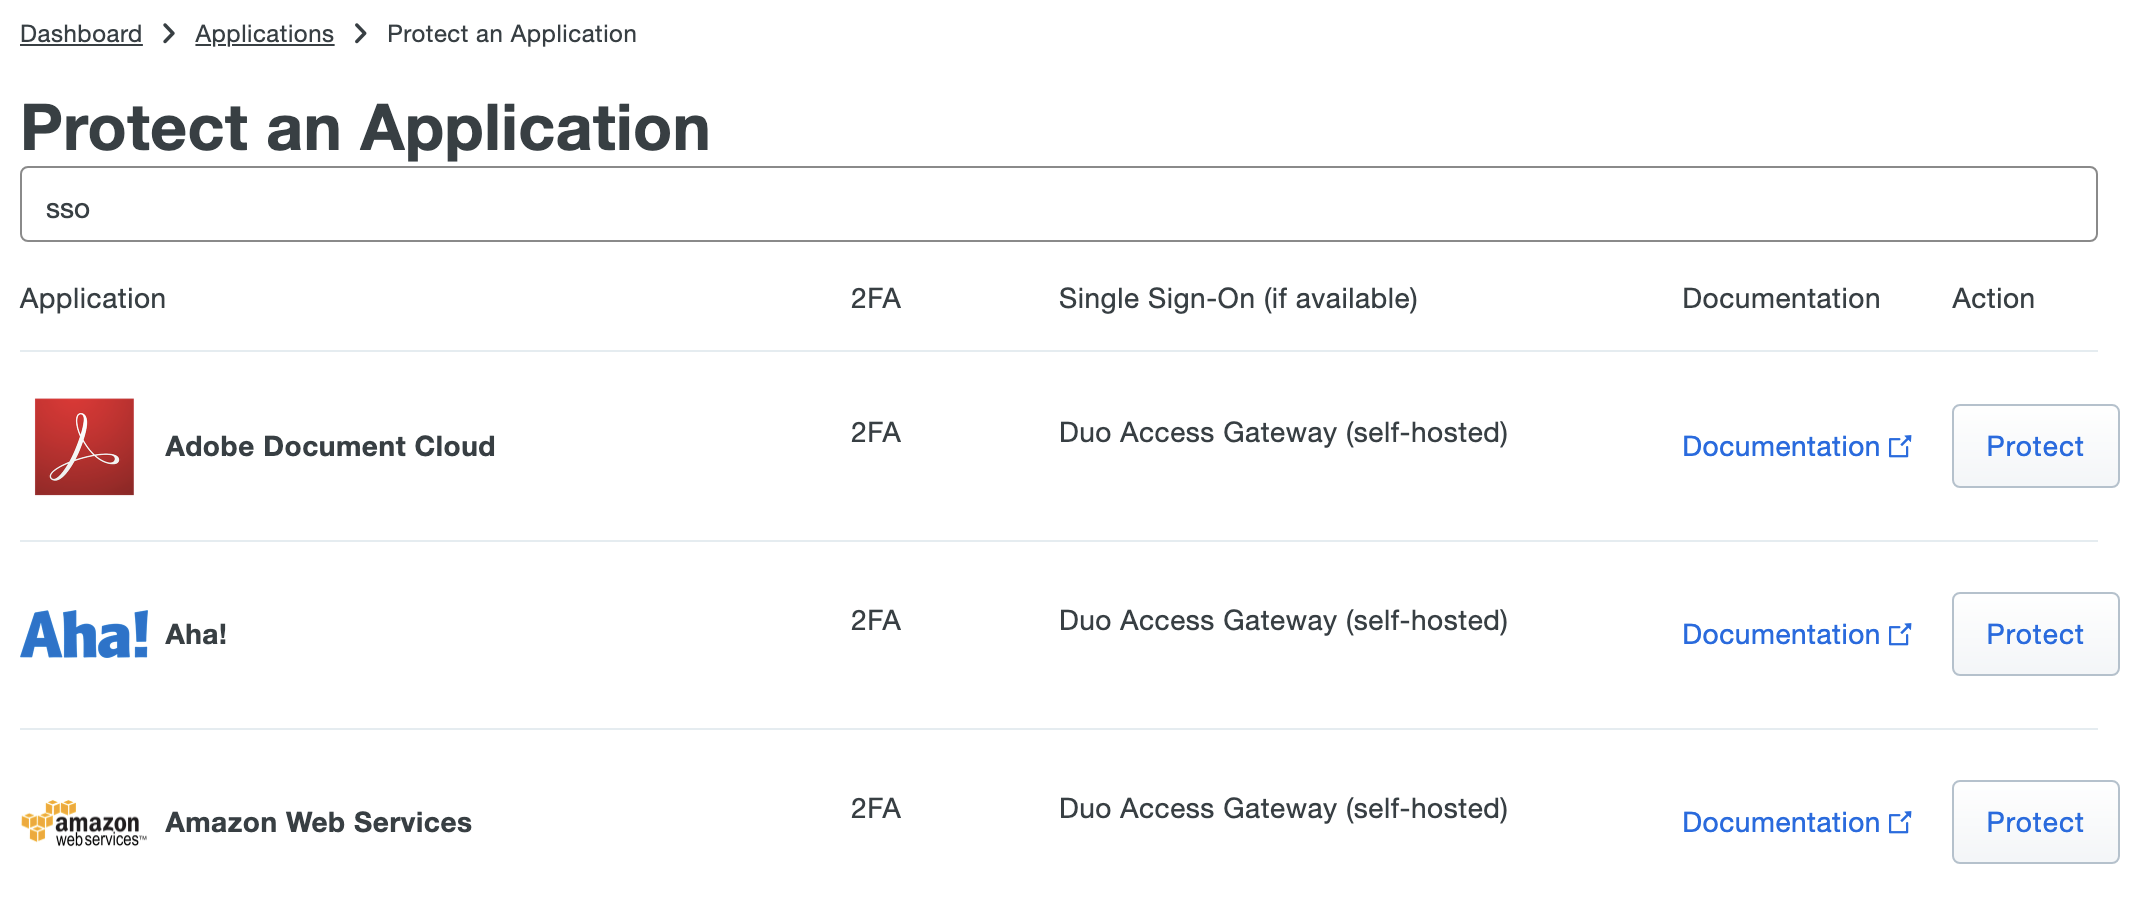
Log in to the Duo Admin Panel and click Applications on the left navigation tab. Then click Protect an Application.
-
Choose your cloud service from the list of applications. Duo Access Gateway supported cloud apps have "Duo Access Gateway (self-hosted)". Click the Protect link next to your cloud service application's name.
-
Some Duo SAML applications require you to input additional information from your service provider to complete the application's configuration. Refer to the instructions for your cloud service for more information about the specific information required. Additionally, if your authentication source isn't using the Duo default attributes you can customize the attribute mapping.
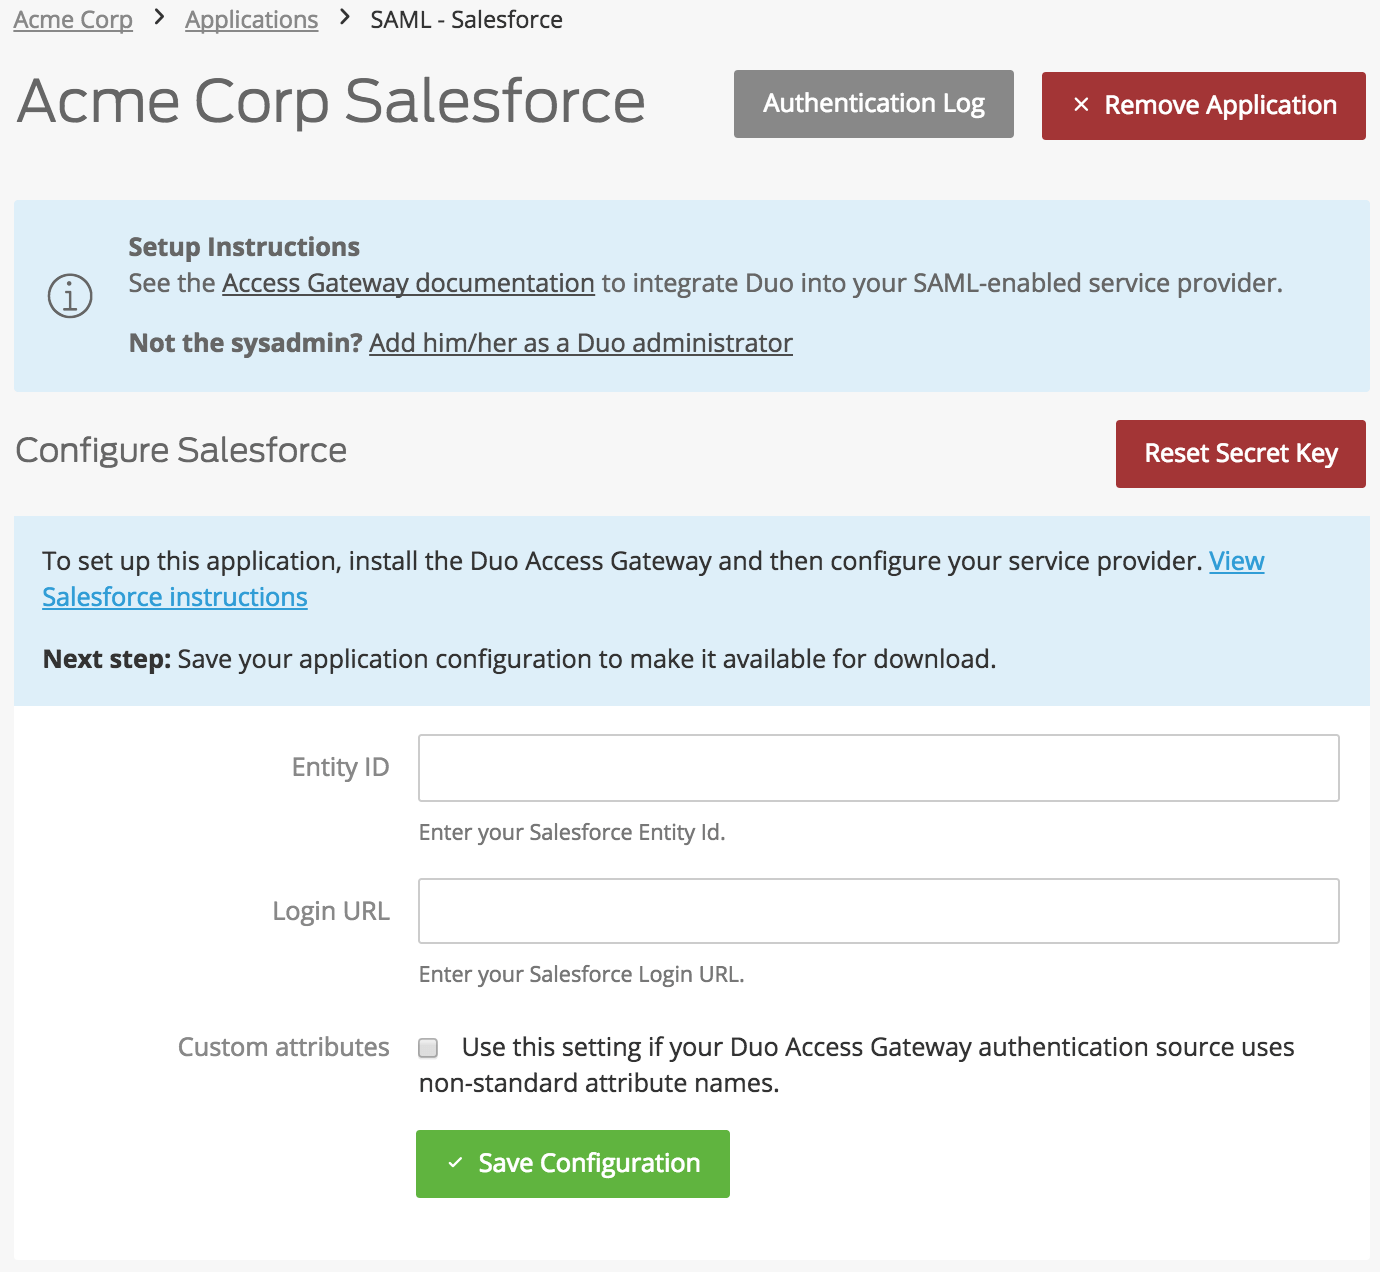
When all required information for the service provider is entered (or if you made no changes), click the Save Configuration button.
-
Saving the service provider configuration creates a configuration file that you will import to the Duo Access Gateway. Click the Download your configuration file link to download JSON file to the Duo Access Gateway server.

You can also create a generic SAML Service Provider application in Duo, which requires you to input information about your cloud application.
Enter the following information about your cloud app vendor in the Service Provider section:
Name Description Service Provider Name The name of the service provider. Entity ID The service provider identifier. Assertion Consumer Service The URL where your service provider receives SAML assertions. Service Provider Login URL Enter the URL for IdP-initiated logins if your service provider specifies one. Default Relay State If your service provider requires a specific RelayState parameter, enter it here. Use your service provider's SSO instructions to complete the SAML Response section:
Name Description NameID format Format of NameID when sent to the service provider. NameID attribute The authentication source attribute used to identify the user to the service provider. This attribute is sent as the NameID. This is often a user's e-mail address ("mail" or "email"). Send attributes By default Duo Access Gateway sends only the NameID IdP attribute to a service provider. Change this option to "All" if your service provider requires additional attributes included in the SAML response. Mapping or creating any additional attributes will also cause Duo Access Gateway to send all attributes. Signature Algorithm Select the encryption strength supported by your service provider. Defaults to SHA-256. Sign response Leave this option enabled if Duo Access Gateway needs to sign the SAML response to the service provider. Uncheck the box if the response should not be signed. Sign assertion Leave this option enabled if Duo Access Gateway needs to sign the SAML assertion to the service provider. Uncheck the box if the assertion should not be signed. Map attributes If your service provider requires specific names for the attributes sent by the Duo Access Gateway identity provider, you can map the authentication source attributes to the required names here. Enter the attribute name from your authentication source on the left, and the new attribute name on the right. Consult your service provider's documentation for the required attribute names. Create attributes If your service provider requires that the Duo Access Gateway identity provider sends an attribute with a specific value, you can define that here. Enter the new attribute name on the left, and the static attribute value on the right. Consult your service provider's documentation for the required attribute names.
Here's an example generic SAML Service Provider configuration
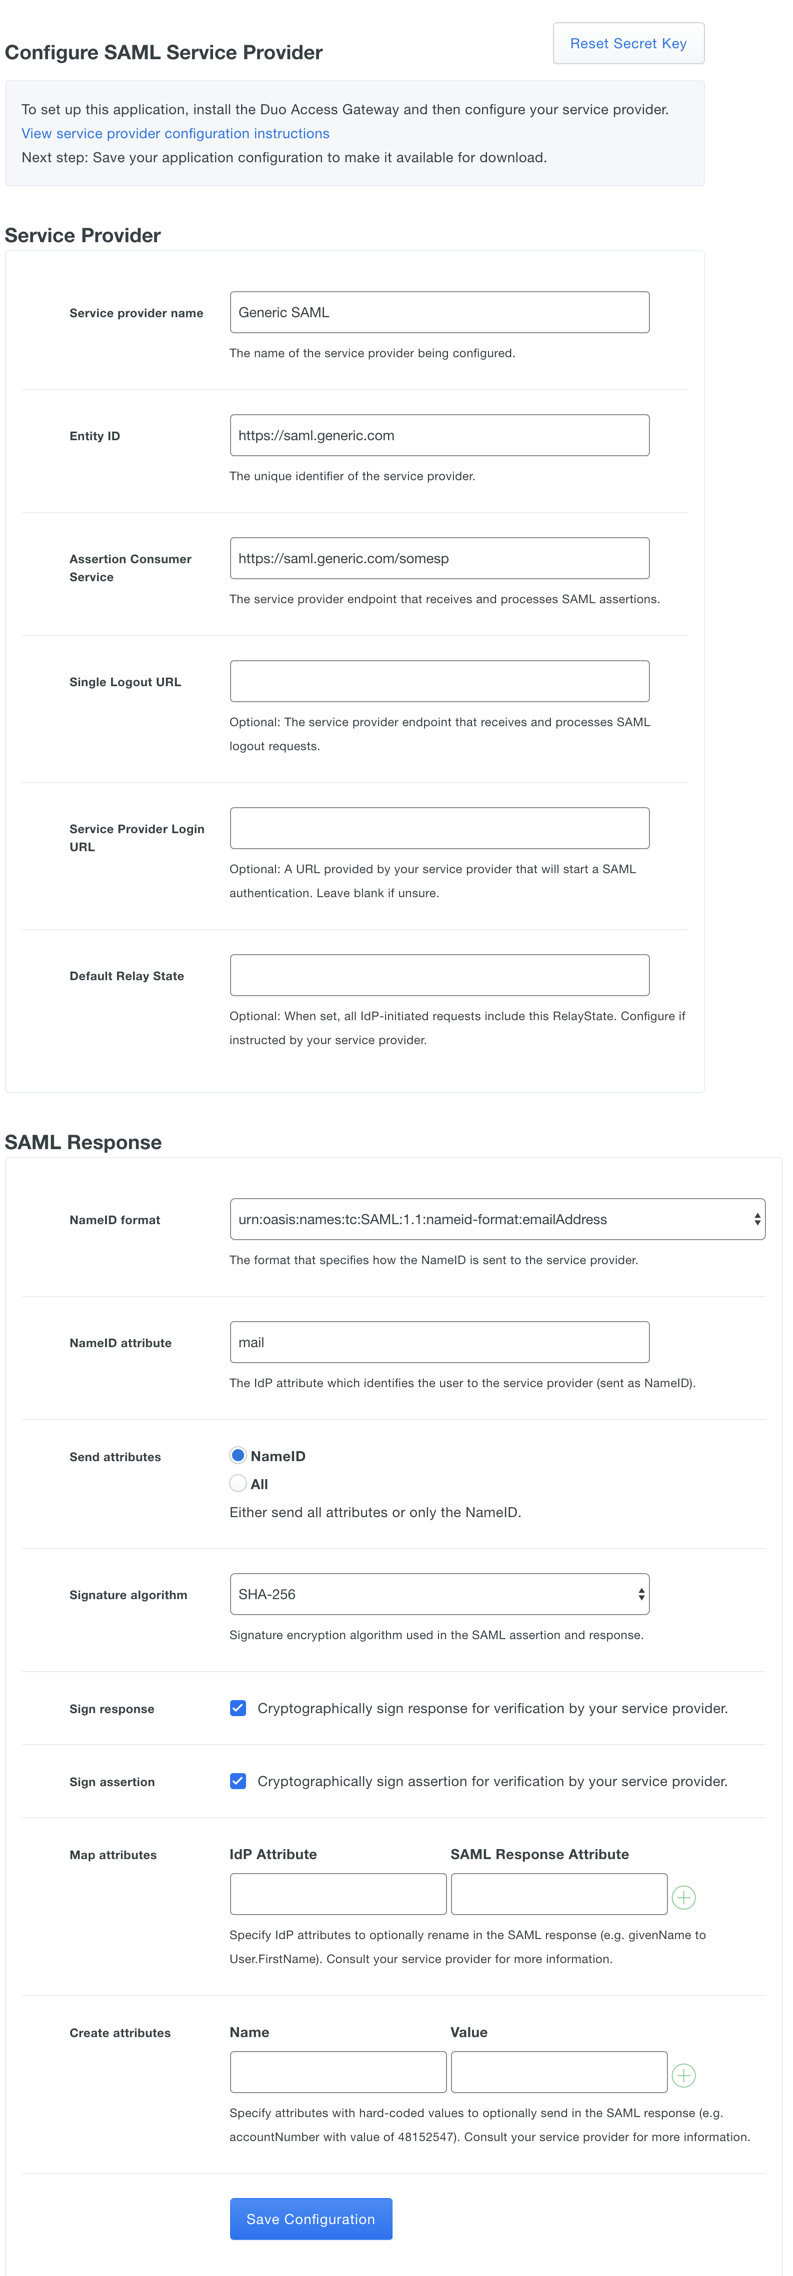
After entering the service provider information click the Save Configuration button and download the configuration file.

If your service provider requires IdP-initiated logins using SSO, the login URL is composed of the URL to your Duo Access Gateway logon page plus the entity ID of the service to which you are authenticating, e.g. https://yourserver.example.com/dag/saml2/idp/SSOService.php?spentityid=Your_SP_Entity_ID.
Add a Cloud Application to Duo Access Gateway
-
From the Duo Access Gateway server's console, click the Configure icon in the "Duo Access Gateway" application group to log on to https://yourserver.example.com/dag. Log in with the administrator password and click Applications.
-
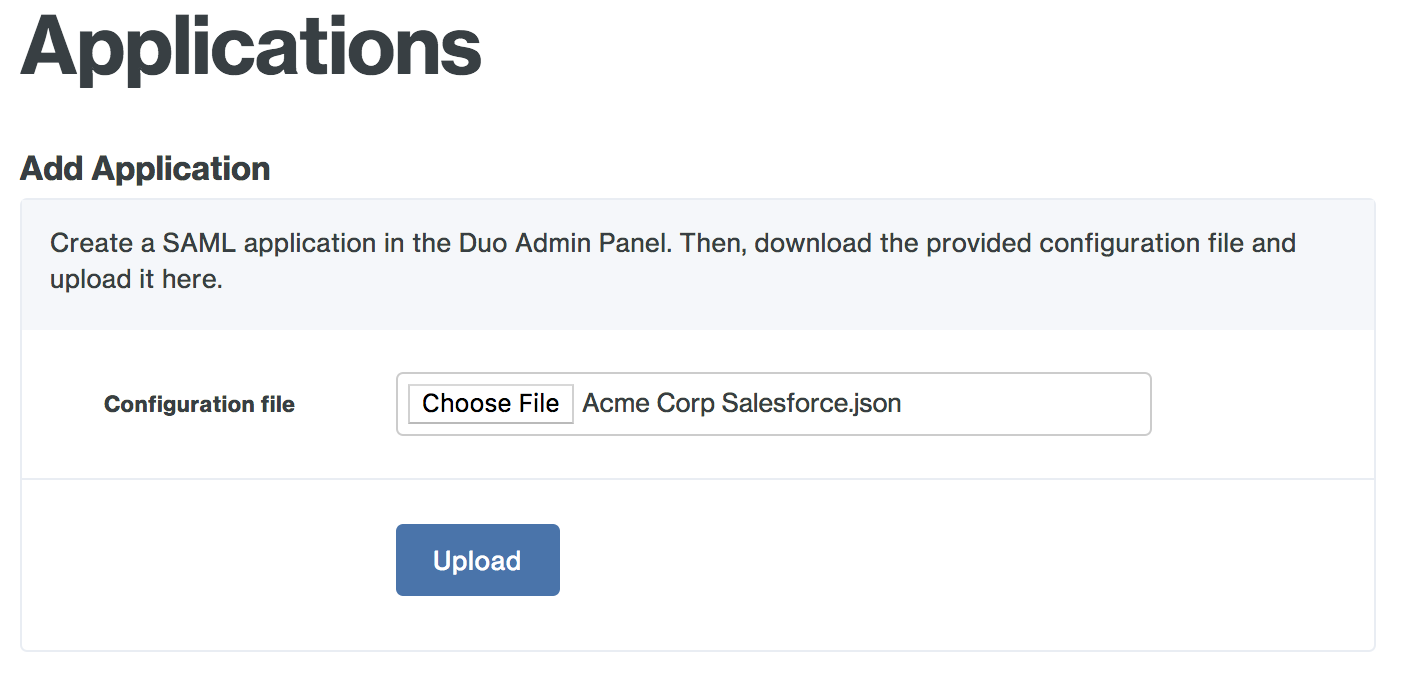
Click the Choose File button in the "Add Application" section of the page and locate the SAML application JSON file you downloaded from the Duo Admin Panel earlier. Click the Upload button after selecting the JSON configuration file.
-
The new SAML application is added.

-
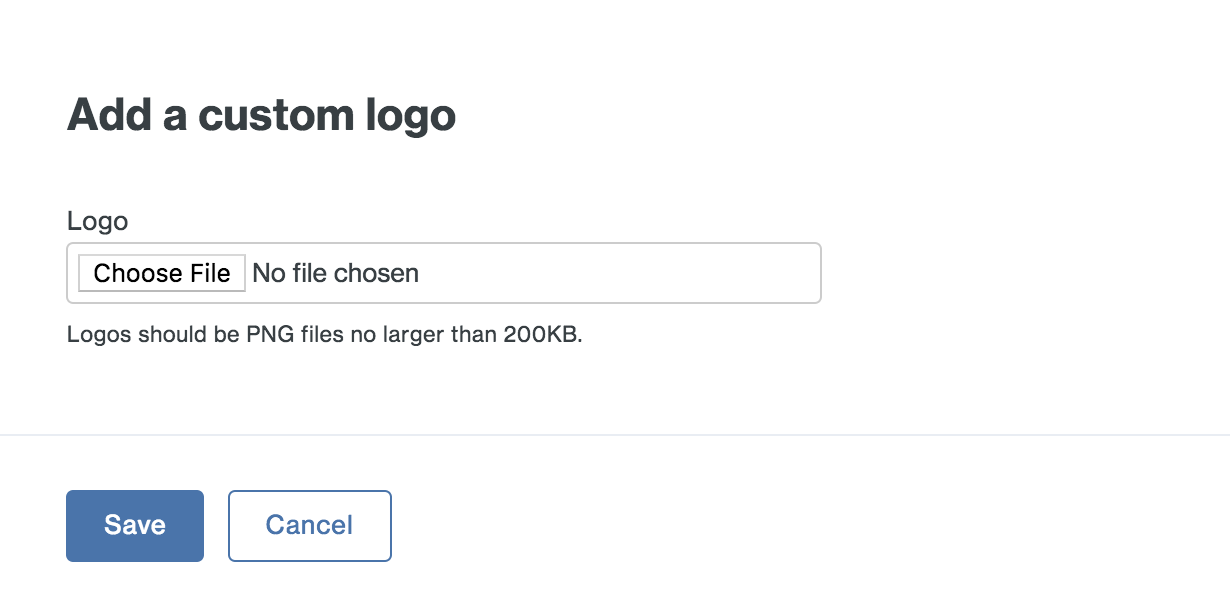
You may want to customize the logo shown for a generic SAML application, as this logo is shown to users in the Duo Access Gateway Launcher. Duo's pre-defined SAML applications show the service provider's logo, while generic SAML apps show a Duo logo by default.
To change the logo shown, click the Edit Logo button to the right of the SAML SP-initiated logon URL and default logo.

-
Select a PNG image to use for the generic SAML application's logo and then click Save
-
Your generic SAML application now has a custom logo.

Configure your Service Provider
You'll need to make some changes in your cloud application to add Duo Access Gateway authentication. Refer to our service provider configuration guides.
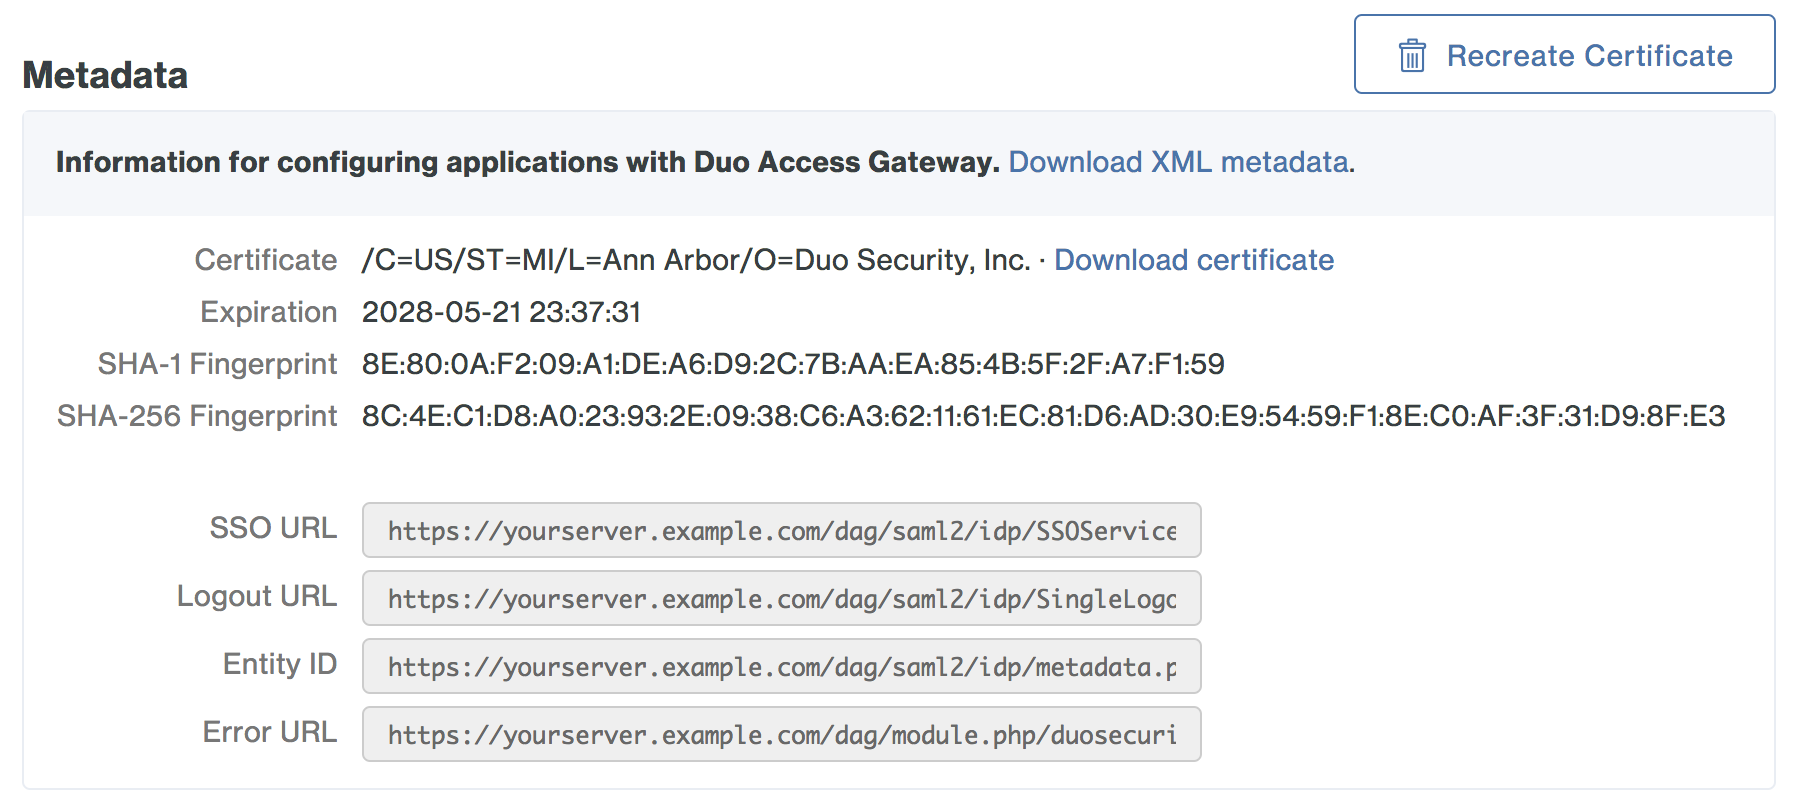
If you're adding Duo protection to another cloud application using the our generic SAML Service Provider application, check with the service provider for SSO instructions. You'll need to provide some information about Duo Access Gateway to that service provider, like URL information, a metadata file, a certificate file, or a certificate thumbprint. You can find this information in the "Metadata" section at the bottom of the Duo Access Gateway console's "Applications" page.
Enable the Duo Access Gateway Launcher
Streamline user access to your apps by enabling the Duo Access Gateway Launcher. The launcher provides a portal from which users can access Duo Access Gateway protected service provider applications or other non-SAML applications configured in Duo with just a click. You can even add bookmarks for organization web sites that don't use Duo authentication.
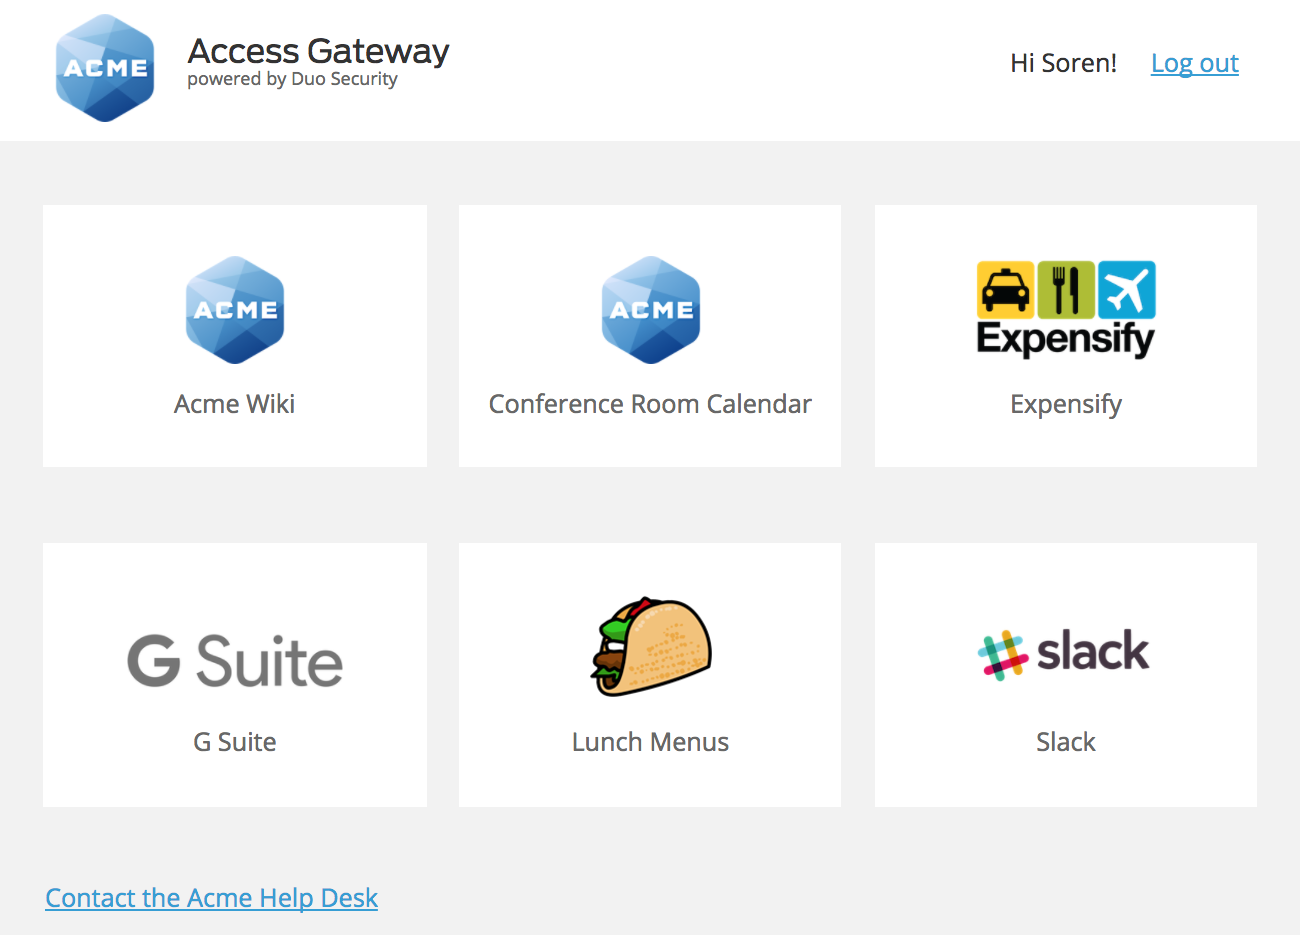
The company logo shown in the launcher is the logo you configured in the General Settings in the Duo Admin Panel. The Duo Access Gateway launcher is unaffected by changes to the Duo branding General settings option, and always shows the "powered by Duo Security" text.
To use the Duo Access Gateway Launcher, you'll need to create a specific application in the Admin Panel, just like you do for a service provider, and then use that information to configure the launcher application in the Duo Access Gateway console.
-
Log in to the Duo Admin Panel and click Applications on the left navigation tab. Then click Protect an Application.
-
Choose Duo Access Gateway Launcher from the list of applications. Click Protect this Application to get your integration key, secret key, and API hostname. (See Getting Started for help.)
If you plan to permit use of WebAuthn authentication methods (security keys, U2F tokens, or Touch ID), Duo recommends configuring allowed hostnames for the Launcher and any other SSO application before onboarding any end-users.
-
From the Duo Access Gateway server's console, click the Configure icon in the "Duo Access Gateway" application group to log on to https://yourserver.example.com/dag. Log in with the administrator password and click Launcher.
-
Enter the integration key, secret key, and API hostname from the Duo Access Gateway Launcher application you created earlier and click Save Setting. This enables the launcher page URL for access.

-
If you have other Duo-protected web applications that you'd like to link directly from the Duo Access Gateway launcher you can add them in the "Duo Web Applications" configuration section. These can be Duo Network Gateway published internal applications or any other externally accessible browser-based Duo application that shows the inline Duo prompt (like OWA, Confluence, etc.).
Click the Add a Duo Web Application link and in the pop-up enter this information for the Duo web application you'd like to add:
- Name: A descriptive name for the application shown to end users in the launcher. Example: "Acme Wiki"
- URL: The URL used to access the application. Example: "https://wiki.acme.corp"
- Logo: Choose a PNG file less than 200 KB. This logo is shown to end users in the launcher. (Optional)
- Application: Start typing in this field to retrieve a list of the Duo applications you've already created in Duo. Click to select the Duo application you're adding to the launcher. If any group restrictions exist on the Duo application they'll affect whether a given user sees the web application tile in the launcher. Example: "Confluence"

Click the Save button when done. The web application link is added.
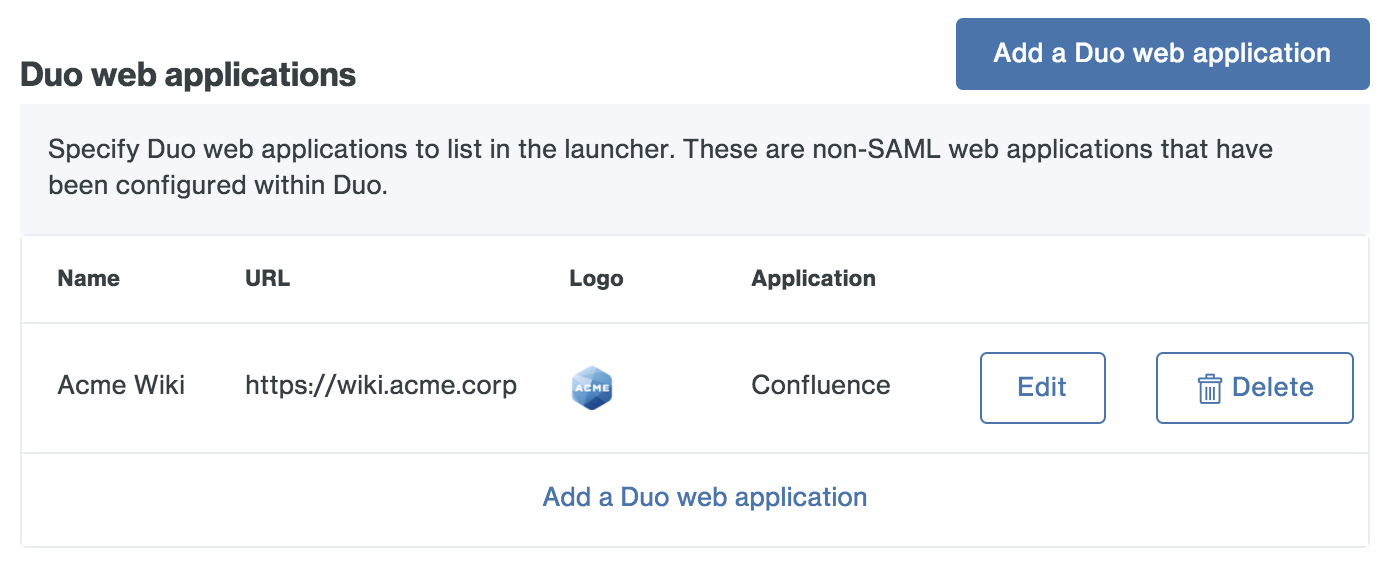
Repeat these steps for all Duo web applications you want to show end users in the launcher.
-
Provide your users with one-click shortcuts to any web application not protected by Duo by adding it as a bookmark.
For each bookmark you'd like to add, enter this information:
- Name: A descriptive name for the application shown to end users in the launcher. Example: "Conference Room Calendar"
- URL: The URL used to access the application. Example: "https://rooms.acme.corp"
- Logo: Choose a PNG file less than 200 KB. This logo is shown to end users in the launcher. (Optional)
- Group Access: New bookmarks display to all users by default. You can use Duo groups to control which users see a bookmark. Check the Only allow access from users in certain groups box and start typing in the group selection field to retrieve a list of Duo groups. Click each group that contains the users you want to see the new bookmark in the launcher. Example: "CorpHQ_Users".
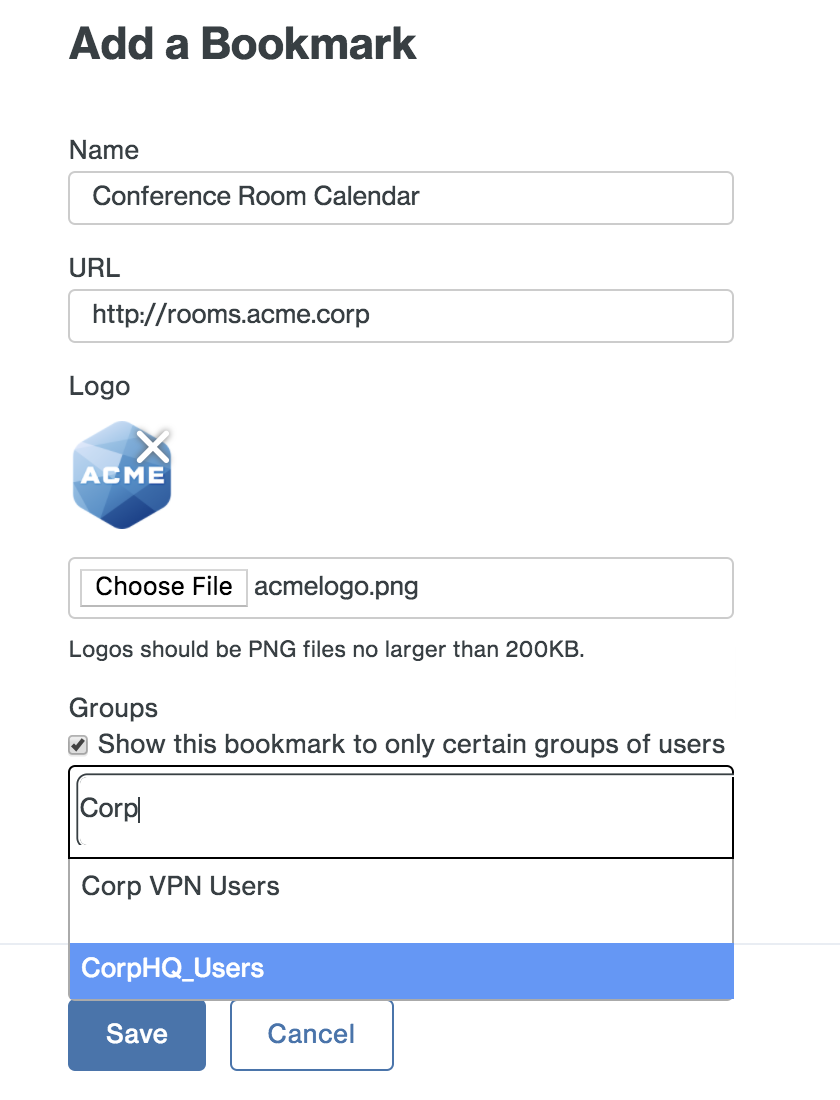
Click the Add button when done. The web application link is added.
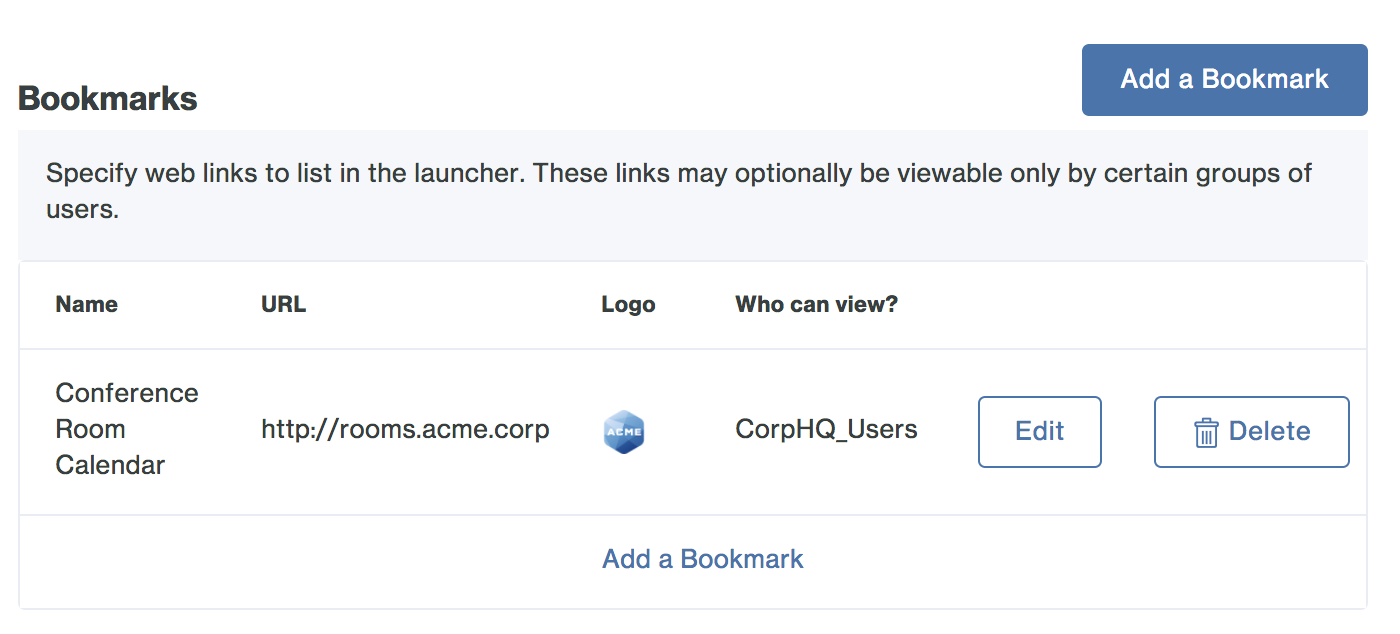
Repeat these steps for all web application bookmarks you want to show end users in the launcher.
-
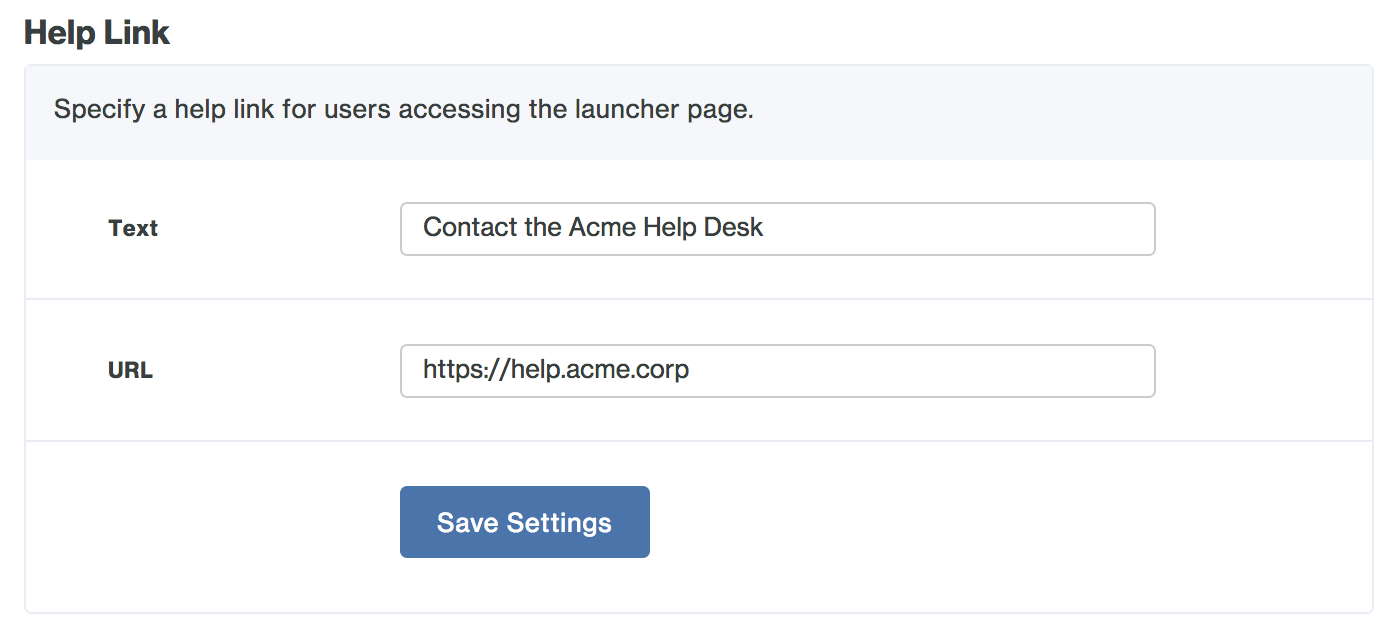
You can optionally change Text of the "Need help?" or the URL destination so that it points to a web page of your choosing instead of the Duo end user documentation. If you customize the help link, be sure to click Save Settings.
-
Give your users the launcher link mentioned at the top of the page, e.g. https://yourserver.example.com/dag/launcher.php. The three different types of launcher links all display as tiles to the user.
Based on the example information from steps 2 and 3, and knowing that the SAML applications Slack, Expensify, and Workspace were all uploaded to the Duo Access Gateway earlier, the different types of application links are shown thusly:
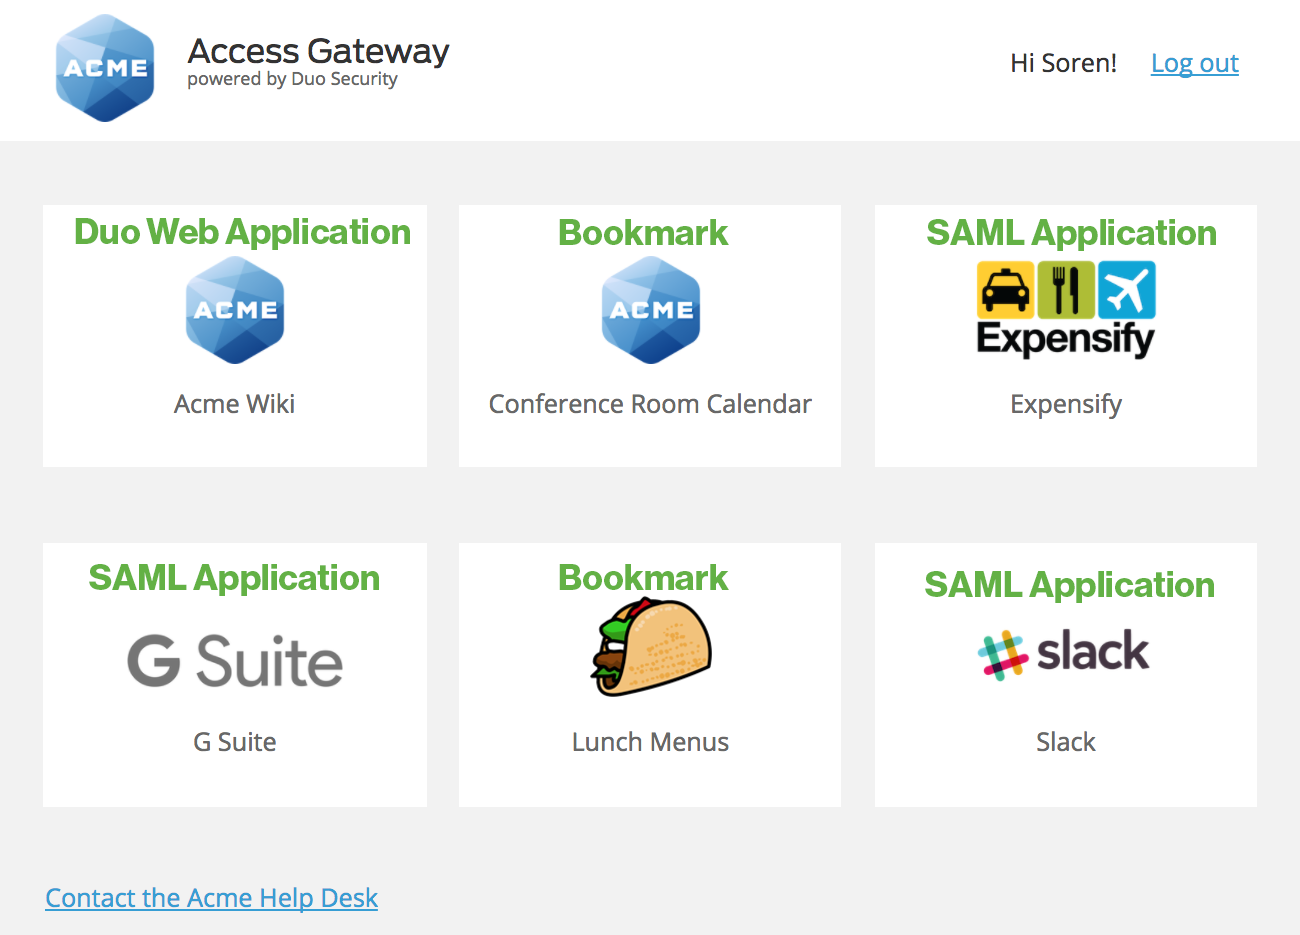
When your users access the Duo Access Gateway launcher they'll first log in with their primary credentials, and then complete Duo two-factor authentication. After that users see a list of all the SAML applications you've configured for use with the Duo Access Gateway, as well as the non-SAML web applications using Duo that you added to the launcher configuration and any other web app bookmarks created.
By default, users perform Duo authentication when logging into the Duo Access Gateway launcher, and again when launching any SAML or Duo Web applications using the shortcuts in the Duo Access Gateway launcher. You can eliminate the second prompt for Duo authentication by assigning a Remembered Devices policy to the Duo Access Gateway Launcher application, to your SAML applications which has the trust-application option enabled, and to the Duo web applications you added to the launcher. With this policy, your users will not need to authenticate to Duo again when accessing an app that shares the same policy. See the Remembered Devices policy documentation for details.
You can also restrict which application links display for a given user in the launcher. When creating your SAML service provider application in the Duo Admin Panel, populate the Permitted groups field with the Duo groups that contain the users you want to access that application. You can do the same thing for any Duo Web applications added to the launcher. When a user who is not a member of the specified group(s) logs in to the launcher, the applications which have group restrictions are not shown. See the Using Groups documentation for more information and detailed instructions.
Test Your Setup
To verify your setup, log on to your configured cloud service provider. You'll be redirected to the Duo Access Gateway login page.
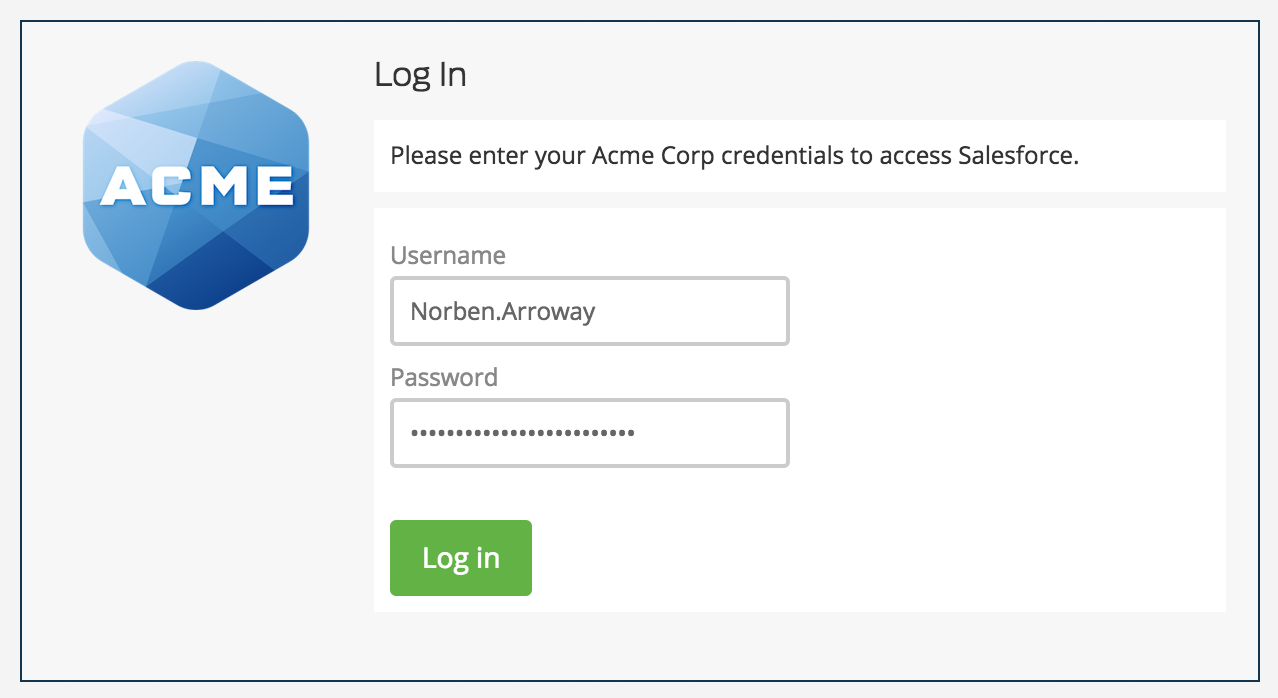
Enter your primary username and password. The Duo authentication prompt appears after successful primary authentication.
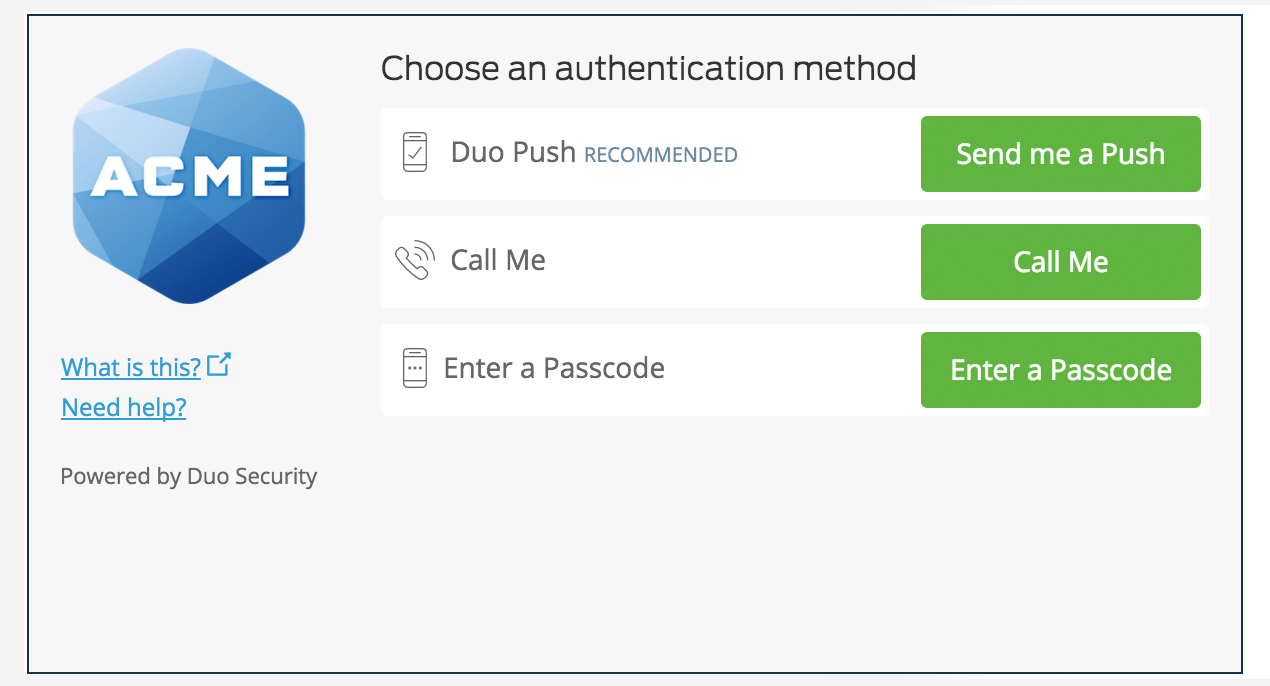
Approving the Duo authentication request completes login to the cloud application.
Upgrading the Duo Access Gateway
To upgrade the Duo Access Gateway, simply download the new version installer and run it on your deployed Duo Access Gateway server. View checksums for Duo downloads here.
The upgrade install automatically preserves your current configuration.
If you are upgrading the Duo Access Gateway to version 1.5.13 or newer from an earlier version you'll also need to update PHP to at least 8.1.13. Review the current PHP Prerequisites before upgrading.
Download PHP as instructed for Duo Access Gateway installation, and when running the Duo Access Gateway 1.5.13 or newer installer browse to the downloaded ZIP file. The installer takes care of upgrading the PHP version you were using previously, and then continues upgrading Duo Access Gateway to 1.5.13 or newer.
If you are upgrading from Duo Access Gateway 1.1 and you plan on changing your authentication source from Active Directory to something different, you'll need to re-download the JSON configuration files for all your existing service provider applications from the Duo Admin Panel and upload the new JSON files into the Duo Access Gateway after the upgrade.
You won't be able to switch the authentication source to anything other than Active Directory until you import the new JSON files. You'll also receive an error if you do switch authentication sources and then try to upload a legacy JSON file that does not support your new authentication source.
If you will continue using Active Directory as your authentication source there is no need to update the service provider JSON files.
Upgrading PHP
After deploying Duo Access Gateway in your environment you may later wish to upgrade the PHP version used by Duo Access Gateway. You can accomplish this with our standalone PHP updater tool. See the Duo Access Gateway FAQ for details.
Logging
Duo Access Gateway records the following events at C:\inetpub\wwwroot\dag\log\dag.log:
- Administrator console logons
- Primary user authentication success and failure
- Secondary user authentication success
- Errors
To enable debug output to the existing dag.log file, navigate to Settings in the Duo Access Gateway admin console. Scroll down to the "General" section and check the box next to Debugging. Click Save Changes when done.
Backup and Restore
Backup your Duo Access Gateway server configuration by making a secure copy of these files:
-
The configured settings file C:\inetpub\wwwroot\dag\config\config.json
-
The custom apps settings file C:\inetpub\wwwroot\dag\config\custom-apps.json (if it exists)
-
The authentication source configuration .json file(s) in C:\inetpub\wwwroot\dag\config\authsources
-
All .pem and .crt certificate files in C:\inetpub\wwwroot\dag\cert, as well as the ldap subfolder (if it exists)
-
The saml20-idp-hosted.json and saml20-idp-remote.json files in C:\inetpub\wwwroot\dag\metadata (if they exist)
-
The imported service provider application JSON files in C:\inetpub\wwwroot\dag\metadata\saml20-sp-remote
-
All the .png files in C:\inetpub\wwwroot\dag\modules\duosecurity\www\resources\images\launcher (if they exist)
To restore your Duo Access Gateway server configuration, restore the copied files and folder to the original location.
High Availability
We recommend deploying a second Duo Access Gateway server with the same configured SAML applications to serve as a standby replacement for the primary Duo Access Gateway server.
-
Deploy your standby Duo Access Gateway server, making sure to give it the same host name or CNAME alias as your primary Duo Access Gateway server, as the hostname entered during installation cannot be changed later. Use the same IIS SSL certificate on both the primary and standby servers.
-
Copy the configured settings file C:\inetpub\wwwroot\dag\config\config.json from the primary Duo Access Gateway server to the standby.
-
Copy the custom apps settings file C:\inetpub\wwwroot\dag\config\custom-apps.json (if it exists) from the primary Duo Access Gateway server to the standby.
-
Copy the authentication source configuration .json file(s) in C:\inetpub\wwwroot\dag\config\authsources from the primary Duo Access Gateway server to the standby.
-
Copy all .pem and .crt certificate files in C:\inetpub\wwwroot\dag\cert from the primary Duo Access Gateway server to the standby. There may be an ldap subfolder; copy this as well.
-
Copy the saml20-idp-hosted.json and saml20-idp-remote.json files in C:\inetpub\wwwroot\dag\metadata (if they exist) from the primary Duo Access Gateway server to the standby.
-
Copy the imported service provider application JSON files in C:\inetpub\wwwroot\dag\metadata\saml20-sp-remote from the primary Duo Access Gateway server to the standby.
-
Copy all the .png files in C:\inetpub\wwwroot\dag\modules\duosecurity\www\resources\images\launcher (if they exist) from the primary Duo Access Gateway server to the standby.
If your primary Duo Access Gateway server is unavailable, you can activate your standby server to process user authentications.
You can also configure a load balancer in front of two identically configured Duo Access Gateway servers for active/active or active/passive high availability. Configure a health check that attempts to load the DAG's entity ID URL i.e. https://yourserver.example.com/dag/saml2/idp/metadata.php. In this scenario we recommend 8-hour persistence to match the lifetime of the Duo session cookie. Consult your load balancer solution documentation for guidance.
Known Issues
-
AD username format for Duo Access Gateway primary logon must be entered as sAMAccountName ("username") or email/userPrincipalName ("username@example.com"). NTLM logon ("DOMAIN\username") is not supported at this time.
-
SP user provisioning is not supported at this time.
-
Authentication sources other than Active Directory do not provide group membership information to the Duo Access Gateway. Therefore, these authentication sources cannot be used with service providers that verify group membership to provide access, such as Amazon Web Services or Meraki.
Troubleshooting
Need some help? Take a look at the Duo Access Gateway Frequently Asked Questions (FAQ) page or try searching our Duo Access Gateway Knowledge Base articles or Community discussions. For further assistance, contact Support.
Network Diagram
On-premises Authentication
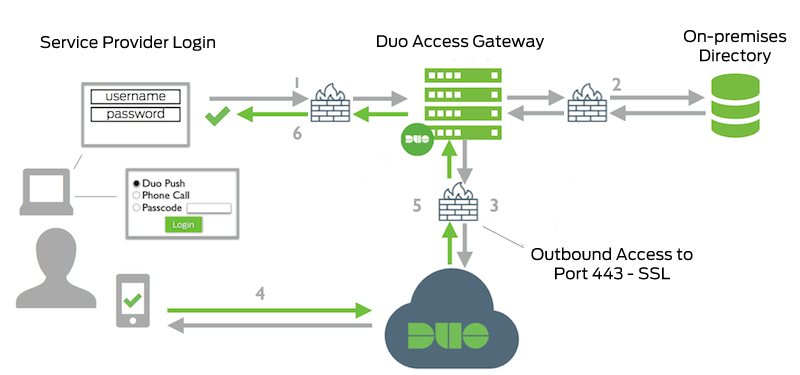
- Service Provider to Duo Access Gateway connection initiated
- Primary authentication to on-premises directory or IdP
- Duo Access Gateway connection established to Duo Security over TCP port 443
- User completes Duo two-factor authentication via the interactive web prompt served from Duo's service and their selected authentication factor.
- Duo Access Gateway receives authentication response
- Service Provider session authenticated
Cloud Authentication
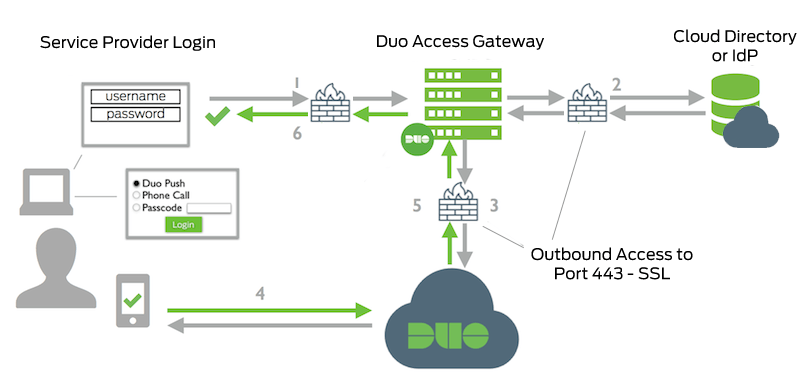
- Service Provider to Duo Access Gateway connection initiated
- Primary authentication to cloud directory or IdP
- Duo Access Gateway connection established to Duo Security over TCP port 443
- User completes Duo two-factor authentication via the interactive web prompt served from Duo's service and their selected authentication factor.
- Duo Access Gateway receives authentication response
- Service Provider session authenticated
